

Jira is one of those tools that quietly runs how teams work. It's used by NASA to track space-bound bugs and by two-person startups shipping sprints on Mondays. Over 300,000 companies use it to keep projects on track.
This guide covers how to get started with Jira's API: authentication, issue management, projects and boards, webhooks, error handling, and a set of real-world use cases. It's written for developers building an integration for the first time as well as those going deeper into specific use cases.
Understanding the Jira API
Jira is a tool for tracking issues and managing projects. The Jira API extends that so external systems can talk to Jira programmatically: creating tickets, updating statuses, pulling reports, and adjusting workflows without anyone using the UI.
The API is RESTful, well-documented, and covers the core Jira data model: issues, projects, boards, users, and workflows.
Why Integrate with Jira?
Most B2B customers already use Jira to manage bugs, tasks, or product sprints. Integrating with it lets them:
- Create and update tickets automatically
- Keep data in sync across tools
- Build dashboards that show real-time project health
Users save time by avoiding duplicate data entry, and the integration becomes a genuine part of their workflow rather than a bolt-on. Once the integration is in place, it also opens up automation: auto-updating statuses, triggering alerts, or creating tasks based on events in your own product.
Foundational Jira Concepts for Developers
Before working with the API, it helps to understand how Jira is structured:
- Issues: The core units, bugs, tasks, features, and so on.
- Projects: A collection of issues under one umbrella (e.g., a product or team).
- Boards: Visual tools for managing issues, especially in agile workflows.
- Workflows: The path an issue takes from "To Do" to "Done."
- Schemes: Settings that define permissions, notifications, and more.
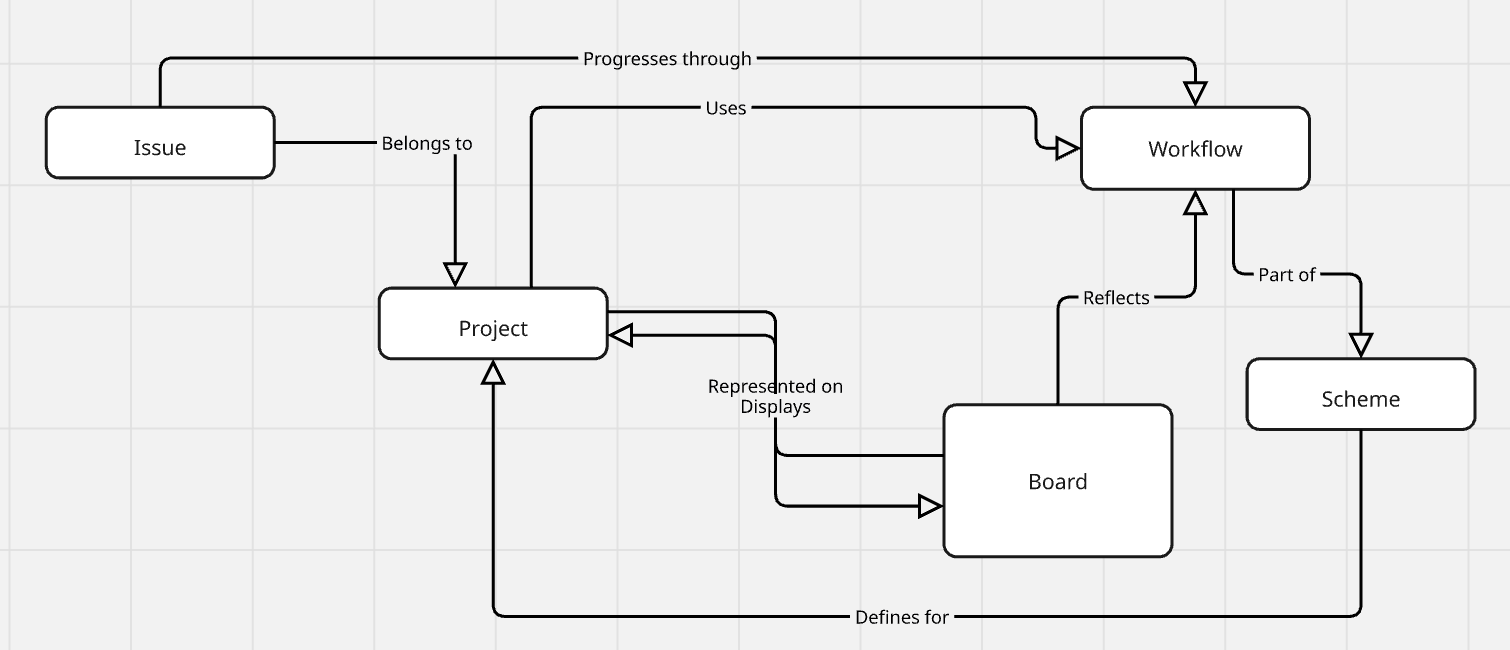
Each of these maps to specific API endpoints. Knowing how they relate helps you design cleaner, more effective integrations.
Preparing Your Development Space
1. Prerequisites
To start building with the Jira API, you'll want:
- A language you're comfortable with (Node.js, Python, Java, etc.)
- An HTTP client like Postman or curl for testing
- Version control (Git)
- Your preferred IDE or code editor
If you're using Jira Cloud, you're working with the current API. If you're on Jira Server/Data Center, expect some differences in endpoints and legacy behavior.
2. Setting Up a Jira Test Environment (Highly Recommended)
Before pointing anything at production, set up a test instance of Jira Cloud. It's free to try and gives you a safe place to test changes.
You can:
- Spin up a trial via Atlassian's website
- Use default settings to mimic real-world use
- Invite teammates for collaborative testing
Testing in a sandbox first catches most integration bugs before they reach production.
Getting Started with the Jira API: The Basics
1. Navigating API Documentation
The official Jira API documentation is the primary reference for building an integration. It's hosted by Atlassian and covers endpoints, request and response bodies, and error messages in detail. Use the interactive API explorer and bookmark the Authentication, Issues, and Projects sections.
2. Authentication and Security
Jira supports several ways to authenticate API requests. Here's how they compare.
A. Basic Authentication (Deprecated)
Basic authentication is now deprecated but may still be present in legacy systems. It passes a username and password with every request. It's simple but lacks strong security features, which is why Atlassian is phasing it out.
B. OAuth 1.0 (Deprecated)
OAuth 1.0a has been replaced by more secure protocols. It was previously used for authorization but is now deprecated.
C. Utilizing API Tokens (Recommended)
For most modern Jira Cloud integrations, API tokens are the standard choice:
- Generate a token from your Atlassian account.
- Use basic auth with your email and the token in place of a password.
For the full walkthrough, scoped vs. un-scoped tokens, the cloud ID routing detail, and a working curl example, see Knit's guide on how to get a Jira API token.
It's simple, reasonably secure, and works well for most use cases.
D. OAuth 2.0 (3LO)
If your app needs to access Jira on behalf of users, with their explicit permission, use 3-legged OAuth:
- Set up an app on Atlassian Developer Console
- Get the user's consent via a browser flow
- Use the resulting token to make authenticated API calls
It requires more setup than an API token, but it gives you scoped, permissioned access tied to an individual user.
E. Forge & Connect Apps
For apps built inside the Atlassian ecosystem, use:
- OAuth 2.0 via Forge (for apps built on Atlassian's cloud dev platform)
- JWT (for legacy Connect apps)
Both support deeper integrations and more control, at the cost of additional setup.
3. Permissions & Rules
Whichever method you use:
- Confirm your user/token has the right permissions (some endpoints require admin access)
- Handle errors explicitly (a 403 usually means missing access, not a bug in your code)
- Store tokens securely (env vars, secret managers, etc.)
Most integration issues during setup come down to misconfigured auth, so it's worth checking that first before debugging the rest of the code.
Managing Issues Using the Jira API
Once authenticated, the next step is usually interacting with Jira issues directly: create, read, update, delete (CRUD).
1. Creating Issues
To create a new issue, call the `POST /rest/api/3/issue` endpoint with a few required fields:
{
  "fields": {
    "project": { "key": "PROJ" },
    "issuetype": { "name": "Bug" },
    "summary": "Something's broken!",
    "description": {
      "type": "doc",
      "version": 1,
      "content": [
        {
          "type": "paragraph",
          "content": [
            { "type": "text", "text": "Details about the bug go here." }
          ]
        }
      ]
    }
  }
}
At minimum, you need the project key, issue type, and summary. Description, labels, and custom fields are optional but useful.
Log the responses so you can debug failures, and add retry logic for rate limits or flaky network conditions.
2. Reading Issues
To fetch an issue, use a GET request:
GET /rest/api/3/issue/{issueIdOrKey}
The response is a JSON object with summary, description, status, assignee, comments, history, and more, useful for syncing with another system or building a custom dashboard.
3. Updating Issues
To update an issue's status, add a comment, or change priority, use PUT for full updates or PATCH for partial ones.
A common example is adding a comment:
{
"body": "Following up on this issue, any updates?"
}
Avoid overwriting fields unintentionally; check exactly what you're sending in the payload before you send it.
4. Deleting Issues (Use with Caution)
Deleting issues is irreversible. Confirm the deletion is intentional, and make sure your API token has the right permissions before calling this endpoint.
Good practice here includes:
Confirming the issue should be deleted, ideally with a soft-delete flag first
Keeping an audit trail
Handling deletion errors explicitly
5. Searching for Issues with JQL
Jira includes a query language called JQL (Jira Query Language) for precise issue searches, for example all open bugs assigned to a specific user, or tasks due this week.
Example: project = PROJ AND status = "In Progress" AND assignee = currentUser()
When using the search API, paginate your results. Atlassian has moved this to a new endpoint: POST /rest/api/3/search/jql, which returns a nextPageToken instead of using startAt/maxResults. Pass the token back on your next request until it's empty. (The older GET /rest/api/3/search endpoint shown in some docs is being phased out; see Knit's Jira API guide for the current request shape.)
This matters once you're dealing with hundreds or thousands of issues.
Managing Projects, Boards, and Workflows
1. Project Management via the API
The API also lets you create and manage Jira projects, useful for automating new customer onboarding.
Use the `POST /rest/api/3/project` endpoint to create a new project, passing in the project key, name, lead, and template.
You can also update project settings and connect them to workflows, issue type schemes, and permission schemes.
2. Agile Management: Boards and Sprints (Agile API)
For customers using Jira for agile work, the API supports boards and sprints:
- Fetch boards (`GET /board`)
- Retrieve or create sprints
- Move issues between sprints
This is useful for syncing sprint timelines or mirroring status in an external dashboard.
3. Workflow Interactions via the API
Jira Workflows define how an issue moves through statuses. You can:
- Get available transitions (`GET /issue/{key}/transitions`)
- Perform a transition (`POST /issue/{key}/transitions`)
This lets you automate flows like moving an issue to "In Review" after a pull request is merged.
Advanced Features and Webhooks
1. Leveraging Advanced Jira API Features
Beyond basic CRUD, the API supports a few features worth knowing about once your integration matures. The `expand` query parameter lets you pull in extra detail, like changelogs or rendered fields, in a single request instead of making follow-up calls. Bulk endpoints (for example, bulk issue creation and bulk transitions) reduce round-trips when you're processing many issues at once. And custom fields, defined per Jira instance, need to be looked up by their field ID (e.g., `customfield_10032`) rather than by display name, so your integration should fetch the field schema for a project before assuming a given field exists.
2. Establishing Links Between Issues
You can link related issues (like blockers or duplicates) via the API. This is useful for tracking dependencies or duplicate reports across teams.
Example:
{
"type": { "name": "Blocks" },
"inwardIssue": { "key": "PROJ-101" },
"outwardIssue": { "key": "PROJ-102" }
}
Validate the link type you're using and make sure it fits your project configuration.
3. Handling File Attachments
To upload logs, screenshots, or files, use the attachments endpoint with a multipart/form-data request.
Keep in mind:
- Respect file size limits
- Watch for unsupported file types
- Handle file storage securely, especially in a public-facing app
4. Implementing Event-Driven Integrations with Webhooks
For integrations that need to react instantly to changes in Jira, webhooks are the standard approach.
You can subscribe to events like issue creation, status changes, or comments. When triggered, Jira sends a JSON payload to your endpoint.
Make sure to:
- Validate incoming payloads
- Log and retry failed deliveries
- Secure your endpoint (rate limits and auth)
5. Key Differences Between Jira Cloud and Jira Server
Understanding the differences between Jira Cloud and Jira Server matters for any integration targeting both:
- Endpoints: Some endpoints differ in URL and available features.
- Version-Specific Features: Jira Cloud often has newer features not available in Server.
- Limitations: Be aware of restrictions that may affect your integration.
Keep track of changes by monitoring Atlassian's release notes and documentation.
Error Handling, Rate Limits, and Performance
Even with a solid setup, requests will sometimes fail. Here's how to plan for it.
1. Common Error Codes
Jira's API returns standard HTTP response codes. The most common ones you'll encounter:
- 400 Bad Request: Usually a missing field or invalid format. Check your payload.
- 401 Unauthorized: Your token is missing or incorrect.
- 403 Forbidden: You're authenticated, but don't have permission for this action.
- 404 Not Found: The issue, project, or resource doesn't exist.
- 429 Too Many Requests: You've hit a rate limit. Back off and retry later.
- 500 Internal Server Error: Something failed on Jira's side. Retry with a delay.
Log error responses with enough context (request, response body, endpoint) to debug quickly.
2. Handling Rate Limiting and API Throttling
Jira Cloud rate-limits requests through a few overlapping systems: a points-based hourly quota (a default Global Pool of 65,000 points/hour for most apps), burst limits of 100 requests/second for GET/POST and 50/second for PUT/DELETE, and per-issue write caps of around 20 writes in 2 seconds and 100 writes in 30 seconds. A 429 response includes a RateLimit-Reason header telling you which limit you hit. Here's how to handle it safely:
- Watch for `429` status codes
- Check headers like `X-Rate-limit-Remaining` if available
- Use exponential backoff to retry: e.g., wait 1s, 2s, 4s, etc.
- Avoid sending bursts of traffic; spread out API calls where possible
If you're building a high-throughput integration, test with realistic volumes and plan for throttling from the start.
3. Strategies for Performance Enhancement
To keep your integration fast and reliable:
- Use JQL wisely: Don't pull every issue; fetch only what you need.
- Paginate properly: Jira caps results per request. Always check `startAt` and `maxResults` (or `nextPageToken` on the newer search endpoint).
- Batch requests: Where possible, group changes to reduce round-trips.
- Cache where safe: For static metadata (like field definitions), caching improves speed.
- Async processing: Trigger long-running processes in the background instead of blocking on them.
These add up to keep your integration stable under real load.
Logging, Debugging, and Testing
Visibility into your integration matters as much as the code itself. Here's how to keep it observable and testable.
1. Best Practices for Logging API Interactions
Good logging makes debugging faster:
- Structure your logs: Use a consistent format (JSON works well for parsing).
- Log requests/responses: Especially when working with external APIs.
- Redact sensitive data: Mask API tokens before logging.
- Trace IDs: Use correlation IDs to trace a flow across systems.
Solid logs save significant debugging time when something breaks.
2. Approaches to Debugging Common Integration Issues
When something isn't working:
- Postman: Useful for testing individual API calls.
- curl: Quick and flexible for command-line requests.
- Request logs: Check the exact payloads being sent and received.
- Jira UI: Confirm that what you're doing via API reflects correctly in the frontend.
If your app logs are tied to user sessions or sync jobs, make those searchable by ID.
3. Incorporating Automated Testing
Testing your Jira integration keeps it reliable as it changes over time:
- Unit tests: Mock the API and validate your logic.
- Integration tests: Run tests against a test Jira instance.
- CI/CD: Add your tests to your pipeline to catch regressions early.
The goal is confidence in every deploy, not shipping and hoping nothing breaks.
Real-World Use Cases (Code Samples)
A few examples of what this looks like in practice:
1. Auto-Creating Jira Tickets from Your App
Trigger issue creation when a bug or support request is reported:
curl --request POST \
  --url 'https://your-domain.atlassian.net/rest/api/3/issue' \
  --user 'email@example.com:<api_token>' \
  --header 'Accept: application/json' \
  --header 'Content-Type: application/json' \
  --data '{
    "fields": {
      "project": { "key": "PROJ" },
      "issuetype": { "name": "Bug" },
      "summary": "Bug in production",
      "description": {
        "type": "doc",
        "version": 1,
        "content": [
          {
            "type": "paragraph",
            "content": [
              { "type": "text", "text": "A detailed bug report goes here." }
            ]
          }
        ]
      }
    }
  }'
2. Syncing Two Project Management Tools
Read issue data from Jira and sync it to another tool:
bash
curl -u email@example.com:API_TOKEN -X GET \ https://your-domain.atlassian.net/rest/api/3/issue/PROJ-123
Map fields like title, status, and priority, and push updates as needed.
3. Auto-Transitioning Overdue Tasks
Use a scheduled script to move overdue tasks to a "Stuck" column:
import requests
import json

jira_domain = "https://your-domain.atlassian.net"
api_token = "API_TOKEN"
email = "email@example.com"
headers = {"Content-Type": "application/json", "Accept": "application/json"}

# Find overdue issues
jql = "project = PROJ AND due < now() AND status != 'Done'"
response = requests.post(
    f"{jira_domain}/rest/api/3/search/jql",
    headers=headers,
    auth=(email, api_token),
    data=json.dumps({"jql": jql})
)

for issue in response.json().get("issues", []):
    issue_key = issue["key"]
    payload = {"transition": {"id": "31"}}  # Replace with correct transition ID
    requests.post(
        f"{jira_domain}/rest/api/3/issue/{issue_key}/transitions",
        headers=headers,
        auth=(email, api_token),
        data=json.dumps(payload)
    )
Note: this endpoint doesn't paginate results in this example, if PROJ regularly has more overdue issues than fit in one page, handle the nextPageToken field the same way described in the JQL search section of the article body.
Keeping Your Jira Integration Secure
A few basics that matter more than they seem:
1. Handle Secrets Right
Treat API keys like passwords.
- Env Vars: Store them there, not in your code.
- Encryption: Encrypt them at rest where possible.
- Rotate: Change them on a regular schedule.
Secure secrets reduce the blast radius if something else goes wrong.
2. User Data: Be Deliberate
If your integration touches user data:
- Compliance: Know the applicable rules (GDPR, etc.).
- Retention: Don't keep data longer than necessary.
- Access: Limit visibility to those who need it.
Making Your Jira Integration Better
1. Client Libraries
Client libraries (Java, Python, etc.) can help with common tasks and reduce boilerplate. They're generally a good fit for standard use cases and a worse fit when you need full control over request behavior.
2. CI/CD for Your Integration
Automate testing and deployment for the integration itself:
- Test often: Catch issues early.
- Deploy smoothly: Reduce manual release work.
- Monitor: Watch for failures after deploys, not just before them.
Conclusion and Final Checklist
At this point, you have what you need to build a Jira integration that handles authentication, issue management, webhooks, and rate limiting correctly. The checklist below is a quick way to confirm you haven't missed a step.
Before You Start
- Choose between Jira Cloud or Server/Data Center.
- Set up a sandbox/test environment.
- Pick your auth method (API token, OAuth, etc.).
While Building
- Use the right endpoints for issues, projects, boards, and workflows.
- Test API calls in Postman or curl.
- Log requests and responses (without leaking sensitive data).
- Handle common errors and rate limits.
- Optimize with pagination, batching, and caching.
Before Shipping
- Write automated tests (unit and integration).
- Monitor logs for failures or edge cases.
- Document your field mappings and logic.
- Validate your webhook setup if used.
Jira API FAQs
1. Does Jira have a free API?
Yes, the Jira REST API itself is free to use, though you still need a Jira Cloud or Server license to access an instance. Knit connects to Jira's API as part of its unified project management integration layer, so teams building on Knit don't need to manage Jira-specific auth or rate limiting themselves. Most rate limits and endpoint access depend on your Jira plan rather than the API access itself.
2. What is the base URL for the Jira Cloud REST API?
For Jira Cloud, it's `https://your-domain.atlassian.net/rest/api/3/`, where `your-domain` is your site's subdomain. Knit resolves and manages this per-tenant routing automatically for connected Jira instances, so integrators querying through Knit don't track individual customer domains themselves. Jira Server and Data Center use a different base path, so always confirm which product a customer is on before assuming the Cloud format.
3. Is Basic Authentication still supported for the Jira API?
Basic authentication with a raw password is deprecated and shouldn't be used for new integrations. Knit authenticates to Jira using currently supported methods (API tokens and OAuth 2.0) behind the scenes, so integrators don't need to track which auth methods Atlassian has deprecated. API tokens combined with your account email are the current recommended replacement for most integrations.
4. What are Jira's API rate limits?
Jira Cloud enforces a default Global Pool of 65,000 points per hour for most apps, burst limits of 100 requests/second for GET and POST and 50/second for PUT and DELETE, and per-issue write caps of about 20 writes in 2 seconds and 100 writes in 30 seconds. Knit handles request pacing and retry-with-backoff automatically for connected Jira instances, so integrators don't build this throttling logic themselves. A 429 response includes a RateLimit-Reason header identifying which specific limit was hit.
5. How do I search for issues using the Jira API?
Use JQL (Jira Query Language) with the search endpoint to filter issues by project, status, assignee, and other fields. Knit exposes equivalent filtering through its own unified query interface, so integrators get consistent search behavior across Jira and other connected project management tools. Note that Atlassian has moved the current search endpoint to `POST /rest/api/3/search/jql`, which paginates with a `nextPageToken` rather than the older `startAt`/`maxResults` pattern.
6. Can I use the Jira API to build a custom integration without OAuth?
Yes, API tokens with basic auth (email plus token) work for most server-to-server integrations that don't need to act on behalf of individual end users. Knit uses this same token-based model for direct Jira connections while reserving OAuth 2.0 (3LO) for integrations where end users need to authorize access themselves. OAuth 2.0 becomes necessary when your app needs scoped, user-specific permissions rather than a single service-level credential.
Keep Exploring
Jira is constantly evolving, and so are the use cases around it. To go further:
- Follow the Atlassian Developer Changelog
- Explore the Jira API Docs
- Join the Atlassian Developer Community
And if you're building on top of Knit, we're here to help.
Drop us an email at hello@getknit.dev if you run into a use case that isn't covered.


.webp)

.png)
.webp)


