

Insights
-
Apr 3, 2026
ATS Integration : An In-Depth Guide With Key Concepts And Best Practices
Read more

Read more
All the hot and popular Knit API resources
.webp)
Sage 200 is a comprehensive business management solution designed for medium-sized enterprises, offering strong accounting, CRM, supply chain management, and business intelligence capabilities. Its API ecosystem enables developers to automate critical business operations, synchronize data across systems, and build custom applications that extend Sage 200's functionality.
The Sage 200 API provides a structured, secure framework for integrating with external applications, supporting everything from basic data synchronization to complex workflow automation.
In this blog, you'll learn how to integrate with the Sage 200 API, from initial setup, authentication, to practical implementation strategies and best practices.
Sage 200 serves as the operational backbone for growing businesses, providing end-to-end visibility and control over business processes.
Sage 200 has become essential for medium-sized enterprises seeking integrated business management by providing a unified platform that connects all operational areas, enabling data-driven decision-making and streamlined processes.
Sage 200 breaks down departmental silos by connecting finance, sales, inventory, and operations into a single system. This integration eliminates duplicate data entry, reduces errors, and provides a 360-degree view of business performance.
Designed for growing businesses, Sage 200 scales with organizational needs, supporting multiple companies, currencies, and locations. Its modular structure allows businesses to start with core financials and add capabilities as they expand.
With built-in analytics and customizable dashboards, Sage 200 provides immediate insights into key performance indicators, cash flow, inventory levels, and customer behavior, empowering timely business decisions.
Sage 200 includes features for tax compliance, audit trails, and financial reporting standards, helping businesses meet regulatory requirements across different jurisdictions and industries.
Through its API and development tools, Sage 200 can be tailored to specific industry needs and integrated with specialized applications, providing flexibility without compromising core functionality.
Before integrating with the Sage 200 API, it's important to understand key concepts that define how data access and communication work within the Sage ecosystem.
The Sage 200 API enables businesses to connect their ERP system with e-commerce platforms, CRM systems, payment gateways, and custom applications. These integrations automate workflows, improve data accuracy, and create seamless operational experiences.
Below are some of the most impactful Sage 200 integration scenarios and how they can transform your business processes.
Online retailers using platforms like Shopify, Magento, or WooCommerce need to synchronize orders, inventory, and customer data with their ERP system. By integrating your e-commerce platform with Sage 200 API, orders can flow automatically into Sage for processing, fulfillment, and accounting.
How It Works:
Sales teams using CRM systems like Salesforce or Microsoft Dynamics need access to customer financial data, order history, and credit limits. Integrating CRM with Sage 200 ensures sales representatives have complete customer visibility.
How It Works:
Manufacturing and distribution companies need to coordinate with suppliers through procurement portals or vendor management systems. Sage 200 API integration automates purchase order creation, goods receipt, and supplier payment processes.
How It Works:
Organizations with multiple subsidiaries or complex group structures need consolidated financial reporting. Sage 200 API enables automated data extraction for consolidation tools and business intelligence platforms.
How It Works:
Field sales and service teams need mobile access to customer data, inventory availability, and order processing capabilities. Sage 200 API powers mobile applications for on-the-go business operations.
How It Works:
Financial teams spend significant time matching bank transactions with accounting entries. Integrating banking platforms with Sage 200 automates this process, improving accuracy and efficiency.
How It Works:
Sage 200 API uses token-based authentication to secure access to business data:
Implementation examples and detailed configuration are available in the Sage 200 Authentication Guide.
Before making API requests, you need to obtain authentication credentials. Sage 200 supports multiple authentication methods depending on your deployment (cloud or on-premise) and integration requirements.
Step 1: Register your application in the Sage Developer Portal. Create a new application and note your Client ID and Client Secret.
Step 2: Configure OAuth 2.0 redirect URIs and requested scopes based on the data your application needs to access.
Step 3: Implement the OAuth 2.0 authorization code flow:
Step 4: Refresh tokens automatically before expiry to maintain seamless access.
Step 1: Enable web services in the Sage 200 system administration and configure appropriate security settings.
Step 2: Use basic authentication or Windows authentication, depending on your security configuration:
Authorization: Basic {base64_encoded_credentials}
Step 3: For SOAP services, configure WS-Security headers as required by your deployment.
Step 4: Test connectivity using Sage 200's built-in web service test pages before proceeding with custom development.
Detailed authentication guides are available in the Sage 200 Authentication Documentation.
IIntegrating with the Sage 200 API may seem complex at first, but breaking the process into clear steps makes it much easier. This guide walks you through everything from registering your application to deploying it in production. It focuses mainly on Sage 200 Standard (cloud), which uses OAuth 2.0 and has the API enabled by default, with notes included for Sage 200 Professional (on-premise or hosted) where applicable.
Before making any API calls, you need to register your application with Sage to get a Client ID (and Client Secret for web/server applications).
Step 1: Submit the official Sage 200 Client ID and Client Secret Request Form.
Step 2: Sage will process your request (typically within 72 hours) and email you the Client ID and Client Secret (for confidential clients).
Step 3: Store these credentials securely, never expose the Client Secret in client-side code.
✅ At this stage, you have the credentials needed for authentication.
Sage 200 uses OAuth 2.0 Authorization Code Flow with Sage ID for secure, token-based access.
Steps to Implement the Flow:
1. Redirect User to Authorization Endpoint (Ask for Permission):
GET https://id.sage.com/authorize?
audience=s200ukipd/sage200&
client_id={YOUR_CLIENT_ID}&
response_type=code&
redirect_uri={YOUR_REDIRECT_URI}&
scope=openid%20profile%20email%20offline_access&
state={RANDOM_STATE_STRING}2. User logs in with their Sage ID and consents to access.
3. Sage redirects back to your redirect_uri with a code:
{YOUR_REDIRECT_URI}?code={AUTHORIZATION_CODE}&state={YOUR_STATE}4. Exchange Code for Tokens:
POST https://id.sage.com/oauth/token
Content-Type: application/x-www-form-urlencoded

client_id={YOUR_CLIENT_ID}
&client_secret={YOUR_CLIENT_SECRET}  // Only for confidential clients
&redirect_uri={YOUR_REDIRECT_URI}
&code={AUTHORIZATION_CODE}
&grant_type=authorization_code5. Refresh Token When Needed:
POST https://id.sage.com/oauth/token
Content-Type: application/x-www-form-urlencoded
client_id={YOUR_CLIENT_ID}
&client_secret={YOUR_CLIENT_SECRET}
&refresh_token={YOUR_REFRESH_TOKEN}
&grant_type=refresh_tokenSage 200 organizes data by sites and companies. You need their IDs for most requests.
Steps:
1. Call the sites endpoint (no X-Site/X-Company headers needed here):
Headers:
Authorization: Bearer {ACCESS_TOKEN}
Content-Type: application/json
2. Response lists available sites with site_id, site_name, company_id, etc. Note the ones you need.
Sage 200 API is fully RESTful with OData v4 support for querying.
Key Features:
No SOAP Support in Current API - It's all modern REST/JSON.
All requests require:
Authorization: Bearer {ACCESS_TOKEN}
X-Site: {SITE_ID}
X-Company: {COMPANY_ID}
Content-Type: application/json
Use Case 1: Fetching Customers (GET)
GET https://api.columbus.sage.com/uk/sage200/accounts/v1/customers?$top=10Response Example (Partial):
[
  {
    "id": 27828,
    "reference": "ABS001",
    "name": "ABS Garages Ltd",
    "balance": 2464.16,
    ...
  }
]
Use Case 2: Creating a Customer (POST)
POST https://api.columbus.sage.com/uk/sage200/accounts/v1/customers
Body:
{
  "reference": "NEW001",
  "name": "New Customer Ltd",
  "short_name": "NEW001",
  "credit_limit": 5000.00,
  ...
}Success: Returns 201 Created with the new customer object.
1. Use Development Credentials from your registration.
2. Test with a demo or non-production site (request via your Sage partner if needed).
3. Tools:
4. Test scenarios: Create/read/update/delete key entities (customers, orders), error handling, token refresh.
5. Monitor responses for errors (e.g., 401 for invalid token).
Building reliable Sage 200 integrations requires understanding platform capabilities and limitations. Following these best practices ensures optimal performance and maintainability.
Sage 200 APIs have practical limits on data volume per request. For large data transfers:
Implement robust error handling:
Ensure data consistency between systems:
Protect sensitive business data:
Choose the right approach for each integration scenario:
Integrating directly with Sage 200 API requires handling complex authentication, data mapping, error handling, and ongoing maintenance. Knit simplifies this by providing a unified integration platform that connects your application to Sage 200 and dozens of other business systems through a single, standardized API.
Instead of writing separate integration code for each ERP system (Sage 200, SAP Business One, Microsoft Dynamics, NetSuite), Knit provides a single Unified ERP API. Your application connects once to Knit and can instantly work with multiple ERP systems without additional development.
Knit automatically handles the differences between systems—different authentication methods, data models, API conventions, and business rules—so you don't have to.
Sage 200 authentication varies by deployment (cloud vs. on-premise) and requires ongoing token management. Knit's pre-built Sage 200 connector handles all authentication complexities:
Your application interacts with a simple, consistent authentication API regardless of the underlying Sage 200 configuration.
Every ERP system has different data models. Sage 200's customer structure differs from SAP's, which differs from NetSuite's. Knit solves this with a Unified Data Model that normalizes data across all supported systems.
When you fetch customers from Sage 200 through Knit, they're automatically transformed into a consistent schema. When you create an order, Knit transforms it from the unified model into Sage 200's specific format. This eliminates the need for custom mapping logic for each integration.
Polling Sage 200 for changes is inefficient and can impact system performance. Knit provides real-time webhooks that notify your application immediately when data changes in Sage 200:
This event-driven approach ensures your application always has the latest data without constant polling.
Building and maintaining a direct Sage 200 integration typically takes months of development and ongoing maintenance. With Knit, you can build a complete integration in days:
Your team can focus on core product functionality instead of integration maintenance.
A. Sage 200 provides API support for both cloud and on-premise versions. The cloud API is generally more feature-rich and follows standard REST/OData patterns. On-premise versions may have limitations based on the specific release.
A. Yes, Sage 200 supports webhooks for certain events, particularly in cloud deployments. You can subscribe to notifications for created, updated, or deleted records. Configuration is done through the Sage 200 administration interface or API. Not all object types support webhooks, so check the specific documentation for your requirements.
A. Sage 200 Cloud enforces API rate limits to ensure system stability:
On-premise deployments may have different limits based on server capacity and configuration. Implement retry logic with exponential backoff to handle rate limit responses gracefully.
A. Yes, Sage provides several options for testing:
A. Sage 200 APIs provide detailed error responses, including:
Enable detailed logging in your integration code and monitor both application logs and Sage 200's audit trails for comprehensive troubleshooting.
A. You can use any programming language that supports HTTP requests and JSON parsing. Sage provides SDKs and examples for:
Community-contributed libraries may be available for other languages. The REST/OData API ensures broad language compatibility.
A. For large data operations:
A. Multiple support channels are available:
Jira is one of those tools that quietly powers the backbone of how teams work—whether you're NASA tracking space-bound bugs or a startup shipping sprints on Mondays. Over 300,000 companies use it to keep projects on track, and it’s not hard to see why.
This guide is meant to help you get started with Jira’s API—especially if you’re looking to automate tasks, sync systems, or just make your project workflows smoother. Whether you're exploring an integration for the first time or looking to go deeper with use cases, we’ve tried to keep things simple, practical, and relevant.
At its core, Jira is a powerful tool for tracking issues and managing projects. The Jira API takes that one step further—it opens up everything under the hood so your systems can talk to Jira automatically.
Think of it as giving your app the ability to create tickets, update statuses, pull reports, and tweak workflows—without anyone needing to click around. Whether you're building an integration from scratch or syncing data across tools, the API is how you do it.
It’s well-documented, RESTful, and gives you access to all the key stuff: issues, projects, boards, users, workflows—you name it.
Chances are, your customers are already using Jira to manage bugs, tasks, or product sprints. By integrating with it, you let them:
It’s a win-win. Your users save time by avoiding duplicate work, and your app becomes a more valuable part of their workflow. Plus, once you set up the integration, you open the door to a ton of automation—like auto-updating statuses, triggering alerts, or even creating tasks based on events from your product.
Before you dive into the API calls, it's helpful to understand how Jira is structured. Here are some basics:
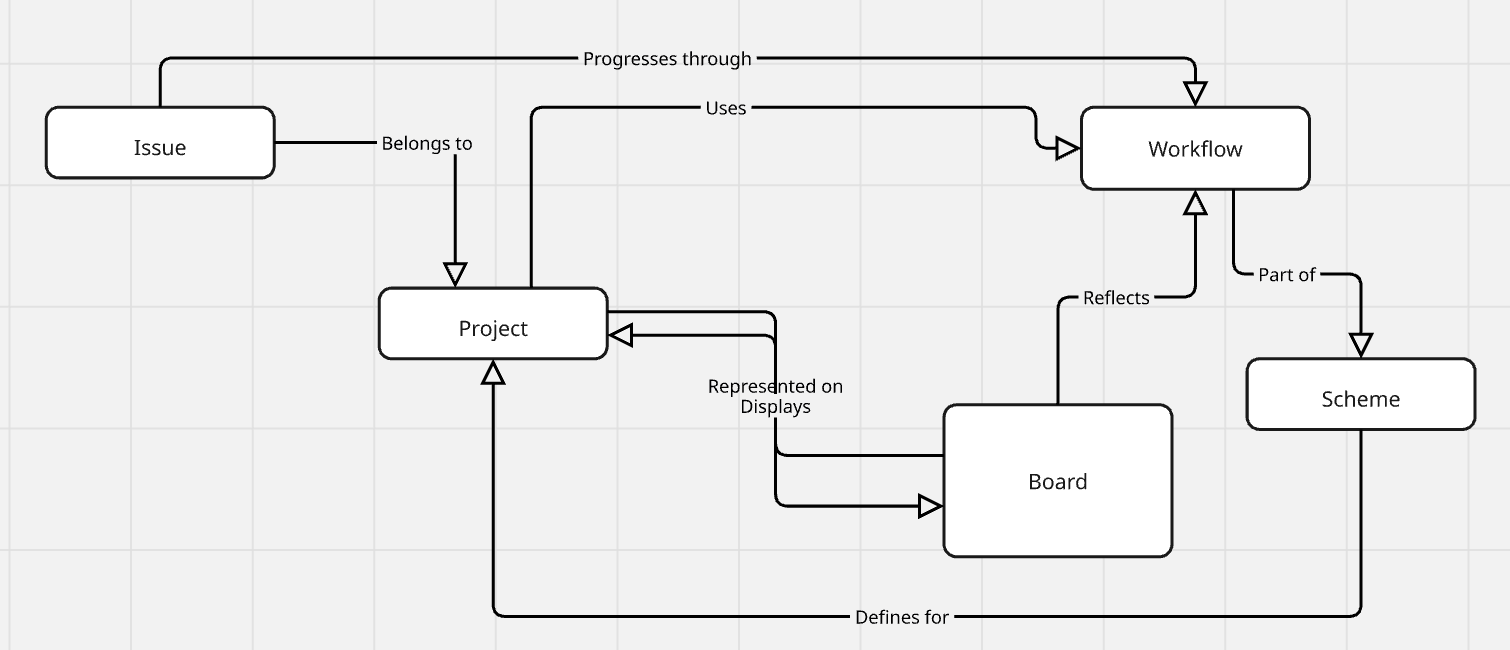
Each of these maps to specific API endpoints. Knowing how they relate helps you design cleaner, more effective integrations.
To start building with the Jira API, here’s what you’ll want to have set up:
If you're using Jira Cloud, you're working with the latest API. If you're on Jira Server/Data Center, there might be a few quirks and legacy differences to account for.
Before you point anything at production, set up a test instance of Jira Cloud. It’s free to try and gives you a safe place to break things while you build.
You can:
Testing in a sandbox means fewer headaches down the line—especially when things go wrong (and they sometimes will).
The official Jira API documentation is your best friend when starting an integration. It's hosted by Atlassian and offers granular details on endpoints, request/response bodies, and error messages. Use the interactive API explorer and bookmark sections such as Authentication, Issues, and Projects to make your development process efficient.
Jira supports several different ways to authenticate API requests. Let’s break them down quickly so you can choose what fits your setup.
Basic authentication is now deprecated but may still be used for legacy systems. It consists of passing a username and password with every request. While easy, it does not have strong security features, hence the phasing out.
OAuth 1.0a has been replaced by more secure protocols. It was previously used for authorization but is now phased out due to security concerns.
For most modern Jira Cloud integrations, API tokens are your best bet. Here’s how you use them:
For the full walkthrough - scoped vs. un-scoped tokens, the cloud id routing quirk, and a working curl example - see Knit's guide on how to get a Jira API token.
It’s simple, secure, and works well for most use cases.
If your app needs to access Jira on behalf of users (with their permission), you’ll want to go with 3-legged OAuth. You’ll:
It’s a bit more work upfront, but it gives you scoped, permissioned access.
If you're building apps *inside* the Atlassian ecosystem, you'll either use:
Both offer deeper integrations and more control, but require additional setup.
Whichever method you use, make sure:
A lot of issues during integration come down to misconfigured auth—so double-check before you start debugging the code.
Once you're authenticated, one of the first things you’ll want to do is start interacting with Jira issues. Here’s how to handle the basics: create, read, update, delete (aka CRUD).
To create a new issue, you’ll need to call the `POST /rest/api/3/issue` endpoint with a few required fields:
{
"fields": {
"project": { "key": "PROJ" },
"issuetype": { "name": "Bug" },
"summary": "Something’s broken!",
"description": "Details about the bug go here."
}
}
At a minimum, you need the project key, issue type, and summary. The rest—like description, labels, and custom fields—are optional but useful.
Make sure to log the responses so you can debug if anything fails. And yes, retry logic helps if you hit rate limits or flaky network issues.
To fetch an issue, use a GET request:
GET /rest/api/3/issue/{issueIdOrKey}
You’ll get back a JSON object with all the juicy details: summary, description, status, assignee, comments, history, etc.
It’s pretty handy if you’re syncing with another system or building a custom dashboard.
Need to update an issue’s status, add a comment, or change the priority? Use PUT for full updates or PATCH for partial ones.
A common use case is adding a comment:
{
"body": "Following up on this issue—any updates?"
}
Make sure to avoid overwriting fields unintentionally. Always double-check what you're sending in the payload.
Deleting issues is irreversible. Only do it if you're absolutely sure—and always ensure your API token has the right permissions.
It’s best practice to:
Confirm the issue should be deleted (maybe with a soft-delete flag first)
Keep an audit trail somewhere. Handle deletion errors gracefully
Jira comes with a powerful query language called JQL (Jira Query Language) that lets you search for precise issues.
Want all open bugs assigned to a specific user? Or tasks due this week? JQL can help with that.
Example: project = PROJ AND status = "In Progress" AND assignee = currentUser()
When using the search API, don't forget to paginate. Note that Atlassian has moved this to a new endpoint: POST /rest/api/3/search/jql, which returns a nextPageToken instead of using startAt/maxResults. Pass the token back on your next request until it's empty. (The older GET /rest/api/3/search endpoint shown in some docs is being phased out - see Knit's Jira API guide for the current request shape.)
This helps when you're dealing with hundreds (or thousands) of issues.
The API also allows you to create and manage Jira projects. This is especially useful for automating new customer onboarding.
Use the `POST /rest/api/3/project` endpoint to create a new project, and pass in details like the project key, name, lead, and template.
You can also update project settings and connect them to workflows, issue type schemes, and permission schemes.
If your customers use Jira for agile, you’ll want to work with boards and sprints.
Here’s what you can do with the API:
- Fetch boards (`GET /board`)
- Retrieve or create sprints
- Move issues between sprints
It helps sync sprint timelines or mirror status in an external dashboard.
Jira Workflows define how an issue moves through statuses. You can:
- Get available transitions (`GET /issue/{key}/transitions`)
- Perform a transition (`POST /issue/{key}/transitions`)
This lets you automate common flows like moving an issue to "In Review" after a pull request is merged.
Jira’s API has some nice extras that help you build smarter, more responsive integrations.
You can link related issues (like blockers or duplicates) via the API. Handy for tracking dependencies or duplicate reports across teams.
Example:
{
"type": { "name": "Blocks" },
"inwardIssue": { "key": "PROJ-101" },
"outwardIssue": { "key": "PROJ-102" }
}
Always validate the link type you're using and make sure it fits your project config.
Need to upload logs, screenshots, or files? Use the attachments endpoint with a multipart/form-data request.
Just remember:
Want your app to react instantly when something changes in Jira? Webhooks are the way to go.
You can subscribe to events like issue creation, status changes, or comments. When triggered, Jira sends a JSON payload to your endpoint.
Make sure to:
Understanding the differences between Jira Cloud and Jira Server is critical:
Keep updated with the latest changes by monitoring Atlassian’s release notes and documentation.
Even with the best setup, things can (and will) go wrong. Here’s how to prepare for it.
Jira’s API gives back standard HTTP response codes. Some you’ll run into often:
Always log error responses with enough context (request, response body, endpoint) to debug quickly.
Jira Cloud rate-limits requests through a few overlapping systems: a points-based hourly quota (a default Global Pool of 65,000 points/hour for most apps), burst limits of 100 requests/second for GET/POST and 50/second for PUT/DELETE, and a per-issue write cap (around 20 requests in 2 seconds). A 429 response includes a RateLimit-Reason header telling you which limit you hit. Here's how to handle it safely:
If you’re building a high-throughput integration, test with realistic volumes and plan for throttling.
To make your integration fast and reliable:
These small tweaks go a long way in keeping your integration snappy and stable.
Getting visibility into your integration is just as important as writing the code. Here's how to keep things observable and testable.
Solid logging = easier debugging. Here's what to keep in mind:
If something breaks, good logs can save hours of head-scratching.
When you’re trying to figure out what’s going wrong:
Also, if your app has logs tied to user sessions or sync jobs, make those searchable by ID.
Testing your Jira integration shouldn’t be an afterthought. It keeps things reliable and easy to update.
The goal is to have confidence in every deploy—not to ship and pray.
Let’s look at a few examples of what’s possible when you put it all together:
Trigger issue creation when a bug or support request is reported:
curl --request POST \
  --url 'https://your-domain.atlassian.net/rest/api/3/issue' \
  --user 'email@example.com:<api_token>' \
  --header 'Accept: application/json' \
  --header 'Content-Type: application/json' \
  --data '{
    "fields": {
      "project": { "key": "PROJ" },
      "issuetype": { "name": "Bug" },
      "summary": "Bug in production",
      "description": "A detailed bug report goes here."
    }
}'Read issue data from Jira and sync it to another tool:
bash
curl -u email@example.com:API_TOKEN -X GET \ https://your-domain.atlassian.net/rest/api/3/issue/PROJ-123
Map fields like title, status, and priority, and push updates as needed.
Use a scheduled script to move overdue tasks to a "Stuck" column:
```python
import requests
import json
jira_domain = "https://your-domain.atlassian.net"
api_token = "API_TOKEN"
email = "email@example.com"
headers = {"Content-Type": "application/json"}
# Find overdue issues
jql = "project = PROJ AND due < now() AND status != 'Done'"
response = requests.get(f"{jira_domain}/rest/api/3/search",
                        headers=headers,
                        auth=(email, api_token),
                        params={"jql": jql})
for issue in response.json().get("issues", []):
    issue_key = issue["key"]
    payload = {"transition": {"id": "31"}}  # Replace with correct transition ID
    requests.post(f"{jira_domain}/rest/api/3/issue/{issue_key}/transitions",
                  headers=headers,
                  auth=(email, api_token),
                  data=json.dumps(payload))
```
Automations like this can help keep boards clean and accurate.
Security's key, so let's keep it simple:
Think of API keys like passwords.
Secure secrets = less risk.
If you touch user data:
Quick tips to level up:
Libraries (Java, Python, etc.) can help with the basics.
Your call is based on your needs.
Automate testing and deployment.
Reliable integration = happy you.
If you’ve made it this far—nice work! You’ve got everything you need to build a powerful, reliable Jira integration. Whether you're syncing data, triggering workflows, or pulling reports, the Jira API opens up a ton of possibilities.
Here’s a quick checklist to recap:
Jira is constantly evolving, and so are the use cases around it. If you want to go further:
- Follow [Atlassian’s Developer Changelog]
- Explore the [Jira API Docs]
- Join the [Atlassian Developer Community]
And if you're building on top of Knit, we’re always here to help.
Drop us an email at hello@getknit.dev if you run into a use case that isn’t covered.
Happy building! 🙌
Sage Intacct API integration allows businesses to connect financial systems with other applications, enabling real-time data synchronization and reducing errors and missed opportunities. Manual data transfers and outdated processes can lead to errors and missed opportunities. This guide explains how Sage Intacct API integration removes those pain points. We cover the technical setup, common issues, and how using Knit can cut down development time while ensuring a secure connection between your systems and Sage Intacct.
Sage Intacct API integration integrates your financial and ERP systems with third-party applications. It connects your financial information and tools used for reporting, budgeting, and analytics.
The Sage Intacct API documentation provides all the necessary information to integrate your systems with Sage Intacct’s financial services. It covers two main API protocols: REST and SOAP, each designed for different integration needs. REST is commonly used for web-based applications, offering a simple and flexible approach, while SOAP is preferred for more complex and secure transactions.
By following the guidelines, you can ensure a secure and efficient connection between your systems and Sage Intacct.
Integrating Sage Intacct with your existing systems offers a host of advantages.
Before you start the integration process, you should properly set up your environment. Proper setup creates a solid foundation and prevents most pitfalls.
A clear understanding of Sage Intacct’s account types and ecosystem is vital.
A secure environment protects your data and credentials.
Setting up authentication is crucial to secure the data flow.
An understanding of the different APIs and protocols is necessary to choose the best method for your integration needs.
Sage Intacct offers a flexible API ecosystem to fit diverse business needs.
The Sage Intacct REST API offers a clean, modern approach to integrating with Sage Intacct.
Note (2025): Sage Intacct has designated the XML API as legacy. All new objects and features are now released via the REST API only. The XML API remains supported for existing integrations, but new builds should use the REST API. See developer.intacct.com for the current migration guidance.
Curl request:
curl -i -X GET \ 'https://api.intacct.com/ia/api/v1/objects/cash-management/bank-acount {key}' \-H 'Authorization: Bearer <YOUR_TOKEN_HERE>'Here’s a detailed reference to all the Sage Intacct REST API Endpoints.
For environments that need robust enterprise-level integration, the Sage Intacct SOAP API is a strong option.
Each operation is a simple HTTP request. For example, a GET request to retrieve account details:
Parameters for request body:
<read>
    <object>GLACCOUNT</object>
    <keys>1</keys>
    <fields>*</fields>
</read>
Data format for the response body:
Here’s a detailed reference to all the Sage Intacct SOAP API Endpoints.
Comparing SOAP versus REST for various scenarios:
Beyond the primary REST and SOAP APIs, Sage Intacct provides other modules to enhance integration.
Now that your environment is ready and you understand the API options, you can start building your integration.
A basic API call is the foundation of your integration.
Step-by-step guide for a basic API call using REST and SOAP:
REST Example:
Example:
Curl Request:
curl -i -X GET \
https://api.intacct.com/ia/api/v1/objects/accounts-receivable/customer \
-H 'Authorization: Bearer <YOUR_TOKEN_HERE>'
Response 200 (Success):
{
  "ia::result": [
    {
      "key": "68",
      "id": "CUST-100",
      "href": "/objects/accounts-receivable/customer/68"
    },
    {
      "key": "69",
      "id": "CUST-200",
      "href": "/objects/accounts-receivable/customer/69"
    },
    {
      "key": "73",
      "id": "CUST-300",
      "href": "/objects/accounts-receivable/customer/73"
    }
  ],
  "ia::meta": {
    "totalCount": 3,
    "start": 1,
    "pageSize": 100
  }
}
Response 400 (Failure):
{
  "ia::result": {
    "ia::error": {
      "code": "invalidRequest",
      "message": "A POST request requires a payload",
      "errorId": "REST-1028",
      "additionalInfo": {
        "messageId": "IA.REQUEST_REQUIRES_A_PAYLOAD",
        "placeholders": {
          "OPERATION": "POST"
        },
        "propertySet": {}
      },
      "supportId": "Kxi78%7EZuyXBDEGVHD2UmO1phYXDQAAAAo"
    }
  },
  "ia::meta": {
    "totalCount": 1,
    "totalSuccess": 0,
    "totalError": 1
  }
}
SOAP(Legacy) Example:
Example snippet of creating a reporting period:
<create>
    <REPORTINGPERIOD>
        <NAME>Month Ended January 2017</NAME>
        <HEADER1>Month Ended</HEADER1>
        <HEADER2>January 2017</HEADER2>
        <START_DATE>01/01/2017</START_DATE>
        <END_DATE>01/31/2017</END_DATE>
        <BUDGETING>true</BUDGETING>
        <STATUS>active</STATUS>
    </REPORTINGPERIOD>
</create>Using Postman for Testing and Debugging API Calls
Postman is a good tool for sending and confirming API requests before implementation to make the testing of your Sage Intacct API integration more efficient.
You can import the Sage Intacct Postman collection into your Postman tool, which has pre-configured endpoints for simple testing. You can use it to simply test your API calls, see results in real time, and debug any issues.
This helps in debugging by visualizing responses and simplifying the identification of errors.
Mapping your business processes to API workflows makes integration smoother.
To test your Sage Intacct API integration, using Postman is recommended. You can import the Sage Intacct Postman collection and quickly make sample API requests to verify functionality. This allows for efficient testing before you begin full implementation.
Understanding real-world applications helps in visualizing the benefits of a well-implemented integration.
This section outlines examples from various sectors that have seen success with Sage Intacct integrations.
Industry
Joining a sage intacct partnership program can offer additional resources and support for your integration efforts.
The partnership program enhances your integration by offering technical and marketing support.
Different partnership tiers cater to varied business needs.
Following best practices ensures that your integration runs smoothly over time.
Manage API calls effectively to handle growth.
query, readByQuery, create, update, or delete call — query results are capped at 2,000 per call, so large datasets require multiple queries, each counting separately. Monitor your usage at Company → Admin → Usage Insights → API Usage. Higher tiers are available for additional fees — contact your Sage Intacct Customer Success Manager. Knit manages transaction volume automatically, batching requests and staying within tier limits to avoid unexpected overage charges.Security must remain a top priority.
Effective monitoring helps catch issues early.
No integration is without its challenges. This section covers common problems and how to fix them.
Prepare for and resolve typical issues quickly.
Effective troubleshooting minimizes downtime.
Long-term management of your integration is key to ongoing success.
Stay informed about changes to avoid surprises.
Ensure your integration remains robust as your business grows.
Knit offers a streamlined approach to integrating Sage Intacct. This section details how Knit simplifies the process.
Knit reduces the heavy lifting in integration tasks by offering pre-built accounting connectors in its Unified Accounting API.
This section provides a walk-through for integrating using Knit.
A sample table for mapping objects and fields can be included:
Knit eliminates many of the hassles associated with manual integration.
In this guide, we have walked you through the steps and best practices for integrating Sage Intacct via API. You have learned how to set up a secure environment, choose the right API option, map business processes, and overcome common challenges.
If you're ready to link Sage Intacct with your systems without the need for manual integration, it's time to discover how Knit can assist. Knit delivers customized, secure connectors and a simple interface that shortens development time and keeps maintenance low. Book a demo with Knit today to see firsthand how our solution addresses your integration challenges so you can focus on growing your business rather than worrying about technical roadblocks
Yes. Sage Intacct provides two API interfaces: the REST API (recommended for all new integrations, available at api.intacct.com) and the XML API (legacy, still supported but receiving no new features). The REST API uses standard HTTP verbs and OAuth 2.0 Bearer token authentication. It covers the full financial data model — customers, vendors, invoices, bills, GL accounts, and reporting objects. Knit's Unified Accounting API normalises Sage Intacct alongside QuickBooks, NetSuite, and Xero into a consistent schema, so teams build one integration rather than one per platform.
Sage Intacct enforces API transaction limits under a Performance Tier model (enforced April 2025). The default Tier 1 allows 100,000 transactions per month. Each query, readByQuery, create, update, or delete call counts as one transaction — query results are capped at 2,000 per call, so large datasets require multiple queries. Overages are charged at $0.15 per pack of 10 transactions. Monitor usage at Company → Admin → Usage Insights → API Usage. Knit manages transaction volume automatically to avoid unexpected overage charges.
The Sage Intacct REST API uses OAuth 2.0 Bearer token authentication. Register an application in the Sage Developer Portal to obtain a Client ID and Client Secret, then use the Authorization Code flow for user-delegated access. The legacy XML API uses Web Services credentials — a Sender ID, User ID, and Company ID passed in the XML request body. For new integrations, use OAuth 2.0 via the REST API. Knit handles the full OAuth flow for Sage Intacct; users authorise once and Knit manages token refresh automatically.
The REST API is Sage Intacct's current recommended interface — it uses standard HTTP verbs, JSON payloads, and OAuth 2.0 authentication. All new objects and features are released via REST only. The XML API (also called the SOAP or Web Services API) is the legacy interface — it uses XML request/response structures and Web Services credentials (Sender ID + User ID). It remains supported for existing integrations but receives no new features. New integrations should always use the REST API.
Yes — Sage Intacct provides an openly documented API available to any developer. The REST API documentation is published at developer.sage.com and the legacy XML API reference is at developer.intacct.com. Both are accessible without special partnership status, though production access requires a Sage Intacct subscription or a developer sandbox account. Some advanced modules (multi-entity consolidation, project accounting) require the corresponding Sage Intacct subscription to access via API.
Sage Intacct includes Sage Copilot, an AI assistant embedded natively in the product that proactively analyses financial data, surfaces insights, and responds to natural language queries within the application. For AI agent integrations (external tools calling Sage Intacct programmatically), the REST API provides the data layer — an external MCP server or AI agent can call Sage Intacct endpoints to retrieve invoices, GL balances, or vendor data as part of a multi-step workflow. Knit provides a unified accounting API that enables AI agents to query Sage Intacct alongside other accounting platforms through a consistent interface.
Sage Intacct provides a sandbox environment that mirrors your production account for safe testing. You can request a sandbox via the Sage Intacct Developer Portal at developer.intacct.com. If you don't have an existing Sage Intacct subscription, Sage offers a demo account at sage.com/intacct for proof-of-concept work. The sandbox uses the same API endpoints as production — note that the base URL differs slightly from production and must be configured separately in your integration. Knit might also be able provide access to a Sage Intacct sandbox for testing integrations built on the Knit platform -speak to your account manager to request for it.
.png)
In today's AI-driven world, AI agents have become transformative tools, capable of executing tasks with unparalleled speed, precision, and adaptability. From automating mundane processes to providing hyper-personalized customer experiences, these agents are reshaping the way businesses function and how users engage with technology. However, their true potential lies beyond standalone functionalities—they thrive when integrated seamlessly with diverse systems, data sources, and applications.
This integration is not merely about connectivity; it’s about enabling AI agents to access, process, and act on real-time information across complex environments. Whether pulling data from enterprise CRMs, analyzing unstructured documents, or triggering workflows in third-party platforms, integration equips AI agents to become more context-aware, action-oriented, and capable of delivering measurable value.
This article explores how seamless integrations unlock the full potential of AI agents, the best practices to ensure success, and the challenges that organizations must overcome to achieve seamless and impactful integration.
The rise of Artificial Intelligence (AI) agents marks a transformative shift in how we interact with technology. AI agents are intelligent software entities capable of performing tasks autonomously, mimicking human behavior, and adapting to new scenarios without explicit human intervention. From chatbots resolving customer queries to sophisticated virtual assistants managing complex workflows, these agents are becoming integral across industries.
This rise of use of AI agents has been attributed to factors like:
AI agents are more than just software programs; they are intelligent systems capable of executing tasks autonomously by mimicking human-like reasoning, learning, and adaptability. Their functionality is built on two foundational pillars:
For optimal performance, AI agents require deep contextual understanding. This extends beyond familiarity with a product or service to include insights into customer pain points, historical interactions, and updates in knowledge. However, to equip AI agents with this contextual knowledge, it is important to provide them access to a centralized knowledge base or data lake, often scattered across multiple systems, applications, and formats. This ensures they are working with the most relevant and up-to-date information. Furthermore, they need access to all new information, such as product updates, evolving customer requirements, or changes in business processes, ensuring that their outputs remain relevant and accurate.
For instance, an AI agent assisting a sales team must have access to CRM data, historical conversations, pricing details, and product catalogs to provide actionable insights during a customer interaction.
AI agents’ value lies not only in their ability to comprehend but also to act. For instance, AI agents can perform activities such as updating CRM records after a sales call, generating invoices, or creating tasks in project management tools based on user input or triggers. Similarly, AI agents can initiate complex workflows, such as escalating support tickets, scheduling appointments, or launching marketing campaigns. However, this requires seamless connectivity across different applications to facilitate action.
For example, an AI agent managing customer support could resolve queries by pulling answers from a knowledge base and, if necessary, escalating unresolved issues to a human representative with full context.
The capabilities of AI agents are undeniably remarkable. However, their true potential can only be realized when they seamlessly access contextual knowledge and take informed actions across a wide array of applications. This is where integrations play a pivotal role, serving as the key to bridging gaps and unlocking the full power of AI agents.
The effectiveness of an AI agent is directly tied to its ability to access and utilize data stored across diverse platforms. This is where integrations shine, acting as conduits that connect the AI agent to the wealth of information scattered across different systems. These data sources fall into several broad categories, each contributing uniquely to the agent's capabilities:
Platforms like databases, Customer Relationship Management (CRM) systems (e.g., Salesforce, HubSpot), and Enterprise Resource Planning (ERP) tools house structured data—clean, organized, and easily queryable. For example, CRM integrations allow AI agents to retrieve customer contact details, sales pipelines, and interaction histories, which they can use to personalize customer interactions or automate follow-ups.
The majority of organizational knowledge exists in unstructured formats, such as PDFs, Word documents, emails, and collaborative platforms like Notion or Confluence. Cloud storage systems like Google Drive and Dropbox add another layer of complexity, storing files without predefined schemas. Integrating with these systems allows AI agents to extract key insights from meeting notes, onboarding manuals, or research reports. For instance, an AI assistant integrated with Google Drive could retrieve and summarize a company’s annual performance review stored in a PDF document.
Real-time data streams from IoT devices, analytics tools, or social media platforms offer actionable insights that are constantly updated. AI agents integrated with streaming data sources can monitor metrics, such as energy usage from IoT sensors or engagement rates from Twitter analytics, and make recommendations or trigger actions based on live updates.
APIs from third-party services like payment gateways (Stripe, PayPal), logistics platforms (DHL, FedEx), and HR systems (BambooHR, Workday) expand the agent's ability to act across verticals. For example, an AI agent integrated with a payment gateway could automatically reconcile invoices, track payments, and even issue alerts for overdue accounts.
To process this vast array of data, AI agents rely on data ingestion—the process of collecting, aggregating, and transforming raw data into a usable format. Data ingestion pipelines ensure that the agent has access to a broad and rich understanding of the information landscape, enhancing its ability to make accurate decisions.
However, this capability requires robust integrations with a wide variety of third-party applications. Whether it's CRM systems, analytics tools, or knowledge repositories, each integration provides an additional layer of context that the agent can leverage.
Without these integrations, AI agents would be confined to static or siloed information, limiting their ability to adapt to dynamic environments. For example, an AI-powered customer service bot lacking integration with an order management system might struggle to provide real-time updates on a customer’s order status, resulting in a frustrating user experience.
In many applications, the true value of AI agents lies in their ability to respond with real-time or near-real-time accuracy. Integrations with webhooks and streaming APIs enable the agent to access live data updates, ensuring that its responses remain relevant and timely.
Consider a scenario where an AI-powered invoicing assistant is tasked with generating invoices based on software usage. If the agent relies on a delayed data sync, it might fail to account for a client’s excess usage in the final moments before the invoice is generated. This oversight could result in inaccurate billing, financial discrepancies, and strained customer relationships.
Integrations are not merely a way to access data for AI agents; they are critical to enabling these agents to take meaningful actions on behalf of other applications. This capability is what transforms AI agents from passive data collectors into active participants in business processes.
Integrations play a crucial role in this process by connecting AI agents with different applications, enabling them to interact seamlessly and perform tasks on behalf of the user to trigger responses, updates, or actions in real time.
For instance, A customer service AI agent integrated with CRM platforms can automatically update customer records, initiate follow-up emails, and even generate reports based on the latest customer interactions. SImilarly, if a popular product is running low, the AI agent for e-commerce platform can automatically reorder from the supplier, update the website’s product page with new availability dates, and notify customers about upcoming restocks. Furthermore, A marketing AI agent integrated with CRM and marketing automation platforms (e.g., Mailchimp, ActiveCampaign) can automate email campaigns based on customer behaviors—such as opening specific emails, clicking on links, or making purchases.
Integrations allow AI agents to automate processes that span across different systems. For example, an AI agent integrated with a project management tool and a communication platform can automate task assignments based on project milestones, notify team members of updates, and adjust timelines based on real-time data from work management systems.
For developers driving these integrations, it’s essential to build robust APIs and use standardized protocols like OAuth for secure data access across each of the applications in use. They should also focus on real-time synchronization to ensure the AI agent acts on the most current data available. Proper error handling, logging, and monitoring mechanisms are critical to maintaining reliability and performance across integrations. Furthermore, as AI agents often interact with multiple platforms, developers should design integration solutions that can scale. This involves using scalable data storage solutions, optimizing data flow, and regularly testing integration performance under load.
Retrieval-Augmented Generation (RAG) is a transformative approach that enhances the capabilities of AI agents by addressing a fundamental limitation of generative AI models: reliance on static, pre-trained knowledge. RAG fills this gap by providing a way for AI agents to efficiently access, interpret, and utilize information from a variety of data sources. Here’s how iintegrations help in building RAG pipelines for AI agents:
Traditional APIs are optimized for structured data (like databases, CRMs, and spreadsheets). However, many of the most valuable insights for AI agents come from unstructured data—documents (PDFs), emails, chats, meeting notes, Notion, and more. Unstructured data often contains detailed, nuanced information that is not easily captured in structured formats.
RAG enables AI agents to access and leverage this wealth of unstructured data by integrating it into their decision-making processes. By integrating with these unstructured data sources, AI agents:
RAG involves not only the retrieval of relevant data from these sources but also the generation of responses based on this data. It allows AI agents to pull in information from different platforms, consolidate it, and generate responses that are contextually relevant.
For instance, an HR AI agent might need to pull data from employee records, performance reviews, and onboarding documents to answer a question about benefits. RAG enables this agent to access the necessary context and background information from multiple sources, ensuring the response is accurate and comprehensive through a single retrieval mechanism.
RAG empowers AI agents by providing real-time access to updated information from across various platforms with the help of Webhooks. This is critical for applications like customer service, where responses must be based on the latest data.
For example, if a customer asks about their recent order status, the AI agent can access real-time shipping data from a logistics platform, order history from an e-commerce system, and promotional notes from a marketing database—enabling it to provide a response with the latest information. Without RAG, the agent might only be able to provide a generic answer based on static data, leading to inaccuracies and customer frustration.
While RAG presents immense opportunities to enhance AI capabilities, its implementation comes with a set of challenges. Addressing these challenges is crucial to building efficient, scalable, and reliable AI systems.
Integration of an AI-powered customer service agent with CRM systems, ticketing platforms, and other tools can help enhance contextual knowledge and take proactive actions, delivering a superior customer experience.
For instance, when a customer reaches out with a query—such as a delayed order—the AI agent retrieves their profile from the CRM, including past interactions, order history, and loyalty status, to gain a comprehensive understanding of their background. Simultaneously, it queries the ticketing system to identify any related past or ongoing issues and checks the order management system for real-time updates on the order status. Combining this data, the AI develops a holistic view of the situation and crafts a personalized response. It may empathize with the customer’s frustration, offer an estimated delivery timeline, provide goodwill gestures like loyalty points or discounts, and prioritize the order for expedited delivery.
The AI agent also performs critical backend tasks to maintain consistency across systems. It logs the interaction details in the CRM, updating the customer’s profile with notes on the resolution and any loyalty rewards granted. The ticketing system is updated with a resolution summary, relevant tags, and any necessary escalation details. Simultaneously, the order management system reflects the updated delivery status, and insights from the resolution are fed into the knowledge base to improve responses to similar queries in the future. Furthermore, the AI captures performance metrics, such as resolution times and sentiment analysis, which are pushed into analytics tools for tracking and reporting.
In retail, AI agents can integrate with inventory management systems, customer loyalty platforms, and marketing automation tools for enhancing customer experience and operational efficiency. For instance, when a customer purchases a product online, the AI agent quickly retrieves data from the inventory management system to check stock levels. It can then update the order status in real time, ensuring that the customer is informed about the availability and expected delivery date of the product. If the product is out of stock, the AI agent can suggest alternatives that are similar in features, quality, or price, or provide an estimated restocking date to prevent customer frustration and offer a solution that meets their needs.
Similarly, if a customer frequently purchases similar items, the AI might note this and suggest additional products or promotions related to these interests in future communications. By integrating with marketing automation tools, the AI agent can personalize marketing campaigns, sending targeted emails, SMS messages, or notifications with relevant offers, discounts, or recommendations based on the customer’s previous interactions and buying behaviors. The AI agent also writes back data to customer profiles within the CRM system. It logs details such as purchase history, preferences, and behavioral insights, allowing retailers to gain a deeper understanding of their customers’ shopping patterns and preferences.
Integrating AI (Artificial Intelligence) and RAG (Recommendations, Actions, and Goals) frameworks into existing systems is crucial for leveraging their full potential, but it introduces significant technical challenges that organizations must navigate. These challenges span across data ingestion, system compatibility, and scalability, often requiring specialized technical solutions and ongoing management to ensure successful implementation.
Adding integrations to AI agents involves providing these agents with the ability to seamlessly connect with external systems, APIs, or services, allowing them to access, exchange, and act on data. Here are the top ways to achieve the same:
Custom development involves creating tailored integrations from scratch to connect the AI agent with various external systems. This method requires in-depth knowledge of APIs, data models, and custom logic. The process involves developing specific integrations to meet unique business requirements, ensuring complete control over data flows, transformations, and error handling. This approach is suitable for complex use cases where pre-built solutions may not suffice.
Embedded iPaaS (Integration Platform as a Service) solutions offer pre-built integration platforms that include no-code or low-code tools. These platforms allow organizations to quickly and easily set up integrations between the AI agent and various external systems without needing deep technical expertise. The integration process is simplified by using a graphical interface to configure workflows and data mappings, reducing development time and resource requirements.
Unified API solutions provide a single API endpoint that connects to multiple SaaS products and external systems, simplifying the integration process. This method abstracts the complexity of dealing with multiple APIs by consolidating them into a unified interface. It allows the AI agent to access a wide range of services, such as CRM systems, marketing platforms, and data analytics tools, through a seamless and standardized integration process.
Knit offers a game-changing solution for organizations looking to integrate their AI agents with a wide variety of SaaS applications quickly and efficiently. By providing a seamless, AI-driven integration process, Knit empowers businesses to unlock the full potential of their AI agents by connecting them with the necessary tools and data sources.
By integrating with Knit, organizations can power their AI agents to interact seamlessly with a wide array of applications. This capability not only enhances productivity and operational efficiency but also allows for the creation of innovative use cases that would be difficult to achieve with manual integration processes. Knit thus transforms how businesses utilize AI agents, making it easier to harness the full power of their data across multiple platforms.
Ready to see how Knit can transform your AI agents? Contact us today for a personalized demo!
What are integrations for AI agents?
Integrations for AI agents are the connections that give an AI agent access to external data sources, APIs, and tools it needs to complete tasks. An AI agent without integrations can only work with the information in its context window - it can't read a CRM record, trigger a payroll run, or pull a customer's support history. Integrations bridge the gap between the agent's reasoning capability and the real-world systems it needs to act on. Common integration types include REST APIs (for SaaS platforms like HubSpot, Salesforce, or Workday), file storage systems, databases, and event streams. For agents built on LLMs, integrations are typically exposed as tools the model can call - either through direct API connections, an embedded iPaaS, or a unified API platform like Knit.
Why do AI agents need integrations?
AI agents need integrations for two reasons: knowledge and action. For knowledge, integrations give agents access to up-to-date, customer-specific data they can't get from their training - CRM records, HR data, support tickets, financial history. For action, integrations let agents do things beyond generating text - update a record, trigger a workflow, send a message, or write to a database. Without integrations, an AI agent is a sophisticated chatbot. With integrations, it becomes a system that can perceive context across your tech stack and take meaningful actions on behalf of users.
What is MCP and how does it relate to AI agent integrations?
MCP (Model Context Protocol) is an open standard that defines how AI models connect to external tools and data sources. Rather than every agent framework implementing its own tool-calling conventions, MCP provides a standardised protocol so that any MCP-compatible agent can use any MCP server. For AI agent integrations, this means a well-built MCP server can expose your SaaS integrations (CRM, HRIS, ticketing) to any agent framework that supports MCP - without bespoke wiring for each one. Knit provides an MCP hub that you could use for MCP servers across 150+ apps that knit supports, so agents built on Claude, GPT-4o, or any MCP-compatible framework can call Knit's 100+ HRIS, payroll, and CRM integrations through a single MCP connection.
What is the best way to add integrations to an AI agent?
There are three main approaches. Custom development gives you the most control but requires building and maintaining each integration individually - practical for one or two integrations, but it doesn't scale. Embedded iPaaS platforms (like Zapier Embedded or Workato) provide pre-built connectors with a workflow layer, which speeds up deployment but adds cost and a middleware dependency. Unified API platforms (like Knit) provide a single API endpoint that normalises data from hundreds of SaaS tools into a consistent schema - the fastest path to multi-tool coverage for agents. For 2026, unified APIs combined with MCP server support is becoming the standard architecture for production AI agents that need to act across many systems.
What are examples of integrations for AI agents?
Common AI agent integration examples include: an HR agent that reads employee data from Workday or BambooHR to answer questions about org structure, leave balances, or comp data; a sales agent that pulls deal context from Salesforce or HubSpot before drafting outreach; a support agent that retrieves ticket history from Zendesk or Intercom to provide contextual responses; a finance agent that reads invoices from accounting software like QuickBooks or NetSuite; and an onboarding agent that writes new hire records to an HRIS and provisions access in an identity provider.
What is a unified API for AI agents and why does it matter?
A unified API normalises multiple third-party APIs into a single consistent interface. Instead of building separate connectors for Workday, BambooHR, and Rippling, an AI agent calls one endpoint like GET /hris/employees and receives normalised data regardless of the underlying platform. This matters for AI agents specifically because agents often need to act across multiple systems in a single workflow - pulling an employee record from Workday, updating a ticket in Jira, and logging the action in a CRM. Without a unified API, the agent needs custom connector logic for each system, which multiplies engineering cost and maintenance burden. Knit is built specifically as a unified API for enterprise HRIS, ATS, and ERP platforms.
What are the main challenges of building integrations for AI agents?
The main challenges are: data compatibility (different SaaS tools structure the same data differently, requiring normalisation); rate limits (agents can make far more API calls per session than traditional integrations, requiring careful throttling); authentication management across many customer accounts; maintaining integrations as upstream APIs evolve; and observability - understanding exactly which integration call caused a failure in a multi-step agent workflow. Unified API platforms like Knit address these by abstracting the integration layer: one endpoint, normalised schema, managed auth, and built-in rate limit handling across all connected platforms.
How do MCP servers help AI agents access enterprise data?
MCP servers wrap enterprise APIs in a standardised tool interface that any MCP-compatible AI agent can call. The agent calls a named tool like get_employee_list or get_open_roles and the MCP server handles the underlying API call, authentication, pagination, and data transformation - without any per-platform custom code in the agent itself. Knit's MCP servers expose tools covering employees, org structure, payroll, and job profiles across 100+ HRIS and ATS platforms, all accessible from Claude, GPT, or any MCP-compatible agent through a single server connection.
.png)
In today’s fast-paced digital landscape, organizations across all industries are leveraging Calendar APIs to streamline scheduling, automate workflows, and optimize resource management. While standalone calendar applications have always been essential, Calendar Integration significantly amplifies their value—making it possible to synchronize events, reminders, and tasks across multiple platforms seamlessly. Whether you’re a SaaS provider integrating a customer’s calendar or an enterprise automating internal processes, a robust API Calendar strategy can drastically enhance efficiency and user satisfaction.
Explore more Calendar API integrations
In this comprehensive guide, we’ll discuss the benefits of Calendar API integration, best practices for developers, real-world use cases, and tips for managing common challenges like time zone discrepancies and data normalization. By the end, you’ll have a clear roadmap on how to build and maintain effective Calendar APIs for your organization or product offering in 2026.
In 2026, calendars have evolved beyond simple day-planners to become strategic tools that connect individuals, teams, and entire organizations. The real power comes from Calendar Integration, or the ability to synchronize these planning tools with other critical systems—CRM software, HRIS platforms, applicant tracking systems (ATS), eSignature solutions, and more.
Essentially, Calendar API integration becomes indispensable for any software looking to reduce operational overhead, improve user satisfaction, and scale globally.
One of the most notable advantages of Calendar Integration is automated scheduling. Instead of manually entering data into multiple calendars, an API can do it for you. For instance, an event management platform integrating with Google Calendar or Microsoft Outlook can immediately update participants’ schedules once an event is booked. This eliminates the need for separate email confirmations and reduces human error.
When a user can book or reschedule an appointment without back-and-forth emails, you’ve substantially upgraded their experience. For example, healthcare providers that leverage Calendar APIs can let patients pick available slots and sync these appointments directly to both the patient’s and the doctor’s calendars. Changes on either side trigger instant notifications, drastically simplifying patient-doctor communication.
By aligning calendars with HR systems, CRM tools, and project management platforms, businesses can ensure every resource—personnel, rooms, or equipment—is allocated efficiently. Calendar-based resource mapping can reduce double-bookings and idle times, increasing productivity while minimizing conflicts.
Notifications are integral to preventing missed meetings and last-minute confusion. Whether you run a field service company, a professional consulting firm, or a sales organization, instant schedule updates via Calendar APIs keep everyone on the same page—literally.
API Calendar solutions enable triggers and actions across diverse systems. For instance, when a sales lead in your CRM hits “hot” status, the system can automatically schedule a follow-up call, add it to the rep’s calendar, and send a reminder 15 minutes before the meeting. Such automation fosters a frictionless user experience and supports consistent follow-ups.
<a name="calendar-api-data-models-explained"></a>
To integrate calendar functionalities successfully, a solid grasp of the underlying data structures is crucial. While each calendar provider may have specific fields, the broad data model often consists of the following objects:
Properly mapping these objects during Calendar Integration ensures consistent data handling across multiple systems. Handling each element correctly—particularly with recurring events—lays the foundation for a smooth user experience.
Below are several well-known Calendar APIs that dominate the market. Each has unique features, so choose based on your users’ needs:
Applicant Tracking Systems (ATS) like Lever or Greenhouse can integrate with Google Calendar or Outlook to automate interview scheduling. Once a candidate is selected for an interview, the ATS checks availability for both the interviewer and candidate, auto-generates an event, and sends reminders. This reduces manual coordination, preventing double-bookings and ensuring a smooth interview process.
Learn more on How Interview Scheduling Companies Can Scale ATS Integrations Faster
ERPs like SAP or Oracle NetSuite handle complex scheduling needs for workforce or equipment management. By integrating with each user’s calendar, the ERP can dynamically allocate resources based on real-time availability and location, significantly reducing conflicts and idle times.
Salesforce and HubSpot CRMs can automatically book demos and follow-up calls. Once a customer selects a time slot, the CRM updates the rep’s calendar, triggers reminders, and logs the meeting details—keeping the sales cycle organized and on track.
Systems like Workday and BambooHR use Calendar APIs to automate onboarding schedules—adding orientation, training sessions, and check-ins to a new hire’s calendar. Managers can see progress in real-time, ensuring a structured, transparent onboarding experience.
Assessment tools like HackerRank or Codility integrate with Calendar APIs to plan coding tests. Once a test is scheduled, both candidates and recruiters receive real-time updates. After completion, debrief meetings are auto-booked based on availability.
DocuSign or Adobe Sign can create calendar reminders for upcoming document deadlines. If multiple signatures are required, it schedules follow-up reminders, ensuring legal or financial processes move along without hiccups.
QuickBooks or Xero integrations place invoice due dates and tax deadlines directly onto the user’s calendar, complete with reminders. Users avoid late penalties and maintain financial compliance with minimal manual effort.
While Calendar Integration can transform workflows, it’s not without its hurdles. Here are the most prevalent obstacles:
Businesses can integrate Calendar APIs either by building direct connectors for each calendar platform or opting for a Unified Calendar API provider that consolidates all integrations behind a single endpoint. Here’s how they compare:
Learn more about what should you look for in a Unified API Platform
The calendar landscape is only getting more complex as businesses and end users embrace an ever-growing range of tools and platforms. Implementing an effective Calendar API strategy—whether through direct connectors or a unified platform—can yield substantial operational efficiencies, improved user satisfaction, and a significant competitive edge. From Calendar APIs that power real-time notifications to AI-driven features predicting best meeting times, the potential for innovation is limitless.
If you’re looking to add API Calendar capabilities to your product or optimize an existing integration, now is the time to take action. Start by assessing your users’ needs, identifying top calendar providers they rely on, and determining whether a unified or direct connector strategy makes the most sense. Incorporate the best practices highlighted in this guide—like leveraging webhooks, managing data normalization, and handling rate limits—and you’ll be well on your way to delivering a next-level calendar experience.
Ready to transform your Calendar Integration journey?
Book a Demo with Knit to See How AI-Driven Unified APIs Simplify Integrations
Calendar API integration is the process of connecting your software application to a calendar platform - such as Google Calendar, Microsoft Outlook, or Apple Calendar - using that platform's API to read, create, update, and delete events programmatically. Instead of requiring users to manually copy meeting details between systems, a calendar API integration lets your product sync scheduling data directly with the user's existing calendar. For B2B SaaS products, calendar integrations are commonly used for interview scheduling in ATS tools, client meeting sync in CRM platforms, and onboarding milestone tracking in HRIS systems. Knit provides a unified Calendar API that connects your product to all major calendar platforms through a single integration.
To integrate a calendar API:
(1) Register your application with the calendar provider (Google Cloud Console for Google Calendar, Azure AD for Microsoft Graph);
(2) implement OAuth 2.0 to authenticate users and obtain access tokens scoped to calendar permissions;
(3) call the API endpoints to list, create, or update calendar events using the provider's REST API;
(4) handle webhooks or push notifications to receive real-time event changes;
(5) implement time zone normalization, since calendar APIs return timestamps in various formats. Each calendar platform has a different authentication model, event schema, and rate limit.
For products integrating multiple calendar providers, a unified calendar API layer handles per-provider differences automatically.
With a calendar API you can: read a user's upcoming events and availability windows; create new events with attendees, location, conferencing links, and reminders; update or cancel existing events; access free/busy information to find open slots for scheduling; subscribe to calendar change notifications via webhooks; and manage recurring event series including exceptions and cancellations. Calendar APIs expose the core scheduling primitives - events, attendees, reminders, recurrence rules - that power features like automated interview scheduling, appointment booking, resource allocation, and cross-platform event sync in B2B SaaS products.
Yes. Google Calendar API is free to use - there is no per-request charge and exceeding quota limits does not incur extra billing. The default quota is 1,000,000 queries per day per project, with a per-user rate limit of 60 requests per minute. For production applications with high request volumes, you can apply for a quota increase via Google Cloud Console. The Microsoft Graph Calendar API (Outlook/Microsoft 365) is similarly free to use for reading and writing calendar data, provided the end user has a valid Microsoft 365 licence. You pay for the underlying platform licences (if applicable), not for API calls themselves.
Prioritise based on your users' calendar providers. For most B2B SaaS products, start with Google Calendar API (dominant among SMB and tech-forward companies) and Microsoft Graph Calendar API (dominant in enterprise and regulated industries). Together these two cover the vast majority of business users. Apple Calendar (CalDAV-based) is worth adding if your users skew to Mac-heavy or mobile-first workflows. Zoho Calendar and Exchange on-premises matter for specific verticals. Most products build Google first, then Microsoft, then expand based on customer demand. If you want to go live with all of them at once consider a unified API like Knit that lets you integrate with all calendar apps via a single integration
Key challenges include: time zone handling - calendar events use IANA timezone identifiers and RFC 5545 recurrence rules (RRULE) that must be normalised across providers; recurring events - modifying a single instance vs. the entire series requires careful handling of exception logic; permission scopes - requesting overly broad calendar access triggers user friction during OAuth consent; rate limits - Google Calendar enforces per-user limits requiring exponential backoff; data sync inconsistencies - webhook delivery can be delayed or missed, requiring periodic polling as a fallback; and multi-provider divergence, where the event object structure differs significantly between Google, Microsoft, and Apple calendar APIs.
Key best practices: use webhooks (Google Calendar push notifications, Microsoft Graph change notifications) for real-time event updates rather than polling; request the minimum OAuth scopes needed - for read-only use cases, avoid requesting write permissions; normalise time zones using the IANA timezone database before storing or displaying event times; handle recurring event exceptions carefully - modifying a single occurrence requires sending the recurrence ID; implement exponential backoff for rate limit errors (HTTP 429); store event ETags or sync tokens to detect changes efficiently; and test edge cases like all-day events, multi-day events, and events with no attendees, which vary in structure across providers.
Use a unified calendar API when your product needs to support more than one or two calendar providers and you want to avoid maintaining separate integration codebases for each. A unified layer normalises the event schema, handles per-provider OAuth flows, and abstracts webhook differences - so you build once and gain coverage across Google Calendar, Microsoft Outlook, Apple Calendar, and others. Direct integrations make sense when you need provider-specific features not exposed by a unified layer, or when you're building deeply for a single platform. Knit's unified Calendar API lets B2B SaaS products connect to all major calendar platforms through a single integration without managing per-provider authentication or event schema differences.
By following the strategies in this comprehensive guide, you’ll not only harness the power of Calendar APIs but also future-proof your software or enterprise operations for the decade ahead. Whether you’re automating interviews, scheduling field services, or synchronizing resources across continents, Calendar Integration is the key to eliminating complexity and turning time management into a strategic asset.
This guide is part of our growing collection on HRIS integrations. We’re continuously exploring new apps and updating our HRIS Guides Directory with fresh insights.
Workday has become one of the most trusted platforms for enterprise HR, payroll, and financial management. It’s the system of record for employee data in thousands of organizations. But as powerful as Workday is, most businesses don’t run only on Workday. They also use performance management tools, applicant tracking systems, payroll software, CRMs, SaaS platforms, and more.
The challenge? Making all these systems talk to each other.
That’s where the Workday API comes in. By integrating with Workday’s APIs, companies can automate processes, reduce manual work, and ensure accurate, real-time data flows between systems.
In this blog, we’ll give you everything you need, whether you’re a beginner just learning about APIs or a developer looking to build an enterprise-grade integration.
We’ll cover terminology, use cases, step-by-step setup, code examples, and FAQs. By the end, you’ll know how Workday API integration works and how to do it the right way.
Looking to quickstart with the Workday API Integration? Check our Workday API Directory for common Workday API endpoints
Workday integrations can support both internal workflows for your HR and finance teams, as well as customer-facing use cases that make SaaS products more valuable. Let’s break down some of the most impactful examples.
Performance reviews are key to fair salary adjustments, promotions, and bonus payouts. Many organizations use tools like Lattice to manage reviews and feedback, but without accurate employee data, the process can become messy.
By integrating Lattice with Workday, job titles and salaries stay synced and up to date. HR teams can run performance cycles with confidence, and once reviews are done, compensation changes flow back into Workday automatically — keeping both systems aligned and reducing manual work.
Onboarding new employees is often a race against time , from getting payroll details set up to preparing IT access. With Workday, you can automate this process.
For example, by integrating an ATS like Greenhouse with Workday:
For SaaS companies, onboarding users efficiently is key to customer satisfaction. Workday integrations make this scalable.
Take BILL, a financial operations platform, as an example:
Offboarding is just as important as onboarding, especially for maintaining security. If a terminated employee retains access to systems, it creates serious risks.
Platforms like Ramp, a spend management solution, solve this through Workday integrations:
While this guide equips developers with the skills to build robust Workday integrations through clear explanations and practical examples, the benefits extend beyond the development team. You can also expand your HRIS integrations with the Workday API integration and automate tedious tasks like data entry, freeing up valuable time to focus on other important work. Business leaders gain access to real-time insights across their entire organization, empowering them to make data-driven decisions that drive growth and profitability. This guide empowers developers to build integrations that streamline HR workflows, unlock real-time data for leaders, and ultimately unlock Workday's full potential for your organization.
Understanding key terms is essential for effective integration with Workday. Let’s look upon few of them, that will be frequently used ahead -
1. API Types: Workday offers REST and SOAP APIs, which serve different purposes. REST APIs are commonly used for web-based integrations, while SOAP APIs are often utilized for complex transactions.
2. Endpoint Structure: You must familiarize yourself with the Workday API structure as each endpoint corresponds to a specific function. A common workday API example would be retrieving employee data or updating payroll information.
3. API Documentation: Workday API documentation provides a comprehensive overview of both REST and SOAP APIs.
Workday supports two primary ways to authenticate API calls. Which one you use depends on the API family you choose:
SOAP requests are authenticated with a special Workday user account (the ISU) using WS-Security headers. Access is controlled by the security group(s) and domain policies assigned to that ISU.
REST requests use OAuth 2.0. You register an API client in Workday, grant scopes (what the client is allowed to access), and obtain access tokens (and a refresh token) to call endpoints.
To ensure a secure and reliable connection with Workday's APIs, this section outlines the essential prerequisites. These steps will lay the groundwork for a successful integration, enabling seamless data exchange and unlocking the full potential of Workday within your existing technological infrastructure.
Now that you have a comprehensive overview of the steps required to build a Workday API Integration and an overview of the Workday API documentation, lets dive deep into each step so you can build your Workday integration confidently!
The Web Services Endpoint for the Workday tenant serves as the gateway for integrating external systems with Workday's APIs, enabling data exchange and communication between platforms. To access your specific Workday web services endpoint, follow these steps:
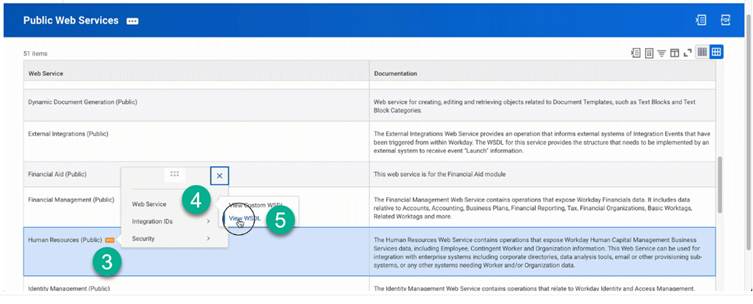
Next, you need to establish an Integration System User (ISU) in Workday, dedicated to managing API requests. This ensures enhanced security and enables better tracking of integration actions. Follow the below steps to set up an ISU in Workday:
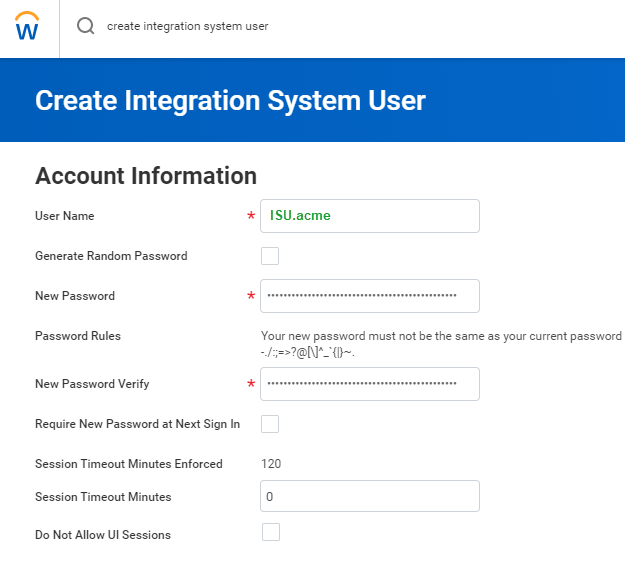
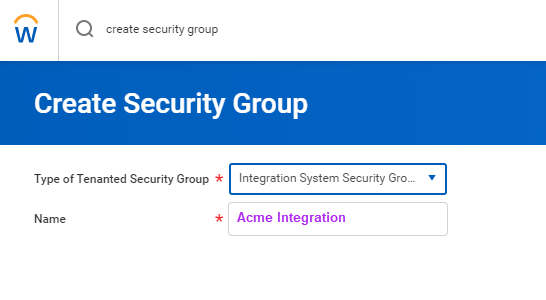
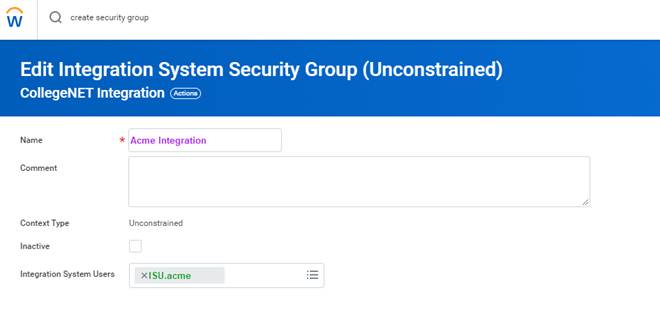
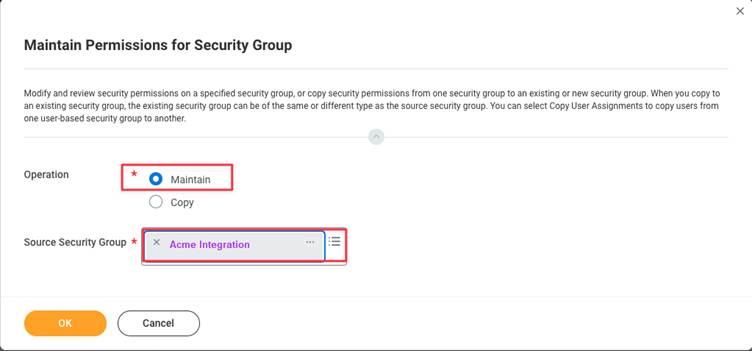

Note: The permissions listed below are necessary for the full HRIS API. These permissions may vary depending on the specific implementation
Parent Domains for HRIS
Parent Domains for HRIS
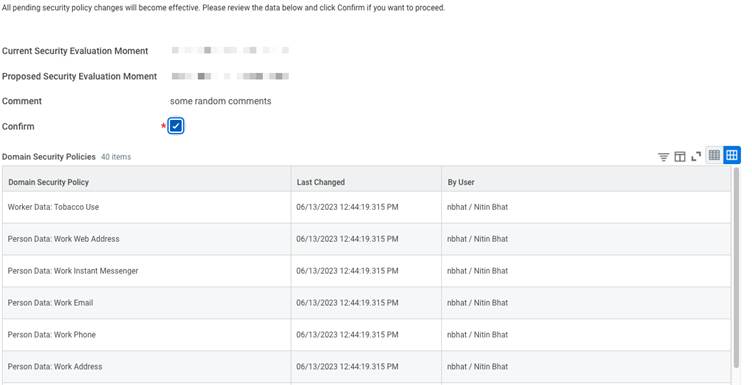
Workday offers different authentication methods. Here, we will focus on OAuth 2.0, a secure way for applications to gain access through an ISU (Integrated System User). An ISU acts like a dedicated user account for your integration, eliminating the need to share individual user credentials. Below steps highlight how to obtain OAuth 2.0 tokens in Workday:
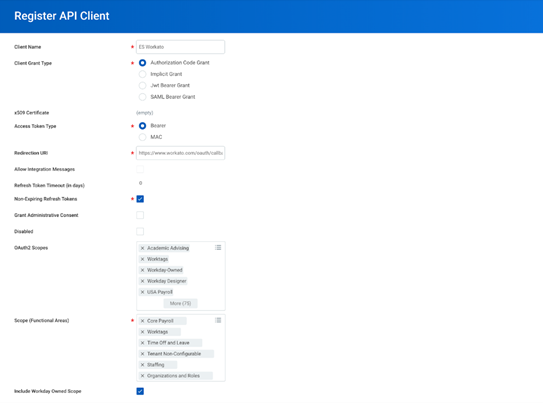
When building a Workday integration, one of the first decisions you’ll face is: Should I use SOAP or REST?
Both are supported by Workday, but they serve slightly different purposes. Let’s break it down.
SOAP (Simple Object Access Protocol) has been around for years and is still widely used in Workday, especially for sensitive data and complex transactions.
How to work with SOAP:
REST (Representational State Transfer) is the newer, lighter, and easier option for Workday integrations. It’s widely used in SaaS products and web apps.
Advantages of REST APIs
How to work with REST:
Now that you have picked between SOAP and REST, let's proceed to utilize Workday HCM APIs effectively. We'll walk through creating a new employee and fetching a list of all employees – essential building blocks for your integration. Remember, if you are using SOAP, you will authenticate your requests with an ISU user name and password, while if your are using REST, you will authenticate your requests with access tokens generated by using the OAuth refresh tokens we generated in the above steps.
In this guide, we will focus on using SOAP to construct our API requests.
First let's learn about constructing a SOAP Request Body
SOAP requests follow a specific format and use XML to structure the data. Here's an example of a SOAP request body to fetch employees using the Get Workers endpoint:
<soapenv:Envelope
xmlns:soapenv="http://schemas.xmlsoap.org/soap/envelope/"
xmlns:bsvc="urn:com.workday/bsvc">
    <soapenv:Header>
        <wsse:Security>
            <wsse:UsernameToken>
                <wsse:Username>{ISU USERNAME}</wsse:Username>
                <wsse:Password>{ISU PASSWORD}</wsse:Password>
            </wsse:UsernameToken>
        </wsse:Security>
    </soapenv:Header>
    <soapenv:Body>
        <bsvc:Get_Workers_Request xmlns:bsvc="urn:com.workday/bsvc" bsvc:version="v40.1">
        </bsvc:Get_Workers_Request>
    </soapenv:Body>
</soapenv:Envelope>
👉 How it works:
Now that you know how to construct a SOAP request, let's look at a couple of real life Workday integration use cases:
Let's add a new team member. For this we will use the Hire Employee API! It lets you send employee details like name, job title, and salary to Workday. Here's a breakdown:
curl --location 'https://wd2-impl-services1.workday.com/ccx/service/{TENANT}/Staffing/v42.0' \
--header 'Content-Type: application/xml' \
--data-raw '<soapenv:Envelope xmlns:bsvc="urn:com.workday/bsvc" xmlns:soapenv="http://schemas.xmlsoap.org/soap/envelope/">
    <soapenv:Header>
        <wsse:Security>
            <wsse:UsernameToken>
                <wsse:Username>{ISU_USERNAME}</wsse:Username>
                <wsse:Password>{ISU_PASSWORD}</wsse:Password>
            </wsse:UsernameToken>
        </wsse:Security>
        <bsvc:Workday_Common_Header>
            <bsvc:Include_Reference_Descriptors_In_Response>true</bsvc:Include_Reference_Descriptors_In_Response>
        </bsvc:Workday_Common_Header>
    </soapenv:Header>
    <soapenv:Body>
        <bsvc:Hire_Employee_Request bsvc:version="v42.0">
            <bsvc:Business_Process_Parameters>
                <bsvc:Auto_Complete>true</bsvc:Auto_Complete>
                <bsvc:Run_Now>true</bsvc:Run_Now>
            </bsvc:Business_Process_Parameters>
            <bsvc:Hire_Employee_Data>
                <bsvc:Applicant_Data>
                    <bsvc:Personal_Data>
                        <bsvc:Name_Data>
                            <bsvc:Legal_Name_Data>
                                <bsvc:Name_Detail_Data>
                                    <bsvc:Country_Reference>
                                        <bsvc:ID bsvc:type="ISO_3166-1_Alpha-3_Code">USA</bsvc:ID>
                                    </bsvc:Country_Reference>
                                    <bsvc:First_Name>Employee</bsvc:First_Name>
                                    <bsvc:Last_Name>New</bsvc:Last_Name>
                                </bsvc:Name_Detail_Data>
                            </bsvc:Legal_Name_Data>
                        </bsvc:Name_Data>
                        <bsvc:Contact_Data>
                            <bsvc:Email_Address_Data bsvc:Delete="false" bsvc:Do_Not_Replace_All="true">
                                <bsvc:Email_Address>employee@work.com</bsvc:Email_Address>
                                <bsvc:Usage_Data bsvc:Public="true">
                                    <bsvc:Type_Data bsvc:Primary="true">
                                        <bsvc:Type_Reference>
                                            <bsvc:ID bsvc:type="Communication_Usage_Type_ID">WORK</bsvc:ID>
                                        </bsvc:Type_Reference>
                                    </bsvc:Type_Data>
                                </bsvc:Usage_Data>
                            </bsvc:Email_Address_Data>
                        </bsvc:Contact_Data>
                    </bsvc:Personal_Data>
                </bsvc:Applicant_Data>
                <bsvc:Position_Reference>
                    <bsvc:ID bsvc:type="Position_ID">P-SDE</bsvc:ID>
                </bsvc:Position_Reference>
                <bsvc:Hire_Date>2024-04-27Z</bsvc:Hire_Date>
            </bsvc:Hire_Employee_Data>
        </bsvc:Hire_Employee_Request>
    </soapenv:Body>
</soapenv:Envelope>'
Elaboration:
Response:
<bsvc:Hire_Employee_Event_Response
xmlns:bsvc="urn:com.workday/bsvc" bsvc:version="string">
<bsvc:Employee_Reference bsvc:Descriptor="string">
<bsvc:ID bsvc:type="ID">EMP123</bsvc:ID>
</bsvc:Employee_Reference>
</bsvc:Hire_Employee_Event_Response>
If everything goes well, you'll get a success message and the ID of the newly created employee!
Now, if you want to grab a list of all your existing employees. The Get Workers API is your friend!
Below is workday API get workers example:
curl --location 'https://wd2-impl-services1.workday.com/ccx/service/{TENANT}/Human_Resources/v40.1' \
--header 'Content-Type: application/xml' \
--data '<soapenv:Envelope
xmlns:soapenv="http://schemas.xmlsoap.org/soap/envelope/"
xmlns:bsvc="urn:com.workday/bsvc">
<soapenv:Header>
<wsse:Security>
<wsse:UsernameToken>
<wsse:Username>{ISU_USERNAME}</wsse:Username>
<wsse:Password>{ISU_USERNAME}</wsse:Password>
</wsse:UsernameToken>
</wsse:Security>
</soapenv:Header>
<soapenv:Body>
<bsvc:Get_Workers_Request xmlns:bsvc="urn:com.workday/bsvc" bsvc:version="v40.1">
<bsvc:Response_Filter>
<bsvc:Count>10</bsvc:Count>
<bsvc:Page>1</bsvc:Page>
</bsvc:Response_Filter>
<bsvc:Response_Group>
<bsvc:Include_Reference>true</bsvc:Include_Reference>
<bsvc:Include_Personal_Information>true</bsvc:Include_Personal_Information>
</bsvc:Response_Group>
</bsvc:Get_Workers_Request>
</soapenv:Body>
</soapenv:Envelope>'This is a simple GET request to the Get Workers endpoint.
Elaboration:
Response:
<?xml version='1.0' encoding='UTF-8'?>
<env:Envelope xmlns:env="http://schemas.xmlsoap.org/soap/envelope/">
<env:Body>
<wd:Get_Workers_Response xmlns:wd="urn:com.workday/bsvc" wd:version="v40.1">
<wd:Response_Filter>
<wd:Page>1</wd:Page>
<wd:Count>1</wd:Count>
</wd:Response_Filter>
<wd:Response_Data>
<wd:Worker>
<wd:Worker_Data>
<wd:Worker_ID>21001</wd:Worker_ID>
<wd:User_ID>lmcneil</wd:User_ID>
<wd:Personal_Data>
<wd:Name_Data>
<wd:Legal_Name_Data>
<wd:Name_Detail_Data wd:Formatted_Name="Logan McNeil" wd:Reporting_Name="McNeil, Logan">
<wd:Country_Reference>
<wd:ID wd:type="WID">bc33aa3152ec42d4995f4791a106ed09</wd:ID>
<wd:ID wd:type="ISO_3166-1_Alpha-2_Code">US</wd:ID>
<wd:ID wd:type="ISO_3166-1_Alpha-3_Code">USA</wd:ID>
<wd:ID wd:type="ISO_3166-1_Numeric-3_Code">840</wd:ID>
</wd:Country_Reference>
<wd:First_Name>Logan</wd:First_Name>
<wd:Last_Name>McNeil</wd:Last_Name>
</wd:Name_Detail_Data>
</wd:Legal_Name_Data>
</wd:Name_Data>
<wd:Contact_Data>
<wd:Address_Data wd:Effective_Date="2008-03-25" wd:Address_Format_Type="Basic" wd:Formatted_Address="42 Laurel Street&#xa;San Francisco, CA 94118&#xa;United States of America" wd:Defaulted_Business_Site_Address="0">
</wd:Address_Data>
<wd:Phone_Data wd:Area_Code="415" wd:Phone_Number_Without_Area_Code="441-7842" wd:E164_Formatted_Phone="+14154417842" wd:Workday_Traditional_Formatted_Phone="+1 (415) 441-7842" wd:National_Formatted_Phone="(415) 441-7842" wd:International_Formatted_Phone="+1 415-441-7842" wd:Tenant_Formatted_Phone="+1 (415) 441-7842">
</wd:Phone_Data>
</wd:Worker_Data>
</wd:Worker>
</wd:Response_Data>
</wd:Get_Workers_Response>
</env:Body>
</env:Envelope>This JSON array gives you details of all your employees including details like the name, email, phone number and more.
Use a tool like Postman or curl to POST this XML to your Workday endpoint.
If you used REST instead, the same “Get Workers” request would look much simpler:
curl --location 'https://{host}.workday.com/ccx/api/v1/{tenant}/workers' \
--header 'Authorization: Bearer {ACCESS_TOKEN}'Before moving your integration to production, it’s always safer to test everything in a sandbox environment. A sandbox is like a practice environment; it contains test data and behaves like production but without the risk of breaking live systems.
Here’s how to use a sandbox effectively:
Ask your Workday admin to provide you with a sandbox environment. Specify the type of sandbox you need (development, test, or preview). If you are a Knit customer on the Scale or Enterprise plan, Knit will provide you access to a Workday sandbox for integration testing.
Log in to your sandbox and configure it so it looks like your production environment. Add sample company data, roles, and permissions that match your real setup.
Just like in production, create a dedicated ISU account in the sandbox. Assign it the necessary permissions to access the required APIs.
Register your application inside the sandbox to get client credentials (Client ID & Secret). These credentials will be used for secure API calls in your test environment.
Use tools like Postman or cURL to send test requests to the sandbox. Test different scenarios (e.g., creating a worker, fetching employees, updating job info). Identify and fix errors before deploying to production.
Use Workday’s built-in logs to track API requests and responses. Look for failures, permission issues, or incorrect payloads. Fix issues in your code or configuration until everything runs smoothly.
Once your integration has been thoroughly tested in the sandbox and you’re confident that everything works smoothly, the next step is moving it to the production environment. To do this, you need to replace all sandbox details with production values. This means updating the URLs to point to your production Workday tenant and switching the ISU (Integration System User) credentials to the ones created for production use.
When your integration is live, it’s important to make sure you can track and troubleshoot it easily. Setting up detailed logging will help you capture every API request and response, making it much simpler to identify and fix issues when they occur. Alongside logging, monitoring plays a key role. By keeping track of performance metrics such as response times and error rates, you can ensure the integration continues to run smoothly and catch problems before they affect your workflows.
If you’re using Knit, you also get the advantage of built-in observability dashboards. These dashboards give you real-time visibility into your live integration, making debugging and ongoing maintenance far easier. With the right preparation and monitoring in place, moving from sandbox to production becomes a smooth and reliable process.
PECI (Payroll Effective Change Interface) lets you transmit employee data changes (like new hires, raises, or terminations) directly to your payroll provider, slashing manual work and errors. Below you will find a brief comparison of PECI and Web Services and also the steps required to setup PECI in Workday
Feature: PECI
Feature: Web Services
PECI set up steps :-
Workday does not natively support real-time webhooks. This means you can’t automatically get notified whenever an event happens in Workday (like a new employee being hired or someone’s role being updated). Instead, most integrations rely on polling, where your system repeatedly checks Workday for updates. While this works, it can be inefficient and slow compared to event-driven updates.
This is exactly where Knit Virtual Webhooks step in. Knit simulates webhook functionality for systems like Workday that don’t offer it out of the box.
Knit continuously monitors changes in Workday (such as employee updates, terminations, or payroll changes). When a change is detected, it instantly triggers a virtual webhook event to your application. This gives you real-time updates without having to build complex polling logic.
For example: If a new hire is added in Workday, Knit can send a webhook event to your product immediately, allowing you to provision access or update records in real time — just like native webhooks.
Getting stuck with errors can be frustrating and time-consuming. Although many times we face errors that someone else has already faced, and to avoid giving in hours to handle such errors, we have put some common errors below and solutions to how you can handle them.
Integrating with Workday can unlock huge value for your business, but it also comes with challenges. Here are some important best practices to keep in mind as you build and maintain your integration.
Workday supports two main authentication methods: ISU (Integration System User) and OAuth 2.0. The choice between them depends on your security needs and integration goals.
If your integration is customer-facing, don’t just focus on building it , think about how you’ll launch it. A Workday integration can be a major selling point, and many customers will expect it.
Before going live, align on:
This ensures your team is ready to deliver value from day one and can even help close deals faster.
Building and maintaining a Workday integration completely in-house can be very time-consuming. Your developers may spend months just scoping, coding, and testing the integration. And once it’s live, maintenance can become a headache.
For example, even a small change , like Workday returning a value in a different format (string instead of number) , could break your integration. Keeping up with these edge cases pulls your engineers away from core product work.
A third-party integration platform like Knit can solve this problem. These platforms handle the heavy lifting , scoping, development, testing, and maintenance , while also giving you features like observability dashboards, virtual webhooks, and broader HRIS coverage. This saves engineering time, speeds up your launch, and ensures your integration stays reliable over time.
We know you're here to conquer Workday integrations, and at Knit (rated #1 for ease of use as of 2025!), we're here to help! Knit offers a unified API platform which lets you connect your application to multiple HRIS, CRM, Accounting, Payroll, ATS, ERP, and more tools in one go.
Advantages of Knit for Workday Integrations
Getting Started with Knit
REST Unified API Approach with Knit
A Workday integration is a connection built between Workday and another system (like payroll, CRM, or ATS) that allows data to flow seamlessly between them. These integrations can be created using APIs, files (CSV/XML), databases, or scripts , depending on the use case and system design.
A Workday API integration is a type of integration where you use Workday’s APIs (SOAP or REST) to connect Workday with other applications. This lets you securely access, read, and update Workday data in real time.
It depends on your approach.
Workday offers:
Workday doesn’t publish all rate limits publicly. Most details are available only to customers or partners. However, some endpoints have documented limits , for example, the Strategic Sourcing Projects API allows up to 5 requests per second. Always design your integration with pagination, retry logic, and throttling to avoid issues. The safest approach is to implement exponential backoff on all retry logic, paginate all list operations regardless of expected result size, and avoid polling intervals shorter than 5 minutes for background sync jobs. If you're consuming Workday data through Knit, rate limit management is handled automatically — Knit spaces requests and retries within Workday's thresholds so your application never hits limits directly.
Workday provides sandbox environments to its customers for development and testing. If you’re a software vendor (not a Workday customer), you typically need a partnership agreement with Workday to get access. Some third-party platforms like Knit also provide sandbox access for integration testing.
Workday supports two main methods:
Yes. Workday provides both SOAP and REST APIs, covering a wide range of data domains, HR, recruiting, payroll, compensation, time tracking, and more. REST APIs are typically preferred because they are easier to implement, faster, and more developer-friendly.
Yes. If you are a Workday customer or have a formal partnership, you can build integrations with their APIs. Without access, you won’t be able to authenticate or use Workday’s endpoints.
No, Workday does not natively support outbound webhooks - there is no mechanism to push real-time change events to an external endpoint when an employee record is created, updated, or terminated. The standard alternative is polling: querying Workday's APIs on a schedule (typically every 15–60 minutes) to detect changes. Knit solves this with virtual webhooks — when you connect Workday through Knit, you receive real-time event notifications via webhook whenever data changes in Workday, without needing to build or maintain any polling infrastructure. This is particularly valuable for use cases that require fast response to Workday events, such as automated onboarding workflows triggered by new hires or access revocation triggered by terminations.
A custom Workday integration built directly against Workday Web Services typically takes 4–12 weeks for a single integration, factoring in ISU setup, OAuth configuration, SOAP/REST endpoint selection, data model mapping, error handling, and testing in sandbox before production. That timeline doesn't include ongoing maintenance as Workday releases new API versions. Using Knit's unified API, teams can go from zero to a production Workday integration in 1–3 days - Knit handles authentication, data normalization, rate limiting, and webhook delivery, so your engineering team only needs to integrate once against Knit's normalized API rather than Workday's raw endpoints directly. See https://developers.getknit.dev for implementation guides.
Workday API is a programmatic interface that allows external applications to read and write data in Workday - including employee records, payroll data, org structures, benefits, and time tracking. Workday offers two API types: SOAP-based Web Services (the older, more comprehensive set using XML) and REST APIs (modern, JSON-based, covering a growing set of domains). Both require formal authentication through an Integration System User (ISU) or OAuth 2.0 client. For SaaS products that need to access Workday data on behalf of their customers, Knit provides a unified API that normalizes Workday's data into a consistent schema alongside 100+ other HRIS platforms.
Workday's SOAP API (Web Services) is the older, more comprehensive set - it covers virtually every Workday domain including payroll, benefits, and complex HR transactions, uses XML, and requires constructing SOAP envelopes with WS-Security headers. Workday's REST API is newer, uses JSON, supports OAuth 2.0, and is simpler to implement - but it has narrower domain coverage than the full SOAP Web Services suite. For most new integrations, start with the REST API; fall back to SOAP for payroll, compliance-critical operations, or endpoints not yet exposed via REST. Knit abstracts both API types behind a single normalized endpoint, so you don't need to choose or maintain separate implementations.
Building a Workday integration directly has no per-call API cost from Workday itself - access to the API is included with Workday licenses. The real cost is engineering time: a custom integration typically takes 4–12 weeks of developer time to build and requires ongoing maintenance as Workday updates its API. Third-party tools vary: iPaaS platforms like Workato charge per task or connection; unified APIs like Knit charge per active connection per month, with pricing that covers authentication, data normalization, rate limiting, and webhook delivery. For SaaS teams building customer-facing Workday integrations at scale, unified API pricing is typically more predictable than task-based pricing as connection volume grows.
Resources to get you started on your integrations journey
Learn how to build your specific integrations use case with Knit
.svg)
Interview scheduling companies play an integral role in helping their partner organizations hire the right talent by streamlining the candidate communication and end-to-end interview process.
The first step towards smooth interviews is getting a pool of candidates to choose from. Here, most companies rely on ATS or Application Tracking Systems to pull in candidate and job data.
While building and maintaining all the ATS integrations is a tedious and resource-intensive process, it can be made simpler and faster with unified ATS APIs. We will get to that, first let’s look at all the use cases you can enable with ATS integrations.
• ATS integration in interview scheduling workflow
• ATS integration challenges
• How interview scheduling companies can 10X their growth with unified ATS API
• What else do you get with Knit Unified API?
• FAQs
Let’s quickly look at how ATS APIs can streamline the interview scheduling workflow.
Essentially, the first step is to get the ATS integration in place leveraging popular ATS APIs. As an interview scheduling company, you can choose the appropriate approach to ATS integration via in-house integration building, embedded iPaaS, unified API or workflow automation tools.
Read: Build vs Buy: Best way to build product integrations
Once the integration setup is complete, data synchronization regarding the job requisition, interview schedule, candidate information can be commenced.
This will ensure that whenever data from a new candidate is entered in the ATS, the interview scheduling company gets an automated alert to initiate the next steps to set up the interview and following processes.
The right ATS integration approach will ensure that the interview scheduling company receives new candidate alerts automatically, without pushing for updates.
Read:How Candidate Screening Tools Can Build 30+ ATS Integrations in Two Days
ATS APIs can help interview scheduling companies with real-time calendar and interview slot coordination. Once the applicant profile screening is complete and the profile has been shortlisted in the ATS, the interview scheduling company can automatically capture this update directly from the ATS app and identify potential slots for the interview based on the calendar availability for the candidate and the interviewer.
Once the interview slot has been decided, the interview scheduling company can extract ATS API data to automate interview invitations and reminders and even personalize candidate communication as per the role, position and context.
The same information about the communication will be automatically updated in the ATS to ensure that the hiring organization using the API has a clear picture of the candidate status.
As soon as the interview is complete, the ATS API enables the interview scheduling company to update candidate status in real time.
For instance, Knit WRITE APIs enable you to update candidate status about whether or not the candidate appeared for the interview, status in the interview process (selected, rejected, moved to next round, add notes etc.). See docs
This information is then reflected in real time in the ATS to help the HR and hiring managers understand where they stand for that particular position and whether they need to source more applications.
In addition to the status update, the ATS integration also enables the interview scheduling company to provide a detailed feedback and evaluation of the interview which can be captured directly in the ATS.
In case the hiring organization prefers, they can share it with the candidate or keep it in their ATS records for future reference.
Finally, the ATS integration can help interview scheduling companies capture key hiring metrics and facilitate HR analytics.
For instance, the integration can help capture the metrics including Application-to-Interview Conversion Rate, Interview Scheduling Efficiency, Interview-to-Hire Ratio, Time-to-Fill (TTF), Time-to-Hire (TTH), Offer Acceptance Rate, etc.
Data from these metrics can help identify the gaps in the hiring process and facilitate better outcomes.
While scaling ATS integrations is crucial for any interview scheduling companies to close more deals, building and maintaining ATS integrations is not easy. Here’s why most companies struggle with scaling their integration efforts:
First, different ATS applications use different data fields, models and nuances, which may or may not be compatible with other ATS or even with the data models being used by the interview scheduling company.
This can lead to data compatibility issues leading to larger bandwidth requirements to understand and use different ATS APIs, with the danger of data corruption as well.
Second, since both sides of the data transfer contain sensitive candidate information, the ATS integration must have robust security measures for authorization and authentication as well as others like rate limiting etc. to prevent unauthorized access or DDoS attacks, among others.
With policies like GDPR and most recently the Digital Personal Data Protection (DPDP) law (in India), any data misuse can lead to serious repercussions, especially because ATS and hiring processes use a lot of personal candidate data.
Third, as you scale and onboard more customers, you will be bound to further ATS integrations to their preferred ATS application.
The engineering and maintenance costs associated with adding more ATS applications scale with each new platform you support — every additional ATS means another authentication flow, data model, and set of API quirks to build and maintain in-house. For a team supporting dozens of ATS platforms across customers, this overhead compounds quickly.
This can dilute your engineering team's bandwidth from focusing on the core product. Scalability with the growing number of ATS applications to be added can pose a resource and cost challenge.
In addition to the engineering costs, scaling ATS integrations also comes with additional coordination and cooperation with the ATS vendors.
When you are building and managing ATS integrations in-house you have to take care of coordinating with every ATS vendor in case of any error or challenge in data transfer, security, etc. This can be highly time consuming and counter productive.
Next, if you use a polling infrastructure to power your ATS integration, you will need to take care of the heavy lifting of polling data from ATS applications, dealing with different API calls and rate limits.
Invariably, this will prevent you from accessing data in real time as soon as there is any update in candidate information or a new candidate is onboarded to the system. This can lead to delays in interview scheduling and missed opportunities.
While there are certain operational challenges to using ATS integrations, unified APIs like Knit, can help address all such challenges and even achieve 10X growth.
Knit periodically pulls data from all connected ATS platforms and processes the data coming from different platforms in different formats to convert them to one unified data model.
The heavy lifting of pulling data from various ATS apps, dealing with different API calls, rate limits, formats etc are completely taken care of by Knit.
Depending on the infrastructure used, your data sync frequencies can be set. A webhook driven architecture will facilitate real time data sync without requiring you to initiate polling.
For instance, Knit, having a 100% event-driven webhook architecture, refreshes data in real time by periodically pulling data from all connected ATS platforms and processes the data coming from different platforms in different formats to convert them to our unified model. As a result, you won’t have to manage any polling infrastructure on your end or worry about missing any critical data update.
Adding an ATS integration can take anywhere from a few weeks to several months. But, with a unified API, you can add multiple ATS integrations in as little as one day.
This quick deployment ensures that you are able to leverage the benefits of ATS integration faster.
Not only is deployment faster with unified API, it also supports accelerated and unlimited scalability. You can connect with various ATS applications in one go.
For example, as an interview scheduling company, you can simply embed the Knit’s UI component in your frontend to get access to the full catalog of 30+ ATS applications, regardless of the auth type, credentials, nuances for the application.
All credential management, verification, token generations become the responsibility of Knit in this case.
Not only that, each time a new app is integrated to the Knit’s ATS API category, you get immediate access and sync capabilities with the new app without writing a single line of code. Get your Knit unified ATS API key now! (Start for free)
Reporting and analytics with a unified API like Knit can help facilitate high customer satisfaction.
For instance, Knit allows interview scheduling companies to monitor and manage the health of all ATS integrations for each connected customer using a detailed Logs, Issues, Integrated Accounts and Syncs page.
Companies can keep track of all API calls, data syncs and requests made by users as well as status of each webhook registered on a single dashboard.
A unified API helps interview scheduling companies facilitate better security and data privacy.
For instance, Knit fosters double encryption for data—when it is at rest as well as when it is in transit.
At the same time, most unified APIs comply with the key security protocols such as HIPAA, SOC2, GDPR etc and ensure constant monitoring with top intrusion detection systems. A unified API generally supports all forms of authentication like OAuth, API key or a username-password based authentication.
Note: As a unified API, Knit goes a step further to promote end user security. Knit is the only unified API which considers your data sacrosanct and doesn’t store a copy of your data. The syncs happen over a 100% webhook-based architecture for enhanced data security. Furthermore, an additional layer of application security protects and prevents all PII from any security vulnerabilities. Learn more
By providing instant ATS integration with multiple ATS applications, interview scheduling companies can leverage unified APIs to expand their market reach and acquire new customers.
They no longer have to worry about missed opportunities or make their prospects wait till they are able to build new ATS integrations.
This allows interview scheduling companies to close deals faster and serve a higher number of customers, leading to increased revenue and greater profitability.
Interview scheduling companies using Knit as their unified API for ATS integration automatically retrieve new applications from all connected ATS platforms.
Knit pulls the data and sends the relevant data to the interview scheduling tool, reducing the need for making API calls or manually starting data syncs. Owing to the webhooks architecture, Knit ensures high scalability and delivery, irrespective of the data load.
While Knit supports real time data sync, it also allows users to control when syncs happen, which can be set by the CX team directly from the dashboard, without involving engineering resources.
Furthermore, filters can be set on the information being retrieved from the source system to only consume the relevant data to save network cost and storage cost.
Staying on top of ATS integrations can be overwhelming and time consuming due to the sheer number of the ATS APIs available in the market today.
Knit helps you integrate with 30+ ATS and HR applications with a single unified API. Plus, we have built Knit with a developer friendly setup which requires minimal coding and maximum onboarding support.
If you want to know more about Knit, talk to one of our experts or try our unified ATS API yourself, today. (Getting started is completely free)
ATS integration is the process of connecting an Applicant Tracking System with other software — such as interview scheduling tools, sourcing platforms, or HRIS systems — so candidate, job, and application data flows between them automatically. Knit provides a unified ATS API that connects to 30+ ATS platforms through one integration, so an interview scheduling product can pull candidate and interview-stage data from whichever ATS a customer uses, and push scheduling updates back, without building a separate connection per platform. Without integration, this data has to be entered or updated manually in each system, which is slow and error-prone at scale.
ATS stands for ApplicantTracking System — software that recruiting teams use to post jobs, collectapplications, move candidates through interview stages, and manage offers.Examples include Greenhouse, Lever, Workday, and BambooHR. For an interview schedulingcompany, the ATS is the system of record for candidate and interview data —it's where interview stages, interviewer panels, and scheduling statustypically live. Knit's unified ATS API connects to 30+ of these platformsthrough a single integration, normalizing each one's data model into aconsistent format so a scheduling product doesn't need separate logic per ATS.
Building and maintaining a direct integration with a single ATS typically involves implementing OAuth, mapping that ATS's specific data model, and handling its rate limits and webhook support (or lack of it) — work that scales linearly with each additional ATS a product needs to support. Knit's unified ATS API removes most of this per-platform work: one integration gives an interview scheduling product access to 30+ ATS platforms through a single data model and authentication flow, with Knit handling token refresh and platform-specific quirks. The ongoing maintenance burden — adapting to each ATS's API changes — also shifts from your team to Knit's integration layer.
Interview scheduling tools most often need to integrate with the ATS platforms their customers already use for hiring — commonly Greenhouse, Lever, Workday, BambooHR, JazzHR, and Jobvite, alongside enterprise systems like SAP SuccessFactors and Oracle Taleo. Because customer bases are rarely standardized on one ATS, scheduling products typically need broad coverage rather than a single integration. Knit's unified ATS API covers 30+ of these platforms — including Greenhouse, Lever, Workday, BambooHR, and Jobvite — through one set of endpoints, so a scheduling tool can support whichever ATS a given customer runs without building platform-specific code for each one.
ATS integration lets aninterview scheduling tool automatically pull candidate details, jobrequisitions, and interview stage information directly from the ATS, instead ofrecruiters re-entering this data manually. Knit's unified ATS API delivers thisdata in real time via webhooks, so when a candidate moves to an interview stagein the ATS, the scheduling tool is notified immediately and can triggeravailability checks and calendar invites. Scheduling outcomes — confirmedinterview times, interviewer assignments, feedback — can then be written backto the ATS through Knit's write APIs, keeping the recruiter's view of thepipeline current.
Knit encrypts candidate data both at rest (AES-256) and in transit (TLS 1.3), with an additional layer of application-level encryption applied specifically to personally identifiable information. Knit is SOC 2, GDPR, and ISO 27001 compliant, and uses a pass-through architecture that avoids storing a persistent copy of customer data. For interview scheduling tools, this matters because syncing candidate names, contact details, and interview feedback between systems involves personal data subject to regulations like GDPR — so the integration layer connecting your scheduling tool to a customer's ATS needs its own verifiable security posture.
Yes — this is one of the main benefits of an event-driven ATS integration. Knit's unified ATS API runs on a webhook-based architecture, so when a candidate's stage changes in the ATS —moved to "Interview", rejected, or advanced to offer — your scheduling tool receives that event in near real time instead of polling the ATS on a schedule. For ATS platforms that don't natively support outbound webhooks, Knit provides virtual webhooks that replicate the same event-driven experience, so your scheduling product doesn't need different logic depending on which ATS a customer connects.
With Knit's unified ATS API, an interview scheduling product can get a working integration connected to a given ATS in as little as a day for straightforward setups, since Knit handles authentication, data normalization, and webhook delivery for 30+ ATS platforms out of the box. The exact timeline depends on how deeply the integration needs to map into your scheduling logic — for example, two-way sync of interview feedback or custom field mapping adds development work on your side. Knit's documentation at developers.getknit.dev covers the unified data models and read/write endpoints needed to plan that scope.
.webp)
If you want to unlock 30+ ATS integrations with a single API key, check out Knit API
With the rise of data-driven recruitment, it is imperative for each recruitment tool, including candidate sourcing and screening tools, to integrate with Applicant Tracking Systems(ATS) for enabling centralized data management for end users.
However, there are hundreds of ATS applications available in the market today. To integrate with each one of these applications with different ATS APIs is next to impossible.
That is why more and more recruitment tools are looking for a better (and faster) way to scale their ATS integrations. Unified ATS APIs are one such cost-effective solution that can cut down your integration building and maintenance time by 80%.
Before moving on to how companies can leverage unified ATS API to streamline candidate sourcing and screening, let's look at the workflow and how ATS API helps.
• Candidate sourcing and screening workflow
• How ATS API helps streamline candidate sourcing andscreening
• Addressing challenges of ATS API integration withUnified API
• Other benefits of using a Unified ATS API
• How to improve your screening workflow with Knitunified ATS API
• FAQs

Here’s a quick snapshot of the candidate sourcing and screening workflow:
Posting job requirements/ details about open positions to create widespread outreach about the roles you are hiring for.
Collecting and fetching candidate profiles/ resumes from different platforms—job sites, social media, referrals—to create a pool of potential candidates for the open positions.
Taking out all relevant data—skills, relevant experience, expected salary, etc. —from a candidate’s resume and updating it based on the company’s requirement in a specific format.
Eliminating profiles which are not relevant for the role by mapping profiles to the job requirements.
Conducting a preliminary check to ensure there are no immediate red flags.
Setting up and administering assessments, setting up interviews to ensure role suitability and collating evaluation for final decision making.
Sharing feedback and evaluation, communicating decisions to the candidates and continuing the process in case the position doesn’t close.
Here are some of the top use cases of how ATS API can help streamline candidate sourcing and screening.
All candidate details from all job boards and portals can be automatically collected and stored at one centralized place for communication and processing and future leverage.
ATS APIs ensure real time, automated candidate profile import, reducing manual data entry errors and risk of duplication.
ATS APIs can help automate screening workflows by automating resume parsing and screening as well as ensuring that once a step like background checks is complete, assessments and then interview set up are triggered automatically.
ATS APIs facilitate real time data sync and event-based triggers between different applications to ensure that all candidate information available with the company is always up to date and all application updates are captured ASAP.
Read:How to Automate Recruitment Workflows with ATS APIs and Hire Smarter
ATS APIs help analyze and draw insights from ATS engagement data — like application rate, response to job postings, interview scheduling — to finetune future screening.
ATS API can further integrate with other assessment, interview scheduling and onboarding applications enabling faster movement of candidates across different recruitment stages.
Undoubtedly, using ATS API integration can effectively streamline the candidate sourcing and screening process by automating several parts of the way. However, there are several roadblocks to integrating ATS APIs at scale, which is why many companies hold off on building this out themselves.
In the next section, we'll look at how a unified ATS API solves these common roadblocks for SaaS products looking to scale their ATS integration strategy.
Undoubtedly, using ATS API integration can effectively streamline the candidate sourcing and screening process by automating several parts of the way. However, there are several roadblocks to integrating ATS APIs at scale because of which companies refrain from leveraging the benefits that come along. Try our ROI calculator to see how much building integrations in-house can he.
In the next section we will discuss how to solve the common challenges for SaaS products trying to scale and accelerate their ATS integration strategy.
Let's discuss how the roadblocks can be removed with unified ATS API: just one API for all ATS integrations. Learn more about unified APIs here
When data is being exchanged between different ATS applications and your system, it needs to be normalized and transformed. Since the same details from different applications can have different fields and nuances, chances are if not normalized well, you will end up losing critical data which may not be mapped to specific fields between systems.
This will hamper centralized data storage, initiate duplication and require manual mapping not to mention screening workflow disruption. At the same time, normalizing each data field from each different API requires developers to understand the nuances of each API. This is a time and resource intensive process and can take months of developer time.
Unified APIs like Knit help companies normalize different ATS data by mapping different data schemas from different applications into a single, unified data model for all ATS APIs. Data normalization takes place in real time and is almost 10X faster, enabling companies to save tech bandwidth and skip the complex processes that might lead to data loss due to poor mapping.
Bonus: Knit also offers an custom data fields for data that is not included in the unified model, but you may need for your specific use case. It also allows you to request data directly from the source app via its Passthrough Request feature. Learn more
Second, some ATS API integration has a polling infrastructure which requires recruiters to manually request candidate data from time to time. This lack of automated data updation in real time can lead to delayed sourcing and screening of applicants, delaying the entire recruitment process. This can negatively impact the efficiency that is expected from ATS integration.
Furthermore, Most ATS platforms receive 1000s of applications in a matter of a few minutes. The data load for transfer can be exceptionally high at times, especially when a new role is posted or there is any update.
As your number of integrated platforms increases, managing such bulk data transfers efficiently as well as eliminating delays becomes a huge challenge for engineering teams with limited bandwidth
Knit as a unified ATS API ensures that you don’t lose out on even one candidate application or be delayed in receiving them. To achieve this, Knit works on a webhooks based system with event-based triggers. As soon as an event happens, data syncs automatically via webhooks.
Read: How webhooks work and how to register one?
Knit manages all the heavy lifting of polling data from ATS apps, dealing with different API calls, rate limits, formats etc. It automatically retrieves new applications from all connected ATS platforms, eliminating the need to make API calls or manual data syncs for candidate sourcing and screening.
At the same time, Knit comes with retry and resiliency guarantees to ensure that no application is missed irrespective of the data load. Thus, handling data at scale.
This ensures that recruiters get access to all candidate data in real time to fill positions faster with automated alerts as and when new applications are retrieved for screening.
Since the ATS and other connected platforms have access to sensitive data, protecting candidate data from attacks, ensuring constant monitoring and right permission/ access is crucial yet challenging to put in practice.
Knit unified ATS API enables companies to effectively secure the sensitive candidate data they have access to in multiple ways.
Finally, ATS API integration can be a long drawn process. It can take 2 weeks to 3 months and thousands of dollars to build integration with just a single ATS provider.
With different end points, data models, nuances, documentation etc. ATS API integration can be a long deployment project, diverting away engineering resources from core functions.
It’s not uncommon for companies to lose valuable deals due to this delay in setting up customer requested ATS integrations.
Furthermore, the maintenance, documentation, monitoring as well as error handling further drains engineering bandwidth and resources. This can be a major deterrent for smaller companies that need to scale their integration stack to remain competitive.
A unified ATS API like Knit allows you to connect with 30+ ATS platforms in one go helping you expand your integration stack overnight.
All you have to do is embed Knit’s UI component into your frontend once. All heavy lifting of auth, endpoints, credential management, verification, token generations, etc. is then taken care of by Knit.
Fortunately, companies can easily address the challenges mentioned above and streamline their candidate sourcing and screening process with a unified ATS API. Here are some of the top benefits you get with a unified ATS API:
Once you have scaled your integrations, it can be difficult to monitor the health of each integration and stay on top of user data and security threats. Unified API like Knit provides a detailed Logs and Issues dashboard i.e. a one page overview of all your integrations, webhooks and API calls. With smart filtering options for Logs and Issues, Knit helps you get a quick glimpse of the API's status, extract historical data and take necessary action as needed.
.webp)
Along with Read APIs, Knit also provides a range of Write APIs for ATS integrations so that you can not only fetch data from the apps, you can also update the changes — updating candidate’s stage, rejecting an application etc. - directly into the ATS application's system. See docs
For an average SaaS company, each new integration can take anywhere from six weeks to three months to build and deploy, with ongoing maintenance typically requiring a minimum of 10 developer hours per week per integration. Multiply that across 30+ ATS platforms - or 200, if your customer base needs it - and the in-house build-and-maintain workload adds up quickly, both in direct engineering time and in opportunity cost.
A unified ATS API like Knit absorbs most of this cost by maintaining the connections to its full catalog of ATS platforms centrally - you integrate once and get access to all of them, with Knit handling ongoing maintenance as each ATS updates its own API.
In short, an API aggregator is non negotiable if you want to scale your ATS integration stack without compromising valuable in-house engineering bandwidth.
Fetch job IDs from your users Applicant Tracking Systems (ATS) using Knit’s job data models along with other necessary job information such as departments, offices, hiring managers etc.
Use the job ID to fetch all and individual applicant details associated with the job posting. This would give you information about the candidate such as contact details, experience, links, location, experience, current stage etc. These data fields will help you screen the candidates in one easy step.
Next is where you take care of screening activities on your end after getting required candidate and job details. Based on your use case, you parse CVs, conduct background checks and/or administer assessment procedures.
Once you have your results, you can progmmatically push data back directly within the ATS system of your users using Knit’s write APIs to ensure a centralized, seamless user experience. For example, based on screening results, you can —
Thus, Knit ensures that your entire screening process is smooth and requires minimum intervention.
If you are looking to quickly connect with 30+ ATS applications — including Greenhouse, Lever, Jobvite and more — get your Knit API keys today.
You may talk to our one of our experts to help you build a customized solution for your ATS API use case.
The best part? You can also make a specific ATS integration request. We would be happy to prioritize your request.
Related reading: How to Automate Recruitment Workflows with ATS APIs and Hire Smarter · How Interview Scheduling Companies Can Scale ATS Integrations 10X Faster · ATS Integration Guide
An ATS API is the interface that an Applicant Tracking System exposes so other software can read and write recruiting data — things like job postings, candidate profiles, resumes, and application status. Knit provides a unified ATS API that sits on top of 30+ individual ATS APIs, so a candidate screening tool can pull job and applicant data through one consistent endpoint instead of learning each platform's API separately. Most ATS APIs use REST endpoints with OAuth-based authentication, and data models vary significantly between providers — a Greenhouse candidate object, for example, doesn't look like a Workday one, which is exactly the normalization problem a unified API is built to solve.
ATS integrations are connections that let an Applicant Tracking System share candidate, job, and application data with other tools — sourcing platforms, assessment providers, interview schedulers, HRIS systems, and screening software. For a candidate screening tool, this typically means pulling new applicant profiles and job requisitions from the ATS, and pushing screening results (stage updates, tags, rejections) back. Knit's unified ATS API handles this two-way sync for 30+ ATS platforms through a single integration, including authentication, data normalization, and real-time updates via webhooks, so screening tools don't have to build and maintain a separate connection for every ATS their customers use.
An ATS (Applicant Tracking System) manages the hiring pipeline for open roles — job postings, applications, resume screening, interview stages, and offers. A CRM (Candidate Relationship Management or, in sales contexts, Customer Relationship Management) is built for ongoing relationship management, such as nurturing a talent pool of passive candidates before a role even opens, or managing sales leads. In recruiting, some platforms blend both: an ATS handles active requisitions while a recruiting CRM manages the broader talent pipeline. For a candidate screening tool, the ATS is usually the primary data source, and Knit's ATS API connects to 30+ of these platforms to retrieve that data in one normalized format.
Widely used ATS platforms span from enterprise systems like Workday, Oracle Taleo, SAP SuccessFactors, and iCIMS to recruiting-focused tools like Greenhouse, Lever, JazzHR, and Workable, plus regional platforms like BambooHR, Zoho Recruit, and JobAdder. Which ATS a company uses often depends on its size, industry, and region — there's no single dominant platform across all markets. This fragmentation is the core challenge for candidate screening tools that need to support multiple customers, each potentially on a different ATS. Knit's unified ATS API currently covers 30+ of these platforms — including Greenhouse, Lever, Workday, BambooHR, and Jobvite — through one integration.
Knit's ATS API improves screening accuracy by replacing manual data entry with automated, real-time sync — candidate profiles, resumes, and job requirements flow directly from the ATS into the screening tool in a consistent format, removing the copy-paste errors and missed updates that come with manual handoffs. Because Knit normalizes data from every connected ATS into one schema, a screening tool's matching logic works against the same fields regardless of which ATS a customer uses, rather than handling 30+ different data structures. Screening results — stage updates, tags, scores — can then be written straight back into the ATS via Knit's write APIs, keeping recruiters' view of candidates current.
Knit encrypts candidate data both at rest (AES-256) and in transit (TLS 1.3), with an additional layer of application-level encryption for PII specifically. Knit is SOC 2, GDPR, and ISO 27001 compliant, and operates on a pass-through architecture — it doesn't store a persistent copy of customer data on its servers, syncing instead via a webhook-based model. For candidate screening tools, this matters because applicant data (resumes, contact details, background check results) is sensitive personal data under regulations like GDPR, so the security posture of any integration layer between your tool and your customers' ATS platforms is a real due-diligence question.
Yes — this is the core use case for a unified ATS API. Instead of building and maintaining 30 separate integrations, one per ATS your customers use, a candidate screening tool can embed Knit's unified API once and get access to 30+ ATS platforms — including Greenhouse, Lever, Workday, BambooHR, and Jobvite — through a single set of endpoints and one data model. Knit handles the authentication flow, credential storage, and data normalization differences for each platform, and new ATS platforms added to Knit's catalog become available to your tool automatically, without additional engineering work on your side.
Yes. Knit runs on a 100% event-driven, webhook-based architecture, so when a new candidate applies or an application status changes in a connected ATS, your screening tool receives that update in near real time without polling. This matters for screening workflows because delays in picking up new applicants directly translate to slower time-to-screen. For ATS platforms that don't natively support outbound webhooks, Knit provides virtual webhooks — it handles the underlying polling and delivers the same event-driven experience, so your integration code doesn't need to know which ATS platforms support webhooks natively and which don't.
You can sign up for a Knit account and get an API key for free to start testing against Knit's unified ATS API, which covers 30+ ATS platforms through one set of endpoints. Knit's documentation at developers.getknit.dev covers authentication, the unified data models for jobs, candidates, and applications, and both read and write endpoints — so you can fetch candidate and job data and push screening results back into the ATS. If you need a specific ATS that isn't yet in Knit's catalog, you can request it, and the Knit team can also walk through your specific screening workflow on a call.

Marketing automation tools are like superchargers for marketers, propelling their campaigns to new heights. Yet, there's a secret ingredient that can take this power to the next level: the right audience data.
What better than an organization's CRM to power it?
The good news is that many marketing automation tools are embracing CRM API integrations to drive greater adoption and results. However, with the increasing number of CRM systems in play, building and managing CRM integrations is becoming a huge challenge.
Fortunately, the rise of unified CRM APIs is bridging this gap, making CRM integration seamless for marketing automation tools. Before looking at the specific ways marketing automation tools can put CRM data to work, here's a quick look at what CRM API integration actually means.
A CRM API is a set of endpoints that a Customer Relationship Management platform exposes so external applications can read and write its data — contacts, deals, companies, activities, and custom fields — programmatically, instead of through the CRM's own interface.
CRM API integration is the process of connecting an external application, such as a marketing automation tool, to one or more CRM systems through these APIs so that data and triggers can flow between them automatically. For a marketing automation platform, that usually means pulling contact and deal data from the CRM to power segmentation and personalization, and pushing engagement data — email opens, campaign responses, lead scores — back into the CRM so sales has an up-to-date view of each lead.
Because every CRM structures this data differently, building and maintaining direct integrations with multiple CRMs is a significant engineering investment. A unified CRM API like Knit addresses this by normalizing these differences into a single data model and a single integration covering Knit's full catalog of CRM applications — the approach this post explores in more detail below.
Here's a quick snapshot of how CRM APIs can bring out the best of marketing automation tools, making the most of the audience data for customers.
Personalized messaging consistently outperforms generic, one-size-fits-all campaigns, and CRM integration with marketing automation tools gives users the segmentation data needed to build that personalization at scale.
Users can segment customers based on their likelihood of conversion and personalize content for each campaign. Slicing and dicing customer data — including demographics, preferences, and interactions — can further help in customizing content with higher chances of consumption and engagement. Customer segmentation powered by CRM API data can help create content that customers resonate with.
CRM integration provides the marketing automation tool with every tiny detail of every lead to adjust and customize communication and campaigns that facilitate better nurturing. At the same time, real-time updates from the CRM can help with timely marketing follow-ups for better chances of closure.
As customer data from the CRM and marketing automation tools is synced in real time, early signs of churn — like reduced engagement or changed consumer behavior — can be captured.
Real-time alerts can also be automatically updated in the CRM for sales action. At the same time, marketing automation tools can leverage CRM data to predict which customers are more likely to churn and create specific campaigns to facilitate retention.
Users can leverage customer preferences from CRM data to design campaigns with specific recommendations, and even identify opportunities for upselling and cross-selling.
For instance, customers with high engagement might be interested in upgrading their relationships, and marketing automation tools can use this information together with CRM details on historical trends to propose the best options for upselling.
Similarly, when details of customer transactions are captured in the CRM, they can be used to identify opportunities for complementary selling with dedicated campaigns — leading to a clear increase in revenue.
In most marketing campaigns, as the status of a lead changes, a new set of communication and campaigns takes over. With CRM API integration, marketing automation tools can automate the campaign workflow in real time as soon as there's a status change in the CRM — ensuring greater engagement with the lead right when their status changes.
Marketing communication after events is an important part of the sales process. With CRM integration in marketing automation tools, automated post-event communication or campaigns can be triggered based on a lead's status for attendance and participation in the event.
This facilitates a faster turnaround time for engaging customers right after the event, without delays from manual follow-ups.
CRM integration can help automatically map the source of a lead from different marketing activities — webinars, social media posts, newsletters, and more — in your CRM, helping you understand where your target audience engagement is highest.
At the same time, it can facilitate tagging leads to the right teams or individuals for follow-ups and closures. With automated lead source tracking, users can track the ROI of different marketing activities.
With CRM API integration, users can access customer preference insights to define their social media campaigns and audience. They can also customize scheduling based on a customer's geographic location from the CRM, to maximize efficiency.
With bi-directional sync, CRM API integration with marketing automation tools can enhance lead profiles. As more lead data comes in across both platforms, users get a richer, more comprehensive view of their customers — updated in real time across the CRM and the marketing tool.
Data insights from a CRM integrated with marketing automation tools can help teams build reports that analyze and track customer behavior.
This helps teams understand consumer trends, identify top-performing marketing channels, improve customer segmentation, and refine the marketing strategy for stronger engagement overall.
Put together, these ten capabilities support marketing automation across the full customer lifecycle — from a first touch captured in the CRM, through segmentation, nurturing, and lifecycle campaigns, to churn prevention and retention. The more of this data flows automatically between the CRM and the marketing automation tool, the less manual work is needed to keep campaigns aligned with where each customer actually is in their journey.
While the benefits of CRM API integration with marketing automation tools are many, there are also roadblocks along the way. Since each CRM API is different, and your customers might be using different CRM systems, building and maintaining a plethora of CRM integrations can be challenging due to:
When data is exchanged between two applications, it needs to be transformed so it's normalized, with data fields compatible across both. Since each CRM API has its own data models, syntax, and nuances, inconsistency during data transfer is a big challenge.
If data isn't correctly normalized or transformed, it can get corrupted or lost, leading to gaps in the integration. Inconsistency in data transformation and sync can also lead to sending incorrect campaigns and triggers to customers, compromising their experience.
While inconsistent data transformation is one challenge, a related concern is delays or limited real-time sync capabilities.
If data sync between the CRM and the marketing automation tool isn't happening in real time across all CRMs being used, communication with end customers can be delayed — leading to loss of interest and lower engagement.
A CRM is a hub of sensitive customer data, often governed by GDPR and other compliance regulations. Integration and data transfer are always vulnerable to security threats like man-in-the-middle attacks and DDoS, which can compromise privacy and create monetary and reputational risk.
With the increasing number of CRM applications, scalability becomes a major integration challenge. Building a direct integration with a single CRM's API is itself a meaningful engineering investment — handling that CRM's authentication, data model, rate limits, and edge cases. The challenge is that this effort doesn't scale linearly: supporting a second or third CRM means repeating much of that work against a completely different API, which either means compromising on the CRM integrations you can offer or pulling engineering bandwidth away from your core product.
Moreover, as the number of integrated CRM systems grows, the volume of API calls and data exchange grows with it — leading to delays in data sync and real-time updates as load increases. Scalability inevitably becomes a challenge.
Managing and maintaining integrations is a challenge in itself. When end customers are using integrations, issues that require immediate action are likely to come up.
At the same time, maintaining detailed logs and manually tracking API calls and syncs is tedious — and any lag here can affect the entire integration system.
Finally, when integrating with different CRM APIs, managing the CRM vendors themselves is a challenge. Understanding API updates, managing different endpoints, ensuring zero downtime, handling errors, and coordinating with each vendor's response team is highly operational and time-consuming.
Don't let the challenges above stop you from realizing the benefits described earlier in this post. A unified CRM API like Knit's can help you access those benefits without the operational overhead.
If you want to understand the technical details of how a unified API works, this will help.
A unified CRM API makes it possible to integrate with marketing automation tools within minutes rather than the weeks or months that direct integrations typically take.
At the same time, it enables connecting with multiple CRM applications in one go. With Knit, marketing automation tools simply embed Knit's UI component in their frontend to get access to Knit's full catalog of CRM applications.
Beyond the unified API itself, Knit's Integrations Agent lets you build CRM-to-marketing-automation workflows by describing them in plain English — no integration code required. It supports two kinds of workflows: data sync (keeping records aligned between a CRM and a marketing automation tool) and orchestration (multi-step automations triggered by an event).
In a marketing context, this could look like:
These workflows run on the same normalized CRM data model described throughout this post, so they work the same way across Knit's full catalog of CRM applications — for marketing teams who'd rather configure an automation than wait on an integration backlog.
A unified CRM API can address data transformation and normalization challenges easily. With Knit, different data models, nuances, and schemas across CRM applications are mapped into a single, unified data model — enabling data normalization in real time.
At the same time, Knit lets you map custom data fields to access non-standard data.
The right unified CRM API can help you sync data in real time, without your team having to build and maintain polling logic for every CRM.
Knit syncs data via event-based webhooks rather than scheduled polling — when a record changes in a CRM, Knit detects the update and pushes it to the marketing automation tool in real time, already normalized into a single data model. For CRM platforms that don't natively support webhooks, Knit provides virtual webhooks that replicate this real-time behavior, so the marketing automation tool doesn't need to know which CRMs support webhooks natively and which don't — or build any polling, rate-limit handling, or normalization logic itself.
This ensures that as soon as a customer's details are updated in the CRM, the associated campaigns or triggers are automatically set in motion.
There can be multiple CRM updates within a few minutes, and as data load increases, a unified CRM API helps ensure guaranteed data sync in real time. With Knit, built-in retry mechanisms add resilience so marketing automation tools don't miss CRM updates even at scale — since every lead matters.
You can also configure sync frequency to suit your needs.
With a unified CRM API, you only need to integrate once. Once you embed the UI component, every time a new CRM application is added to Knit's catalog, you can access it automatically — with sync capabilities — without spending any engineering capacity from your team.
This lets you scale in the most resource-light and efficient way, without diverting engineering productivity from your core product. From a data sync perspective too, a unified CRM API ensures guaranteed scalability, regardless of data load.
One of the biggest concerns around security and vulnerability to cyberattacks can be addressed with a unified CRM API. Here's how Knit approaches it:
Finally, integration management — making sure all your CRM APIs are healthy — is well taken care of by a unified CRM API.
Finally, when you're using a unified API, you don't have to deal with multiple vendors, endpoints, and so on — the heavy lifting is handled by the unified CRM API provider.
With Knit, you get access to 24/7 support to securely manage your integrations, along with detailed documentation, guides, and product walkthroughs for your developers and end users.
What is CRM API integration?
CRM API integration is the process of connecting an external application — such as a marketing automation tool — to one or more CRM systems through their APIs, so that records like contacts, deals, and activities can flow between the two systems automatically. Knit provides a unified CRM API that normalizes this connection across its full catalog of CRM platforms, so a marketing automation tool integrates once instead of building a separate connection for each CRM. In practice, this means pulling CRM data into the marketing tool for segmentation and personalization, and pushing engagement data back into the CRM so sales has an up-to-date view of each lead.
What is a CRM API?
A CRM API is a set of endpoints that a Customer Relationship Management platform exposes so other applications can read and write its data — contacts, companies, deals, activities, and custom fields — without going through the CRM's own interface. Knit's unified CRM API sits on top of these individual CRM APIs and normalizes their differences into a single data model and a single integration. Most CRM APIs support core objects like contacts and deals, use OAuth, API key, or username/password authentication, and increasingly offer webhooks for real-time updates — though support varies significantly by provider.
What's an example of CRM API integration in marketing automation?
A common example is lead-stage syncing: when a lead's status changes in the CRM — say from "Qualified" to "Customer" — a CRM API integration can automatically move that contact into a different marketing automation segment, stop one email sequence, and start another, such as an onboarding campaign. With Knit's unified CRM API, this kind of integration is built once against a single normalized data model and works the same way across every CRM in Knit's catalog, rather than being rebuilt for each CRM a marketing automation platform's customers might use. Knit's Integrations Agent can also build this kind of workflow directly from a plain-English description, without integration code.
Does Knit support integrating with multiple CRM platforms through one API?
Yes — Knit's unified CRM API connects to its full catalog of CRM platforms through a single integration, normalizing each provider's data model (contacts, companies, deals, activities) into one consistent format. Instead of building and maintaining separate integrations for each CRM your customers use — each with its own authentication, data structure, and rate limits — you integrate once against Knit's API and gain access to every supported CRM, with new platforms added over time. Custom fields are preserved for CRM-specific data that doesn't fit the standard model. This is particularly useful for marketing automation, sales engagement, and martech platforms whose customers each use a different CRM.
How does a unified CRM API keep marketing automation tools in sync with CRM data in real time?
Knit keeps CRM and marketing automation data in sync through event-based webhooks rather than scheduled polling — when a record changes in the CRM, Knit detects the update and pushes it to the marketing automation tool in real time, already normalized into a single data model. For CRM platforms that don't natively support webhooks, Knit provides virtual webhooks that replicate this real-time behavior, so the marketing automation tool doesn't need to build or maintain any polling logic itself. This is what allows a status change in the CRM — say, a lead becoming a customer — to trigger a campaign change in the marketing tool within moments rather than on the next sync cycle.
Is Knit free to get started with for CRM integrations?
Yes — getting started with Knit's unified CRM API is free. You can sign up, get API keys, and start testing integrations with CRM platforms in Knit's catalog without any upfront cost. This lets a marketing automation team or product team validate that Knit's data model and sync behavior fit their use case before committing to a paid plan for production usage at scale. For teams evaluating whether to build direct CRM integrations or use a unified API, this makes it straightforward to prototype a CRM-to-marketing-automation workflow — including ones built through Knit's Integrations Agent — before any commercial discussion.
How secure is customer data when using a unified CRM API like Knit?
Knit is the only unified API in the market that doesn't store a copy of your end users' CRM data — it operates as a pass-through proxy, processing data on its servers and sending it directly to your application via webhooks. All data Knit processes is encrypted with AES-256 at rest and TLS 1.3 in transit, with an additional layer of application-level encryption for PII and credentials. Knit is also SOC2, GDPR, and ISO27001 certified, with continuously monitored infrastructure and 24/7 support. For marketing automation platforms handling customer contact and engagement data, this means that data isn't sitting in a second database you also have to secure.
Can marketing teams build CRM workflow automations without writing integration code?
Yes — Knit's Integrations Agent lets you build CRM-to-marketing-automation workflows by describing them in plain English; it connects the relevant tools, configures the workflow, and makes it live without requiring integration code. It supports both data-sync workflows (for example, keeping contact records aligned between a CRM and a marketing automation tool) and orchestration workflows (for example, when a lead's stage changes to "Customer" in the CRM, automatically add them to an onboarding sequence and notify the marketing team on Slack). The Agent runs on the same normalized CRM data model as Knit's Unified API, so it works consistently across every CRM in Knit's catalog.
If you're looking to integrate multiple CRM APIs with your product, get your Knit API keys and see the unified API in action — getting started with Knit is completely free.
You can also talk to one of our experts to see how Knit can be customized to solve your specific integration challenges.
Developer resources on APIs and integrations

Note: This is a part of our API Security series where we solve common developer queries in detail with how-to guides, common examples, code snippets and a ready to use security checklist. Feel free to check other articles on topics such as authentication methods, rate limiting, API monitoring and more.
Using third-party APIs - unified API providers, workflow automation tools, and integration platforms - is standard practice for B2B SaaS products. But every third-party API you integrate becomes part of your security perimeter. A provider's breach can be your breach. Their compliance failures can be your audit findings.
This guide covers the specific security criteria to evaluate before integrating any third-party API provider, the questions to ask, and the risk mitigation practices to implement once you do.
Before walking through each criterion in detail, here is the full checklist for quick reference. Use this when evaluating any new API provider.
Before integrating a third-party API into your system; you should ensure they're trustworthy and won't compromise your security. Here’s what you need to ensure:
Start with publicly available information. Search for the provider's name alongside "security breach", "data incident", or "CVE". Review their security page, trust centre, or compliance documentation. Check whether they have disclosed past incidents and, if so, how they handled them — the quality of incident response matters as much as the absence of incidents.
Specific things to look for:
/security page with verifiable details (not just marketing language)Note: Knit is one of the only unified API in the market today that does not store a copy of your end user’s data thus ensuring the maximum security while fetching and syncing data. Learn more
A provider with serious security practices documents them thoroughly. Look for:
Red flags: vague claims like "we use industry-standard encryption" without specifics, or security documentation that has not been updated in over a year.
Do not wait until after integration to assess security. Before going live:
Compliance certifications are evidence of third-party audited security controls. The certifications that matter for B2B SaaS integrations:
Ask for the actual certificates, not just a checkbox on a webpage. Certificates include issuance dates and scope - both matter.
Weak authentication in a third-party API is a direct attack surface. Evaluate:
Verify both channels of encryption:
Rate limiting protects both you and the provider from abuse and denial-of-service conditions. Ask:
If a provider has no rate limiting at all, that is a reliability and security risk — it means a bug in your integration code could spike your spend and potentially affect other customers on shared infrastructure.
A security incident with your provider is a matter of when, not if. Before integrating:
Even after a thorough evaluation, implement these controls on your side:
API gateway as intermediary: Route all third-party API calls through an internal API gateway or proxy. This lets you add request logging, rate limiting, and authentication enforcement that supplements the provider's own controls.
Credential management: Store API keys in a secrets manager (HashiCorp Vault, AWS Secrets Manager, GCP Secret Manager) — never in code or environment variables in plaintext. Implement automated rotation wherever the provider supports it.
Data validation on ingress: Validate and sanitize all data received from third-party APIs before processing it. Do not assume that data from a trusted provider is free of injection payloads or malformed structures.
Continuous monitoring: Log all outbound API calls to third-party providers — endpoint, request size, response code, response time. Alert on anomalous patterns: unexpected data volumes, unusual error rates, calls to endpoints your integration does not normally use.
Dependency and supply chain monitoring: Use software composition analysis (SCA) tools to track the provider's client SDK if you use one. Known vulnerabilities in third-party SDKs (CVEs) can become your vulnerabilities if you do not update.
Fallback and graceful degradation: Plan for provider outages. Implement circuit breakers and fallback logic so that a third-party API failure degrades gracefully rather than propagating as an error through your product.
Regular access reviews: Audit which API keys are active quarterly. Revoke any key that is no longer in use.
If you are evaluating Knit as a unified API provider, here is the relevant security posture:
Pass-through architecture: Knit does not store or copy your end users' data. When your application calls Knit to fetch employee records, CRM contacts, or financial data, the request flows through Knit to the source system and the response flows directly back. No data is persisted in Knit's infrastructure between API calls.
Encryption: All data in transit is encrypted with TLS 1.3. Data at rest uses AES-256. PII fields receive additional app-level encryption.
Certifications: Knit is SOC2 Type II certified, GDPR compliant (with a Data Processing Agreement available), and ISO27001 certified.
Access scoping: Knit MCP Servers and API credentials can be scoped to specific apps and specific tools — your integration only accesses what you explicitly configure.
If you are looking for a unified API provider that takes API and data security seriously, you can try Knit. It doesn’t store any of your user data and uses the latest tools to stay on top of any potential issues while complying with security standards such as SOC2, GDPR, and ISO27001.
Get your API keys or talk to our experts to discuss your customization needs
What are the most important certifications to require from a third-party API provider?
Knit holds SOC2 Type II, GDPR (Article 28), and ISO27001 certifications — the three most commonly required by enterprise buyers for B2B SaaS integrations. For US customers, SOC2 Type II is the baseline. For EU data processing, a GDPR-compliant DPA is required. For international enterprise deals, ISO27001 is often expected. Always verify Type II for SOC2 — Type I only verifies controls exist at a point in time, not that they work continuously. Ask for the actual certificate with issuance date, not a checkbox.
What is the OWASP API Security Top 10 and why does it matter for evaluating providers?
The OWASP API Security Top 10 is the industry-standard framework for API security risks, maintained by the Open Web Application Security Project and updated in 2023. The top risks include Broken Object Level Authorization (BOLA), Broken Authentication, Broken Object Property Level Authorization, Unrestricted Resource Consumption, and Broken Function Level Authorization. When evaluating a provider, asking whether their security practices address the OWASP Top 10 is a fast way to assess maturity — providers with serious security programs will know the framework and can explain their controls.
How do I check if a third-party API is using strong encryption?
Check for HTTPS enforcement on all endpoints (HTTP should redirect to HTTPS, not just work alongside it). Ask explicitly which TLS version is used — TLS 1.3 is the current standard; TLS 1.0 and 1.1 have known vulnerabilities and should be disabled. For data at rest, AES-256 is the current standard. Ask what is stored and for how long — providers that log API request and response payloads indefinitely have a larger encryption surface area than those that do not store payload data.
What should I look for in a provider's incident response plan?
Key elements: a documented notification timeline (GDPR requires 72 hours for EU data breaches; many enterprise contracts require 24–48 hours), a named security contact or security@domain.com address, a responsible disclosure program for external researchers, and a record of how past incidents were handled. Ask whether the provider has experienced a breach — and if so, how they notified customers. The quality of disclosure often matters more than the incident itself.
Should I require penetration testing results from my API provider?
For any integration that handles personal data, financial data, or sensitive business records, yes. Ask when the last third-party penetration test was conducted and by which firm. Annual pen tests by an accredited third party are the minimum bar for enterprise-grade providers. Some providers publish pen test executive summaries or will share them under NDA. If a provider cannot confirm they have had a third-party pen test in the last 12 months, treat that as a significant risk signal.
What are the three pillars of API security?
The three pillars of API security are governance, testing, and continuous validation. Governance covers defining security policies, access controls, and compliance requirements. Testing covers penetration testing, vulnerability assessments, and running API calls against the OWASP Top 10 attack patterns. Continuous validation covers runtime monitoring, anomaly detection, and alerting on unexpected API behavior in production. When evaluating a third-party provider, you are assessing all three pillars — not just whether they have certifications, but whether they test continuously and have operational controls in place.
What is the difference between SOC2 Type I and SOC2 Type II?
SOC2 Type I is a point-in-time assessment: auditors verify that the right security controls exist on a specific date. SOC2 Type II is an audit over a period (typically 6–12 months): auditors verify that the controls are operating effectively over time. Type II is substantially stronger evidence. When a provider says "we're SOC2 compliant," always ask which type. Most enterprise procurement checklists and enterprise contracts require Type II. Ask for the certificate, which shows the audit period covered.
How does Knit's pass-through architecture reduce third-party API security risk?
Knit uses a pass-through architecture — your end users' data is not stored or copied within Knit's infrastructure. When your application calls Knit to fetch an employee record or CRM contact, the data flows from the source system through Knit directly to your application and is not persisted between calls. This significantly reduces the data breach exposure surface compared to providers that store normalized copies of your customers' data. Knit is SOC2 Type II certified, GDPR compliant with a Data Processing Agreement, and ISO27001 certified. All data in transit uses TLS 1.3; data at rest uses AES-256.

Note: This is a part of our series on API Pagination where we solve common developer queries in detail with common examples and code snippets. Please read the full guide here where we discuss page size, error handling, pagination stability, caching strategies and more.
Page size — the number of records returned per API request - is one of the most consequential configuration decisions in a paginated API. Too small, and consumers make hundreds of unnecessary requests to retrieve a full dataset. Too large, and you risk timeout errors, memory pressure on your server, and slow response times that break client-side rendering.
There is no universal right answer, but there are clear frameworks for finding the right answer for your specific case.
In a paginated API, page size (also called limit, per_page, or size depending on the API) controls how many records are returned per request. The consumer increments a page or cursor to retrieve subsequent batches.
GET /employees?page=1&per_page=50
GET /employees?page=2&per_page=50
Your job as the API designer is to pick a sensible default, enforce a safe maximum, and let consumers override the default within that ceiling.
The size and structure of individual records is the first variable to nail down.
Small, flat records (IDs, names, status fields — 1–5 KB each): you can safely return 100–200 per page without straining response payload sizes.
Typical business records (employee profiles, CRM contacts, support tickets — 5–20 KB each, with some nesting): 25–100 per page is the practical range for most APIs.
Complex or deeply nested records (job applications with embedded assessments, financial transactions with line items — 20–50+ KB each): keep page size at 10–25 to avoid response payloads exceeding 1–2 MB.
Media metadata or documents (large embedded blobs, rich-text fields): 5–20 per page, and consider whether the heavy fields should be excluded from list endpoints entirely and fetched only on individual record calls.
A fast check: multiply your average record size by your intended page size. If the math produces a payload above 2 MB, reduce the page size.
Network conditions vary significantly across your consumer base:
Larger pages put more load on your database and API server per request. Key considerations:
Database query cost: a LIMIT 500 query scans and returns 10x more rows than LIMIT 50. For indexed queries on normalized tables this is often acceptable; for complex joins or aggregations, the cost multiplies fast.
Memory allocation: each in-flight large-page request holds the full result set in memory until serialization completes. Under concurrent load, this can spike memory usage substantially.
Timeout risk: if a consumer requests a very large page on a slow query, the request may time out partway through. Set your max page size conservatively and enforce it server-side - do not trust the consumer to be reasonable.
Test at realistic data volumes, not dev-environment datasets with 500 rows. A query that runs in 50ms against 500 rows may take 4 seconds against 5 million.
Always allow consumers to specify page size. A fixed page size optimized for browser pagination is wrong for a batch sync job, and vice versa. Expose a parameter:
GET /contacts?page=2&per_page=100Enforce a ceiling. Even with consumer control, set a maximum the server will honor. A request for per_page=10000 should either be rejected with a 400 or silently capped at your maximum.
Return pagination metadata. Consumers should not have to guess whether there are more pages:
{
  "data": [ ... ],
  "pagination": {
    "page": 2,
    "per_page": 50,
    "total_records": 1247,
    "total_pages": 25,
    "next_page": 3,
    "next_cursor": "eyJpZCI6MTAwfQ"
  }
}
total_records and total_pages let consumers pre-allocate storage and report progress. next_cursor supports cursor-based consumers even alongside page-based navigation.
Based on common API design patterns and real-world benchmarks:
How major APIs set page size in practice:
The range across real-world APIs is wide. Your defaults should reflect your specific query patterns, not what another API does.
Don't pick a page size based on intuition alone. Before shipping:
A common finding: developers set a conservative default of 25 and discover their largest consumer is using ?per_page=25& in a loop making 400 requests to sync 10,000 records. A default of 200 with a max of 1000 would have served them better.
If you are integrating with third-party APIs — HRIS platforms, CRMs, ATS systems, accounting software — you are on the other side of the equation. You do not control the page size. You adapt to whatever the upstream API enforces.
The problem: every platform is different.
page, offset, cursor, pageToken, next)When you are building integrations across multiple platforms, you end up maintaining separate pagination logic for each - correctly handling each platform's parameters, response format, and edge cases (missing total counts, inconsistent last-page detection, cursor invalidation).
Knit's unified API abstracts this. When your application calls Knit to fetch employee data, Knit handles pagination internally against whatever HRIS platform the customer has connected — Workday, BambooHR, Darwinbox, ADP, HiBob, and 150+ others. Your code makes a single normalized request; Knit handles per-platform pagination and returns a complete, consistent dataset.
What is a good default page size for a REST API?
Knit's unified API uses 25–100 records per page as a default for most business data endpoints — a range that works well for typical employee, contact, or ticket records. For your own API, 25–50 is a safe starting default for business records: small enough to keep response times under 500ms in most configurations, large enough to be useful for consumers who need moderate data volumes. Adjust up or down based on your actual record sizes and database query performance at those sizes.
What is the difference between limit/offset and cursor-based pagination?
Limit/offset pagination uses numeric page and size parameters (?page=2&per_page=50) and is easy to implement and understand. Its weakness: if records are added or deleted between requests, the offset shifts and consumers may see duplicate or skipped records. Cursor-based pagination returns an opaque token pointing to the position after the last returned record; the next request passes the token instead of a page number. Cursors are stable under inserts and deletes and are the standard choice for real-time feeds or frequently updated datasets. Knit uses cursor-based pagination internally when connecting to platforms that support it, falling back to offset where cursors are unavailable.
Should I let API consumers set their own page size?
Yes — always allow consumers to specify a page size via a parameter. Different consumers have legitimately different needs: a batch sync job benefits from large pages (200–500), while a UI component loading records for display benefits from smaller pages (10–25). Enforcing a fixed page size that fits your average case will be wrong for your edge cases. Set a maximum ceiling the server enforces, and document both the default and the maximum clearly.
What happens if I set my API page size too large?
Large page sizes increase response payload size, server memory allocation per request, and database query execution time. Under concurrent load, multiple simultaneous large-page requests can spike memory usage and trigger timeout errors. Consumers who receive very large responses may hit client-side memory limits or parsing timeouts, especially in mobile environments. If your API has no max ceiling, a single malicious or misconfigured consumer can send ?per_page=100000 and effectively run a denial-of-service attack against your database. Always enforce a server-side maximum.
How do I paginate through all records in a REST API?
The standard pattern: start at page 1, request your target page size, and loop until the response contains fewer records than the page size (or a next cursor/link is absent). In Python:
all_records = []
page = 1
per_page = 100

while True:
    response = requests.get(
        "https://api.example.com/employees",
        params={"page": page, "per_page": per_page},
        headers={"Authorization": f"Bearer {token}"}
    )
    batch = response.json().get("data", [])
    all_records.extend(batch)

    if len(batch) < per_page:
        break  # Last page reached
    page += 1
When integrating with multiple third-party platforms, Knit handles this pagination loop for you — your application calls a single Knit endpoint and receives the full, normalized dataset without implementing per-platform pagination logic.
What is cursor-based pagination and when should I use it?
Cursor-based pagination replaces the page number with a pointer (cursor or token) to the position after the last returned record. Instead of ?page=3&per_page=50, the consumer sends ?cursor=eyJpZCI6MTUwfQ&per_page=50. The server returns the next batch starting after that position. Use cursor-based pagination when your dataset is updated frequently (new records inserted, existing records deleted) — offset-based pagination is unstable under these conditions and will produce duplicate or missed records between page requests. For static or infrequently updated datasets, offset is simpler and perfectly adequate.
How do major APIs like GitHub and Stripe set their page sizes?
GitHub's REST API defaults to 30 records per page with a maximum of 100. Stripe defaults to 10 with a maximum of 100. Zendesk fixes page size at 100 with no consumer override. Salesforce allows up to 2000 records per query — tuned for bulk data access rather than interactive pagination. HubSpot caps at 100 per endpoint. The wide variance reflects each platform's data model, typical use case, and database architecture. When you integrate with multiple of these APIs (as most B2B products do), you need pagination logic customized for each. Knit normalizes this across 150+ platforms so your integration code handles none of it directly.
How does Knit handle pagination when fetching data from third-party HRIS or CRM platforms?
Knit handles all pagination internally against the upstream SaaS platform — including per-platform page size limits, cursor management, offset handling, and last-page detection. When your application calls Knit's unified API to fetch employee records from Workday, BambooHR, or any of 150+ connected platforms, Knit iterates through all pages of the upstream API response and returns the complete, normalized dataset. Your integration code does not need to implement or maintain platform-specific pagination logic.
If your application integrates with HRIS, CRM, ATS, or accounting platforms, Knit handles pagination, authentication, rate limiting, and data normalization across 150+ business apps — so you do not manage any of it per-platform.
AI agents are only as useful as the business systems they can touch. An agent that can reason about your data but cannot update a CRM record, create a support ticket, or sync an employee record has limited real-world value.
Combining n8n's native MCP Client nodes with Knit MCP Servers solves this directly. Your agents get secure, pre-authenticated access to 150+ business apps — Salesforce, HubSpot, BambooHR, QuickBooks, Zendesk — ithout you managing OAuth flows, API versioning, or rate limit handling for each one.
This tutorial covers everything you need to build functional AI agents that integrate with your existing business stack:
By following this guide, you'll build an agent that can search your CRM, update contact records, and automatically post summaries to Slack.
The Model Context Protocol (MCP) creates a standardized way for AI models to interact with external tools and data sources. It's like having a universal adapter that connects any AI model to any business application.
n8n'sbuilt-in AI Agent node includes native MCP support through two node types, availablefrom the node panel without any additional packages:
MCP Client Tool Node: Connects your AI Agent to external MCP servers, enabling actions like "search contacts in Salesforce" or "create ticket in Zendesk"
MCP Server Trigger Node: Exposes your n8n workflows as MCP endpoints that other systems can call
This architecture means your AI agents can perform real business actions instead of just generating responses.
n8n also works in reverse: the MCP Server Trigger node lets you expose any n8n workflow asan MCP endpoint that other AI clients can call — turning your automations into callabletools for Claude Desktop, Cursor, or any other MCP-compatible host.
This guide covers the most common use case: using n8n as the MCP client, with Knit as the MCP server for your business app integrations.
Building your own MCP server sounds appealing until you face the reality:
Knit MCP Servers eliminate this complexity:
✅ Ready-to-use integrations for 150+ business applications
✅ Bidirectional operations – read data and write updates
✅ Enterprise security with compliance certifications
✅ Instant deployment using server URLs and API keys
✅ Automatic updates when SaaS providers change their APIs
Log into your Knit account and navigate to the MCP Hub. This centralizes all your MCP server configurations.
Click "Create New MCP Server" and select your apps :
Choose the exact capabilities your agent needs:
Click "Deploy" to activate your server. Copy the generated Server URL - – you'll need this for the n8n integration.
Create a new n8n workflow and add these essential nodes:
In your MCP Client Tool node:
Your system prompt determines how the agent behaves. Here's a production example:
You are a lead qualification assistant for our sales team.

When given a company domain:
1. Search our CRM for existing contacts at that company
2. If no contacts exist, create a new contact with available information
3. Create a follow-up task assigned to the appropriate sales rep
4. Post a summary to our #sales-leads Slack channel

Always search before creating to avoid duplicates. Include confidence scores in your Slack summaries.
Run the workflow with sample data to verify:
Trigger: New form submission or website visitActions:
Trigger: New support ticket createdActions:
Trigger: New employee added to HRISActions:
Trigger: Invoice status updates
Actions:
Start with 3-5 essential tools rather than overwhelming your agent with every possible action. You can always expand capabilities later.
Structure your prompts to accomplish tasks in fewer API calls:
Add fallback logic for common failure scenarios:
Store all API keys and tokens in n8n's secure credential system, never in workflow prompts or comments.
Limit MCP server tools to only what each agent actually needs:
Enable comprehensive logging to track:
Problem: Agent errors out even when MCP server tool call is succesful
Solutions:
Error: 401/403 responses from MCP server
Solutions:
Problem: The AI Agent connects but reports no tools available, or shows an error discovering tools from the MCP server.
Solutions
- Verify the server URL ends with the correct path - Knit server URLs follow the pattern: https://mcp.getknit.dev/server/{your-server-id}
- Confirm theAPI key is in the Authorization header as "Bearer {your-api-key}" -not as a query parameter or basic authcredential
- Check thatthe MCP server is deployed (green status) in your Knit MCP Hub
- If tools recently changed, refresh the MCP Client Tool node's tool list by re-saving the node configuration
Use n8n's MCP Server Trigger node to expose your own workflows as MCP tools. This works well for:
However, for standard SaaS integrations, Knit MCP Servers provide better reliability and maintenance.
Connect multiple MCP servers to single agents by adding multiple MCP Client Tool nodes. This enables complex workflows spanning different business systems.
A: Knit MCP Servers provide the simplest setup path for n8n. Deploy a server from mcphub.getknit.dev, copy the generated Server URL and API key. In your n8n workflow, add an MCP Client Tool node to your AI Agent, paste the Server URL as the endpoint, and add the API key as a Bearer token in the Authorization header. n8n automatically discovers all available tools from the Knit server — no manual toolconfiguration required. The full setup takes under five minutes.
A: Yes —n8n's MCP Server Trigger node lets you expose any n8n workflow as an MCP endpoint that AI clients like Claude Desktop or Cursor can call. Knit MCP Servers complement this: if your n8n-based MCP server needs to read or write data from Salesforce, BambooHR, QuickBooks, or 150+ other business apps, Knit handles those API connections so you do not need to build individual integrations into your n8n workflow .Use n8n for business logic orchestration, Knit for data access.
A: Add an MCP Client Tool node as a sub-node attached to your AI Agent node in n8n. Knit MCP Servers expose named tools such as "search_contacts", "create_ticket", or "get_employee_by_id" - the node discovers these automatically from the server URL. Once connected, the AI Agent decides which tool to call based on the task in its system prompt. You do not wire tools manually; the agent handles tool selection and sequencing based on the prompt instructions you write.
A: n8n supports MCP in two directions: as a client (using the MCP Client Tool node to connect to servers like Knit) and as a server (using the MCP Server Trigger node to expose n8n workflows as callable tools). Knit MCP Servers give n8n's client mode instant access to 150+ enterprise apps — HRIS, CRM, ATS, and accounting platforms — without building individual API integrations. For the reverse direction, n8n's own MCP Server capability is natively built into recent n8n versions.
A: Yes. The MCP Server Trigger node in n8n lets you define any workflow as a tool that MCP-compatible AI clients can discover and call. Knit is complementary: use n8n to expose your custom business logic as MCP tools, and pair it with Knit MCP Servers when those tools need to read or write data from third-party SaaS apps. This hybrid pattern — n8n as orchestrator, Knit as data access layer — is the most common production architecture for enterprise AI agents.
A: Yes —n8n's MCP Client Tool node connects to any remote MCP server via HTTP+SSE transport.Knit MCP Servers are fully remote, cloud-hosted endpoints. You connect by pastingthe server URL and adding your API key as a Bearer token in the node settings. No local server installation or ngrok tunneling required — Knit handles the hosting,scaling, and uptime of the server infrastructure.
A: No codingis required for standard MCP workflows in n8n. Knit MCP Servers provide pre-configured tool definitions that the MCP Client Tool node discovers automatically— you do not write tool schemas or API handlers. The entire setup uses n8n'svisual canvas: drag-and-drop nodes, paste the Knit server URL, and write plain-English system prompts for the AI Agent. Custom business logic can be added visuallyusing n8n's other node types without any JavaScript or Python.
A: Knit MCP Server pricing scales by the number of servers and integrations — see getknit.dev/pricing for current rates. n8n offers a free self-hosted tier for developmentuse, with cloud plans starting around $20-50/month depending on workflowvolume and team size. For most B2B automation use cases, the combined cost issubstantially lower than the engineering time required to build and maintain direct APIintegrations to each platform individually.
The combination of n8n and Knit MCP Servers transforms AI from a conversation tool into a business automation platform. Your agents can now:
Instead of spending months building custom API integrations, you can:
Ready to build agents that actually work? Start with Knit MCP Servers and see what's possible when AI meets your business applications.
Deep dives into the Knit product and APIs

Are you in the market for Nango alternatives that can power your API integration solutions? In this article, we’ll explore five top platforms—Knit, Merge.dev, Apideck, Paragon, and Tray Embedded—and dive into their standout features, pros, and cons. Discover why Knit has become the go-to option for B2B SaaS integrations, helping companies simplify and secure their customer-facing data flows.
Nango is an open-source embedded integration platform that helps B2B SaaS companies quickly connect various applications via a single interface. Its streamlined setup and developer-friendly approach can accelerate time-to-market for customer-facing integrations. However, coverage is somewhat limited compared to broader unified API platforms—particularly those offering deeper category focus and event-driven architectures.
Nango also relies heavily on open source communities for adding new connectors which makes connector scaling less predictable fo complex or niche use cases.
Pros (Why Choose Nango):
Cons (Challenges & Limitations):
Now let’s look at a few Nango alternatives you can consider for scaling your B2B SaaS integrations, each with its own unique blend of coverage, security, and customization capabilities.

Overview
Knit is a unified API platform specifically tailored for B2B SaaS integrations. By consolidating multiple applications—ranging from CRM to HRIS, Recruitment, Communication, and Accounting—via a single API, Knit helps businesses reduce the complexity of API integration solutions while improving efficiency. See how Knit compares directly to Nango →
Key Features
Pros

Overview
Merge.dev delivers unified APIs for crucial categories like HR, payroll, accounting, CRM, and ticketing systems—making it a direct contender among top Nango alternatives.
Key Features
Pros
Cons

Overview
Apideck offers a suite of API integration solutions that give developers access to multiple services through a single integration layer. It’s well-suited for categories like HRIS and ATS.
Key Features
Pros
Cons

Overview
Paragon is an embedded integration platform geared toward building and managing customer-facing integrations for SaaS businesses. It stands out with its visual workflow builder, enabling lower-code solutions.
Key Features
Pros
Cons

Overview
Tray Embedded is another formidable competitor in the B2B SaaS integrations space. It leverages a visual workflow builder to enable embedded, native integrations that clients can use directly within their SaaS platforms.
Key Features
Pros
Cons
When searching for Nango alternatives that offer a streamlined, secure, and B2B SaaS-focused integration experience, Knit stands out. Its unified API approach and event-driven architecture protect end-user data while accelerating the development process. For businesses seeking API integration solutions that minimize complexity, boost security, and enhance scalability, Knit is a compelling choice.

Whether you are a SaaS founder/ BD/ CX/ tech person, you know how crucial data safety is to close important deals. If your customer senses even the slightest risk to their internal data, it could be the end of all potential or existing collaboration with you.
But ensuring complete data safety — especially when you need to integrate with multiple 3rd party applications to ensure smooth functionality of your product — can be really challenging.
While a unified API makes it easier to build integrations faster, not all unified APIs work the same way.
In this article, we will explore different data sync strategies adopted by different unified APIs with the examples of Finch API and Knit — their mechanisms, differences and what you should go for if you are looking for a unified API solution.
Let’s dive deeper.
But before that, let us first revisit the primary components of a unified API and how exactly they make building integration easier.
As we have mentioned in our detailed guide on Unified APIs,
“A unified API aggregates several APIs within a specific category of software into a single API and normalizes data exchange. Unified APIs add an additional abstraction layer to ensure that all data models are normalized into a common data model of the unified API which has several direct benefits to your bottom line”.
The mechanism of a unified API can be broken down into 4 primary elements —
Every unified API — whether its Finch API, Merge API or Knit API — follows certain protocols (such as OAuth) to guide your end users authenticate and authorize access to the 3rd party apps they already use to your SaaS application.
Not all apps within a single category of software applications have the same data models. As a result, SaaS developers often spend a great deal of time and effort into understanding and building upon each specific data model.
A unified API standardizes all these different data models into a single common data model (also called a 1:many connector) so SaaS developers only need to understand the nuances of one connector provided by the unified API and integrate with multiple third party applications in half the time.
The primary aim of all integration is to ensure smooth and consistent data flow — from the source (3rd party app) to your app and back — at all moments.
We will discuss different data sync models adopted by Finch API and Knit API in the next section.
Every SaaS company knows that maintaining existing integrations takes more time and engineering bandwidth than the monumental task of building integrations itself. Which is why most SaaS companies today are looking for unified API solutions with an integration management dashboards — a central place with the health of all live integrations, any issues thereon and possible resolution with RCA. This enables the customer success teams to fix any integration issues then and there without the aid of engineering team.
.png)
For any unified API, data sync is a two-fold process —
.png)
First of all, to make any data exchange happen, the unified API needs to read data from the source app (in this case the 3rd party app your customer already uses).
However, this initial data syncing also involves two specific steps — initial data sync and subsequent delta syncs.
Initial data sync is what happens when your customer authenticates and authorizes the unified API platform (let’s say Finch API in this case) to access their data from the third party app while onboarding Finch.
Now, upon getting the initial access, for ease of use, Finch API copies and stores this data in their server. Most unified APIs out there use this process of copying and storing customer data from the source app into their own databases to be able to run the integrations smoothly.
While this is the common practice for even the top unified APIs out there, this practice poses multiple challenges to customer data safety (we’ll discuss this later in this article). Before that, let’s have a look at delta syncs.
Delta syncs, as the name suggests, includes every data sync that happens post initial sync as a result of changes in customer data in the source app.
For example, if a customer of Finch API is using a payroll app, every time a payroll data changes — such as changes in salary, new investment, additional deductions etc — delta syncs inform Finch API of the specific change in the source app.
There are two ways to handle delta syncs — webhooks and polling.
In both the cases, Finch API serves via its stored copy of data (explained below)
In the case of webhooks, the source app sends all delta event information directly to Finch API as and when it happens. As a result of that “change notification” via the webhook, Finch changes its copy of stored data to reflect the new information it received.
Now, if the third party app does not support webhooks, Finch API needs to set regular intervals during which it polls the entire data of the source application to create a fresh copy. Thus, making sure any changes made to the data since the last polling is reflected in its database. Polling frequency can be every 24 hours or less.
This data storage model could pose several challenges for your sales and CS team where customers are worried about how the data is being handled (which in some cases is stored in a server outside of customer geography). Convincing them otherwise is not so easy. Moreover, this friction could result in additional paperwork delaying the time to close a deal.
The next step in data sync strategy is to use the user data sourced from the third party app to run your business logic. The two most popular approaches for syncing data between unified API and SaaS app are — pull vs push.
.png)
Pull model is a request-driven architecture: where the client sends the data request and then the server sends the data. If your unified API is using a pull-based approach, you need to make API calls to the data providers using a polling infrastructure. For a limited number of data, a classic pull approach still works. But maintaining polling infra and/making regular API calls for large amounts of data is almost impossible.

On the contrary, the push model works primarily via webhooks — where you subscribe to certain events by registering a webhook i.e. a destination URL where data is to be sent. If and when the event takes place, it informs you with relevant payload. In the case of push architecture, no polling infrastructure is to be maintained at your end.
There are 3 ways Finch API can interact with your SaaS application.
Knit is the only unified API that does NOT store any customer data at our end.
Yes, you read that right.
In our previous HR tech venture, we faced customer dissatisfaction over data storage model (discussed above) firsthand. So, when we set out to build Knit Unified API, we knew that we must find a way so SaaS businesses will no longer need to convince their customers of security. The unified API architecture will speak for itself. We built a 100% events-driven webhook architecture. We deliver both the initial and delta syncs to your application via webhooks and events only.
The benefits of a completely event-driven webhook architecture for you is threefold —
For a full feature-by-feature comparison, see our Knit vs Finch comparison page →
Let’s look at the other components of the unified API (discussed above) and what Knit API and Finch API offers.
Knit’s auth component offers a Javascript SDK which is highly flexible and has a wider range of use cases than Reach/iFrame used by the Finch API for front-end. This in turn offers you more customization capability on the auth component that your customers interact with while using Knit API.
The Knit API integration dashboard doesn’t only provide RCA and resolution, we go the extra mile and proactively identify and fix any integration issues before your customers raises a request.
Knit provides deep RCA and resolution including ability to identify which records were synced, ability to rerun syncs etc. It also proactively identifies and fixes any integration issues itself.
In comparison, the Finch API customer dashboard doesn’t offer as much deeper analysis, requiring more work at your end.
Wrapping up, Knit API is the only unified API that does not store customer data at our end, and offers a scalable, secure, event-driven push data sync architecture for smaller as well as larger data loads.
By now, if you are convinced that Knit API is worth giving a try, please click here to get your API keys. Or if you want to learn more, see our docs
Our detailed guides on the integrations space

Note: This post is part of Knit's SaaS integration series. See also: The Complete Guide to SaaS Integrations and Build vs Buy: The Best Approach to SaaS Integrations.
The average B2B SaaS company operates alongside dozens — sometimes hundreds — of other SaaS tools. Your customers run their HR data in Workday, their recruiting in Greenhouse, their CRM in Salesforce, their support in Zendesk. When your product doesn't talk to these tools, you're asking customers to live with manual exports, copy-pasted data, and workflow gaps.
That gap has a cost: deals lost to competitors with better integration coverage, customers churning because your product sits in a silo, and engineering teams spending months on one-off integration builds instead of core product work.
SaaS integrations are how you close that gap — and for B2B SaaS companies, they're no longer optional.
A SaaS integration connects your product to another application via its API. Once connected, the two systems can exchange data automatically — no manual exports, no copy-paste, no third-party middleware the end user has to manage.
For example: if you build a workforce analytics platform, a SaaS integration with BambooHR means your customer's employee headcount, role data, and org structure flows into your product automatically. Your customer doesn't need to upload a CSV every Monday.
There are three common ways to build these integrations:
Native API integrations — you build directly against each third-party API. You own the code, control the logic, and can customize to your exact needs. The trade-off: each integration takes weeks to build and requires ongoing maintenance as APIs change.
No-code/workflow tools (Zapier, Make, n8n) — your customers configure automations themselves using a drag-and-drop interface. Fast to set up, but limited in depth, and the integration lives in the customer's workflow layer — not embedded in your product.
Unified APIs — a single API that normalizes data from dozens of third-party platforms into one standardized schema. Knit provides unified APIs for HRIS, ATS, CRM, Accounting, and other categories — one integration to your product connects you to 150+ platforms simultaneously, with data normalized to a consistent structure.
Integration coverage is a standard line item on enterprise procurement checklists. Buyers ask: "Does this connect to our HRIS?" before they ask about pricing. If the answer is no, they buy from someone who says yes.
This isn't anecdotal. The pattern is consistent across B2B sales cycles: prospects whose current toolstack is covered by your integrations move to close faster. Those whose tools aren't supported stall, require custom work statements, or don't close at all.
The practical implication: integration coverage is a top-of-funnel filter, not a post-purchase nice-to-have. Your integration page — and the depth of coverage on it — is a sales asset.
A customer who has connected their HRIS, CRM, and ATS data to your product has invested setup time and organizational buy-in. They've configured field mappings, set permissions, and built internal workflows around your product's data. Switching vendors means unwinding all of that.
This is integration-driven retention — and it works in both directions. Products with deep integrations have lower churn because switching costs are high. Products without integrations are easy to replace.
The retention effect compounds: each additional integration a customer activates makes them more embedded in your product and less likely to leave.
Integrations create natural upgrade triggers. Your base tier might include two or three standard integrations (Slack, Google Calendar, the most common CRM). Premium tiers unlock the full integration catalog — HRIS platforms, ATS connectors, ERP systems.
Customers who hit an integration wall — "I need BambooHR access but it's not in my plan" — have a concrete reason to upgrade. This is a cleaner upgrade conversation than "you've hit your seat limit."
Beyond tiered pricing: if you're routing in-app purchases or facilitating transactions through integrated platforms, you may be eligible for revenue-sharing arrangements with those platforms. Integration coverage creates business model options that a siloed product doesn't have.
Third-party integrations bring data into your product that you couldn't generate internally. A sales intelligence platform that integrates with CRM systems learns from deal patterns across thousands of companies. A workforce platform that integrates with HRIS data can surface compensation benchmarks, turnover signals, or headcount trends.
This data flywheel is one of the most durable competitive advantages integrations provide: the more platforms you connect, the richer the signals, the better the product, the stronger the case for customers to stay.
Building and maintaining integrations in-house is expensive — not just to build, but to keep running.
Third-party APIs break. Authentication schemes change from OAuth 1.0 to 2.0 to PKCE. Rate limits shift. Endpoints are deprecated. Webhooks are added or removed. Each of these changes is a maintenance event that someone on your team has to handle — typically the same engineers who are supposed to be building your core product.
The cost breaks down into three phases:
Build cost: A single production-quality integration (auth, data normalization, error handling, webhook support, retry logic) typically takes 2–4 weeks of engineering time for a common platform like Salesforce or Workday, and longer for less-documented APIs.
Maintenance cost: Plan for 15–20% of build time annually just to keep each integration working as upstream APIs evolve.
Opportunity cost: Every engineer-week spent on integration maintenance is a week not spent on differentiated product features.
For a SaaS company aiming to support 20 integrations, the math becomes unfavorable quickly. A unified API approach — where one integration layer handles auth, normalization, and maintenance for all platforms — shifts that cost dramatically.
Authentication complexity — Each platform handles OAuth, API keys, and token refresh differently. At scale (managing auth across 20+ platforms), this becomes a dedicated engineering concern.
Schema normalization — Workday calls it employee_id; BambooHR calls it id; Salesforce uses ContactId. Normalizing field names, data types, and enumerated values across platforms requires careful mapping and ongoing updates as source schemas change.
Rate limiting and reliability — Third-party APIs have rate limits that vary by plan, endpoint, and request type. Your integration layer needs to handle 429s, retry with backoff, and queue requests appropriately.
Data freshness — Some platforms support real-time webhooks; others require polling. Deciding on refresh cadence, managing stale data, and handling webhook failures are operational concerns that compound as integration count grows.
Security and compliance — Each new integration expands your data surface area. SOC2 auditors care about what data flows through which connections and where it's stored. A pass-through integration architecture — where data is not stored by the integration layer — is the most defensible approach from a compliance standpoint.
Knit is a unified API platform built for B2B SaaS companies that need native integration coverage without the per-integration build cost.
Unified API: One integration to Knit gives your product access to 150+ HRIS, ATS, CRM, and Accounting platforms. Data from all platforms is normalized to a consistent schema — your application reads one standard format regardless of what the customer's source system is.
Pass-through architecture: Knit does not store your customers' data between API calls. Data flows from source system → Knit → your application. This minimizes your compliance exposure and simplifies the data security conversation with enterprise buyers.
MCP Servers: Knit provides MCP (Model Context Protocol) Servers for HRIS, ATS, CRM, and Accounting platforms — giving AI agents direct, structured access to enterprise data. This is the integration layer for AI-native SaaS products.
Certifications: Knit is SOC2 Type II certified, GDPR compliant (DPA available), and ISO27001 certified.
Get started with Knit or book a demo.
What are the benefits of SaaS integration for a B2B software company?
Knit provides unified SaaS integrations for B2B software companies, and the core benefits we see across customers are: faster deal velocity (integration coverage closes procurement checklists), lower churn (customers with multiple active integrations are harder to displace), new upgrade paths (integration tiers drive expansion revenue), and richer product data (third-party signals improve core product features). The compounding effect of these is significant — integrations shift your product from a tool customers use to infrastructure customers depend on.
What is the difference between a native API integration and a unified API?
A native API integration connects directly to one specific platform — you write code against Workday's API, handle Workday's auth, and normalize Workday's data model. A unified API like Knit sits above individual platform APIs and normalizes them: one integration to Knit gives your product access to 150+ platforms with a consistent data schema. The trade-off is some loss of platform-specific customization for a massive reduction in build and maintenance cost.
How many integrations does a typical B2B SaaS product need?
It depends on the category. HRIS-adjacent products (workforce analytics, earned wage access, employee experience) need coverage across BambooHR, Workday, ADP, Rippling, Darwinbox, and a dozen others — each with distinct data models. CRM-adjacent products need Salesforce, HubSpot, Pipedrive coverage at minimum. Most mature B2B SaaS products in people-tech or revenue-tech aim for 15–30 integrations; enterprise-grade coverage often requires 50+. Unified APIs are the practical way to get there without scaling your integrations team proportionally.
What are the three types of SaaS integrations?
The three main types are: (1) native integrations, built directly against a platform's API and fully embedded in your product; (2) no-code/workflow integrations, customer-configured in tools like Zapier or Make, which sit outside your product; and (3) unified API integrations, where a single API layer (like Knit) normalizes access to many platforms simultaneously. For B2B SaaS companies, native and unified API integrations are typically preferred since they're embedded in the product experience — not dependent on the customer setting up a third-party workflow.
How do integrations affect SaaS customer churn?
Integrations reduce churn by increasing switching costs. A customer who has configured your product to pull data from their HRIS, push records to their CRM, and trigger workflows based on third-party events has invested significant setup effort and organizational alignment. Replacing your product requires unwinding all of those connections — a migration cost most customers will avoid if your product continues to deliver value. The more integrations a customer has activated, the lower their propensity to churn.
Is SaaS being replaced by AI?
SaaS products are evolving, not being replaced. The shift happening in 2025–2026 is that AI agents increasingly interact with SaaS data programmatically rather than through web UIs — and the integration infrastructure enabling this is the same API layer that powers traditional SaaS integrations. Knit's MCP Servers, for example, allow AI agents to query HRIS, ATS, and CRM platforms directly using natural language, built on the same integration foundation as Knit's REST APIs. SaaS integration infrastructure becomes more important in an AI-first world, not less.
What is a unified API and why does it matter for SaaS integration?
A unified API is a single integration layer that normalizes access to many platforms in the same category. Instead of building one integration for BambooHR, another for Workday, another for ADP — each with different auth flows, data models, and rate limit handling — you build one integration to the unified API and get access to all three (and dozens more). Knit's Unified API covers HRIS, ATS, CRM, and Accounting categories. The "why it matters" is time-to-market and maintenance cost: a company using Knit can ship 150+ integrations in the time it would take to build five natively.
What should I look for when choosing a SaaS integration platform?
Key criteria: breadth of coverage (how many platforms in your category?), data model quality (is normalization complete, or do edge cases leak through?), reliability (what are the SLAs, and how are upstream API changes handled?), security architecture (does the platform store customer data, or use a pass-through model?), and compliance certifications (SOC2 Type II, GDPR, ISO27001 for enterprise buyers). Knit covers all five — see getknit.dev/security for the detailed security and compliance posture.

Customer Relationship Management (CRM) platforms have evolved into the primary repository of customer data, tracking not only prospects and leads but also purchase histories, support tickets, marketing campaign engagement, and more. In an era when organizations rely on multiple tools—ranging from enterprise resource planning (ERP) systems to e-commerce solutions—the notion of a solitary, siloed CRM is increasingly impractical.
If you're just looking to quick start with a specific CRM APP integration, you can find APP specific guides and resources in our CRM API Guides Directory
CRM API integration answers the call for a more unified, real-time data exchange. By leveraging open (or proprietary) APIs, businesses can ensure consistent records across marketing campaigns, billing processes, customer support tickets, and beyond. For instance:
Whether you need a Customer Service CRM Integration, ERP CRM Integration, or you’re simply orchestrating a multi-app ecosystem, the idea remains the same: consistent, reliable data flow across all systems. This in-depth guide shows why CRM API integration is critical, how it works, and how you can tackle the common hurdles to excel in crm data integration.
An API, or application programming interface, is essentially a set of rules and protocols allowing software applications to communicate. CRM API integration harnesses these endpoints to read, write, and update CRM records programmatically. It’s the backbone for syncing data with other business applications.
Key Features of CRM API Integration
In short, a well-structured crm integration strategy ensures that no matter which department or system touches customer data, changes feed back into a master record—your CRM.
1. Unified Data, Eliminated Silos
Gone are the days when a sales team’s pipeline existed in one system while marketing data or product usage metrics lived in another. CRM API integration merges them all, guaranteeing alignment across the organization.
2. Greater Efficiency and Automation
Manual data entry is not only tedious but prone to errors. An automated, API-based approach dramatically reduces time-consuming tasks and data discrepancies.
3. Enhanced Visibility for All Teams
When marketing can see new leads or conversions in real time, they adjust campaigns swiftly. When finance can see payment statuses in near-real-time, they can forecast revenue more accurately. Everyone reaps the advantages of crm integration.
4. Scalability and Flexibility
As your business evolves—expanding to new CRMs, or layering on new apps for marketing or customer support—unified crm api solutions or robust custom integrations can scale quickly, saving months of dev time.
5. Improved Customer Experience
Customers interacting with your brand expect you to “know who they are” no matter the touchpoint. With consolidated data, each department sees an updated, comprehensive profile. That leads to personalized interactions, timely support, and better overall satisfaction.
5. Core Data Concepts in CRM Integrations
Before diving into an integration project, you need a handle on how CRM data typically gets structured:
Contacts and Leads
Accounts or Organizations
Opportunities or Deals
Tasks, Activities, and Notes
Custom Fields and Objects
Pipeline Stages or Lifecycle Stages
Understanding how these objects fit together is fundamental to ensuring your crm api integration architecture doesn’t lose track of crucial relationships—like which contact belongs to which account or which deals are associated with a particular contact.
When hooking up your CRM with other applications, you have multiple strategies:
1. Direct, Custom Integrations
If your company primarily uses a single CRM (like Salesforce) and just needs one or two integrations (e.g., with an ERP or marketing tool), a direct approach can be cost-effective.
2. Integration Platforms (iPaaS)
While iPaaS solutions can handle e-commerce crm integration, ERP CRM Integration, or other patterns, advanced custom logic or heavy data loads might still demand specialized dev work.
3. Unified CRM API Solutions
A unified crm api is often a game-changer for SaaS providers offering crm integration services to their users, significantly slashing dev overhead.
4. CRM Integration Services or Consultancies
When you need complicated logic (like an enterprise-level erp crm integration with specialized flows for ordering, shipping, or financial forecasting) or advanced custom objects, a specialized agency can accelerate time-to-value.
Though CRM API integration is transformative, it comes with pitfalls.
Key Challenges
Best Practices for a Smooth CRM Integration
For teams that prefer a direct or partially custom approach to crm api integration, here’s a rough, step-by-step guide.
Step 1: Requirements and Scope
Step 2: Auth and Credential Setup
Step 3: Data Modeling & Mapping
Step 4: Handle Rate Limits and Throttling
Step 5: Set Up Logging and Monitoring
Step 6: Testing and Validation
Step 7: Rollout and Post-Launch Maintenance
CRM API integration is rapidly evolving alongside shifts in the broader SaaS ecosystem:
Overall, expect crm integration to keep playing a pivotal role as businesses expand to more specialized apps, push real-time personalization, and adopt AI-driven workflows.
Q1: How do I choose between a direct integration, iPaaS, or a unified CRM API?
Q2: Are there specific limitations for hubspot api integration or pipedrive api integration?
Each CRM imposes unique daily/hourly call limits, plus different naming for objects or fields. HubSpot is known for structured docs but can have daily call limitations, while Pipedrive is quite developer-friendly but also enforces rate thresholds if you handle large data volumes.
Q3: What about security concerns for e-commerce crm integration?
When linking e-commerce with CRM, you often handle payment or user data. Encryption in transit (HTTPS) is mandatory, plus tokenized auth to limit exposure. If you store personal data, ensure compliance with GDPR, CCPA, or other relevant data protection laws.
Q4: Can I integrate multiple CRMs at once?
Yes, especially if you adopt either an iPaaS approach that supports multi-CRM connectors or a unified crm api solution. This is common for SaaS platforms whose customers each use a different CRM.
Q5: What if my CRM doesn’t offer a public API?
In rare cases, legacy or specialized CRMs might only provide CSV export or partial read APIs. You may need custom scripts for SFTP-based data transfers, or rely on partial manual updates. Alternatively, requesting partnership-level API access from the CRM vendor is another route, albeit time-consuming.
Q6: Is there a difference between “ERP CRM Integration” and “Customer Service CRM Integration”?
Yes. ERP CRM Integration typically focuses on bridging finance, inventory, or operational data with your CRM’s lead and deal records. Customer Service CRM Integration merges support or ticketing info with contact or account records, ensuring service teams have sales context and vice versa.
Q7:What is CRM API integration?
CRM API integration is the process of connecting a CRM platform - such as Salesforce, HubSpot, or Pipedrive - to other software via its API, enabling automated bidirectional data sync. Instead of manually re-entering records across tools, it keeps contacts, deals, activities, and support tickets consistent across your marketing, billing, ERP, and helpdesk systems in real time. Knit provides a unified CRM API that lets B2B SaaS products connect to all major CRMs through a single integration.
Q8:What does API mean in CRM?
In CRM, API (Application Programming Interface) is a set of endpoints that allows external software to programmatically read, create, update, and delete records inside a CRM. It's the communication layer that lets your product push sign-up form contacts into a CRM, sync closed-won deals to billing, or pull pipeline data into a BI dashboard - without manual exports. Most major CRMs expose REST APIs with JSON responses and OAuth 2.0 authentication.
Q9:What are the main use cases for CRM API integration?
Common use cases include: sales automation (syncing closed-won Salesforce deals to an ERP for invoicing); e-commerce CRM integration (pushing purchase history into contact records); ERP-CRM sync (aligning billing and fulfilment status with deal records); customer service integration (surfacing Zendesk tickets inside CRM account records); and data analytics (extracting pipeline data into BI dashboards). The unifying goal is making the CRM the single source of truth for all customer-facing data across your stack.
Q10: How does authentication work in CRM API integrations?
Most CRM APIs use OAuth 2.0 for user-delegated access - your product redirects users through the CRM's authorisation screen to obtain a scoped access token. HubSpot deprecated API keys in favour of private app tokens; Salesforce uses OAuth with Connected Apps registered in the org; Pipedrive supports both OAuth and personal API tokens. Access tokens expire (typically 1–2 hours) and must be refreshed. Managing token storage, refresh cycles, and re-auth flows across multiple CRM providers is one of the heaviest engineering costs in building CRM integrations at scale.
CRM API integration is the key to unifying customer records, streamlining processes, and enabling real-time data flow across your organization. Whether you’re linking a CRM like Salesforce, HubSpot, or Pipedrive to an ERP system (for financial operations) or using zendesk crm integrations for a better service desk, the right approach can transform how teams collaborate and how customers experience your brand.
No matter your use case—ERP CRM Integration, e-commerce crm integration, or a simple ticketing sync—investing in robust crm integration services or proven frameworks ensures you keep pace in a fast-evolving digital landscape. By building or adopting a strategic approach to crm api connectivity, you lay the groundwork for deeper customer insights, more efficient teams, and a future-proof data ecosystem

In today's SaaS business landscape, to remain competitive, a product must have seamless integration capabilities with the rest of the tech stack of the customer.
In fact, limited integration capabilities is known as one of the leading causes of customer churn.
However, building integrations from scratch is a time-consuming and resource-intensive process for a SaaS business. It often takes focus away from the core product.
As a result, SaaS leaders are always on the lookout for the most effective integration approach. With the emergence of off-the-shelf tools and solutions, businesses can now automate integrations and scale their integration strategy with minimum effort.
In this article, we cover four integration approaches - in-house development, workflow automation tools, embedded iPaaS, and unified APIs — to help you choose the right strategy for your specific product integration needs.
-Types of product integrations
- Different approaches to integrations
-- In-house integration development
-- Workflow Automation
-- Unified API/ API aggregators
-- Embedded iPaaS
- When to use Unified API
- When to use Workflow Automation
- When to use Embedded iPaaS
- How to choose the right tool for your integration strategy
- FAQs
We will get to the comparison in a bit, but first let’s assess your integration needs.
In order to effectively address customer-facing integration needs, it is crucial to consider the various types of product integrations available. These types can vary in terms of scope and maintenance required, depending on specific integration requirements.
To gain a comprehensive understanding of product integrations, it is important to focus on two key aspects.
Based on these considerations, you can gauge whether or not you will be able to take care of your integration needs in-house.
Read: To Build or To Buy: The practical answer to your product integration questions
When working on any product, it is often beneficial to connect it with an internal system or third-party software to simplify your work processes. This requires integrating two platforms exclusively for internal use.
For example, you may want to integrate a project management tool with your product to accelerate the development lifecycle and ensure automatic updates in the PM tool to reflect changes and progress.
In this scenario, the use case is highly specific and limited to internal execution within your team. Typically, your in-house engineering team will focus on building this integration, which can be further enhanced by other teams who reap its benefits. Overall, internal integrations are highly distinct and customizable to cater to individual organizational needs.
Another type of integrations that organizations encounter are occasional customer-facing integrations, which are not implemented at scale. Occasional customer-facing integrations are typically infrequent and arise as specific requests from customers.
In these cases, customers may have specific software applications that they regularly use and require integration with your platform for a seamless flow of data and automated syncing. For example, a particular customer may request integration of Jira with your product, with highly specific requirements and needs.
In these situations, the integration can be facilitated by the customer's engineering team, third-party vendors, or other external platforms. The resulting integration output is highly tailored and may vary for each organization, even if the demand for the same integration exists. This customization ensures that the integration reflects the structures and workflows unique to each customer's organizational needs.
Finally, there will be certain integrations that all your customers will need. These are essential functionalities required to power their organizational operation.
Instead of being use case or platform specific, scalable or standardized customer facing integrations are more generic in nature. For instance, you want all your customers to be able to connect the HRMS platform of their choice to your product for seamless HR management.
These integrations need to be built and maintained by your team, i.e. essentially, fall under your purview. You can either offer these integrations as a part of the subscription cost that your customers pay for your software or as add-ons at an extra cost. Offering such integrations is important to gain a competitive edge and even explore a new monetization model for your platform.
Standardizing the most common integrations is extremely helpful to provide your customers with a seamless experience.
While companies can always build integrations in-house, it’s not always the most efficient way. That’s where plug-and-play platforms like unified APIs can help. Let’s look at the top approaches to leveraging integrations.
Undoubtedly, the most obvious way of integrating products with your software is to build integrations in-house. Put simply, here your engineering team builds, manages and maintains the integrations.
Building integrations in-house comes with a lot of control and power to customize how the integration should operate, feel and overall create a seamless experience. However, this do-it-yourself approach is extremely resource intensive, both in terms of budgets and engineering bandwidth.
Building just integration can take a couple of months of tech bandwidth and $10-15k worth of resources. Integration building from scratch offers high customization, but at a great cost, putting scalability into question.
Workflow automation tools, as the name suggests, facilitate product integration by automating workflow with specific triggers. These are mostly low code tools which can be connected with specific products by engineering teams for integration with third party software or platforms.
A classic example is connecting a particular CRM with your product to be used by the end user. Here, the CRM of their choice can be integrated with your product following an event driven workflow architecture.
Data transfer, marketing automation, HR, sales and operations, etc. are some of the top use cases where workflow automation tools can help companies with product integrations, without having to build these integrations from scratch.
Finally, the third approach to building and maintaining product integrations is to leverage a Unified API. Any product that you wish to integrate with comes with an API which facilitates connection and data sync.
A unified API normalizes data from different applications within a software category and transfers it to your application in real time. Here, data from all applications from a specific category like CRM, HRMS, Payroll, ATS, etc. is normalized into a common data model which your product understands and can offer to your end customers. To learn more about how unified APIs work, read this
By allowing companies to integrate with hundreds of integrations overnight (instead of months), a unified API enables them to scale integration offerings within a category faster and in a seamless manner.
A fourth approach to buildingand maintaining product integrations is to use an embedded iPaaS - anintegration platform that a SaaS vendor embeds directly into their own productso their customers can connect third-party apps without leaving the vendor'sinterface.
Embedded iPaaS tools typically come in two variants. Workflow-automation embedded iPaaS (such as Paragon,Cyclr, or Tray Embedded) provides a visual, drag-and-drop integration builder that your customers can use to configure their own integration workflows inside your product. Unified API / API aggregator embedded iPaaS (such as Knit or Merge) normalizes all platforms in a software category - ATS, HRIS, CRM, Accounting - into one data model, so your engineering team builds the integration once and automatically covers all platforms in that category without custom workflow configuration per platform.
Embedded iPaaS is particularly well-suited for SaaS companies that need to offer customer-facing integrations at scale — where customers have varying tool preferences within the same software category (e.g., some customers use Salesforce for CRM, others use HubSpot). Like unified APIs, embedded iPaaS removes the need to build and maintain each integration in-house; unlike pure workflow automation tools, it is a productized integration layer built into your SaaS product rather than a standalone automation platform used externally.
Now that you have an understanding of the different types of integrations and approaches, let’s understand which approach is best for you, depending on your scope and needs.

If you want scalable and standardized integrations, choosing a unified API is a sensible option. Here are the top reasons why unified API is ideal for standardized customer-facing integrations:
However, if you want only one-off integrations, with a very high level of customization, using a unified API might not be the ideal choice.
Depending on the nature of your organization and product offerings, you might need integrations which are simple, external and needed to enable specific workflows triggered by some predetermined events.
In such a case, workflow automation tools are quite useful as an integration approach. Some of the top benefits of using workflow automation to power your integration journey are as follows.
However, the low-code functionality comes with a disadvantage of lack of developer friendliness and incidence of errors. At the same time, data normalization is a big challenge for applications even within the same category.
The presence of different APIs across applications necessitates the need to develop customized workflows. Invariably, this custom workflow need adds to the cost of using workflow automation when scaling integration. As API requests increase, workflow automation integration turns out to be extremely expensive.
Therefore, choose workflow automation if you want:
Embedded iPaaS occupies thespace between workflow automation and fully custom in-house development. It isthe right choice when:
• You need to offer customer-facing integrations at scale -where many customers use the same category of software but different specific platforms (e.g., all customers need CRM integration but some use Salesforce, HubSpot, Zoho etc).
• You want a native integration experience - where your customers connect their tools from within your product UI rather than through a separate integration hub.
• Your engineering team cannot afford to build and maintain each integration individually - embedded iPaaS handles connector-level infrastructure (auth, token refresh, API changes) so your team does not have to.
• You need to move fast - embedded iPaaS gives you pre-built connectors for major platforms, significantly shortening time to market versus in-house builds.
However, the right type of embedded iPaaS matters depending on your specific integration needs:
Choose workflow-automation embedded iPaaS if your customers need highly configurable, workflow-driven integrations - different customers need different logic for the same underlying integration, and a visual builder lets them configure it themselves. Choose a unified API (Knit) if you want to offer standardized integrations across all platforms in a category - where every customer needs the same core data(candidate information from their ATS, employee records from their HRIS, deal data from their CRM) normalized into one model, without building per-platform workflow configuration.
Therefore, choose embedded iPaaS if you want:
• To offer customer-facing integrations at scale without in-house per-platform builds
• Native integration UX embedded in your productinterface
• Normalized, category-wide data coverage (use a unifiedAPI) or configurable workflow coverage per customer (use a workflow-automationembedded tool)
• Fast time to market with maintained, up-to-dateconnectors
Read: What is an Embedded iPaaS? Definition, Features, Uses, Benefits
In the previous section, we explored different scenarios for building product integrations and discussed the recommended approaches for each. However, selecting the appropriate approach requires careful consideration of various factors.
In this section, we will provide you with a list of key factors to consider and essential questions to ask in order to make an informed choice between workflow automation tools and unified APIs.
You need to gauge how complex the integration will be. Generally, standardized integrations which are customer facing and need to be scaled, will be more complex. Whereas, internal or one-off customer facing integrations will be less complex.
Try to answer the following questions:
Depending on the nature and scope of complexity, you can choose your integration approach. More complex integrations, which need scale and volume, should be achieved through a unified API approach.
Next, you must gauge the level of customizations you need. Depending on the expectations of your customers, your integrations might be standardized, or require a high amount of customizations.
If you need an internal integration, chances are high that you will need a great degree of customization. You may want to check on:
If you need to customize your integrations for specific workflows tailored to your individual customers, workflow automation tools will be a better choice.
Note: At Knit, we are working on customized cases with our unified API partners every day. If you have a niche use case or special integration need, feel free to contact us. Get in touch
It is extremely important to understand your current and expected integration needs.
Internally, you might need a limited number of integrations, or if you have a very limited number of customers, you will only need one-off customer facing integrations.
However, if you wish to scale the use of your product and stay ahead of competition, you will need to offer more integrations as you grow. Even within a category, you will have to offer multiple integrations.
For instance, some of your customers might use Salesforce as CRM, but others might be using Zoho CRM. Invariably, you need to integrate both the CRM with your product. Thus, you must gauge:
If scaling integrations faster is your priority, unified APIs are the best choice for you.
Your choice of the right integration approach will also depend on the technical expertise available.
You need to make sure that all of your engineering bandwidth is not spent only on building and maintaining integrations. At the same time, the integrations should be developer friendly and resilient to errors.
Try to check:
It is important that not all your technical expertise is spent on integrations. An ideal integration approach will ensure that other team members beyond core engineering are also able to take care of a few action items.
You need to gauge how much budget you have to ensure that you don’t overshoot and stay cost effective. At the same time, you might want to explore different integration approaches depending on the time criticality.
Time and budget critical integrations can be accomplished via unified API or workflow automation. It is important to take a stock of:
It is important to undertake a cost benefit analysis based on the cost and number of integrations.
For instance, a unified API might not be an ideal choice if you only need one integration. However, if you plan to scale the number of integrations, especially in the same category, then this approach will turn out to be most cost effective. The same is also true from a time investment perspective.
When you go for an external integration approach like workflow automation or unified APIs, beyond in-house development or DIY, it is important to understand the ecosystem support available.
If you only get initial set up support from your integration provider/ vendor, you will find your engineering team extremely stretched for maintenance and management.
At the same time, lack of adequate resources and documentation will prevent your teams from learning about the integration to provide the right support. Therefore, it is ideal to get an understanding of:
Finally, integrations are generally an ongoing relationship and not a one-off engagement. The bigger your business grows, the higher will be your integration needs both to close more deals as well as to reduce customer churn.
Therefore, you need to focus on the future considerations and outlook. The future considerations need to take into account your scale up plan, potential lock-in, changing needs, etc. Overall, some of the questions you can consider are:
Understanding these nuances will help you create a long-term plan for your integrations.
If your roadmap includesAI-powered features or AI agents that need access to your customers' businessdata, consider whether your integration approach also supports AI-native accesspatterns - it's MCP Servers, for example, give AI agents direct access toHRIS, ATS, and CRM data through a standardized interface, extending the sameintegration layer your product uses today to AI workflows tomorrow.
When building integrations, the best approach depends on your use case, your customers, and your expectedscale. Here is a quick guide:
• Choose in-house development when you need a small number of internal integrations with very specific, custom logic that no external tool can handle. Highest control, highest cost.
• Choose workflow automation for one-off or internalintegrations where a low-code editor and pre-built connectors are sufficient —particularly when non-engineering team members need to manage integrations.
• Choose embedded iPaaS when you need customer-facing integrations at scale and want a native integration experience in your product— either with workflow-automation tools (Paragon, Cyclr) for configurableper-customer logic, or with a unified API (Knit) for standardized,category-wide coverage.
• Choose unified API (Knit) specifically when yourcustomers all need the same core data from their preferred platform in asoftware category — ATS, HRIS, CRM, or Accounting — and you want to build thatintegration once and cover all platforms in that category without per-platformengineering work.
Knit's unified API connects your product to all major platforms across ATS, HRIS, CRM, and Accounting categories through one normalized API — so you build once and scale to every platform in that category. Knit also offers MCP Servers for teams building AI-native features that need access to customer data.
Talk to one of our experts or try Knit's unified API for free.
A unified API is an aggregated API that normalizes data from multiple platforms in a specific software category — such as all ATS platforms, all HRIS platforms, or all CRM platforms— into one standardized data model. Knit provides a unified API that covers 30+platforms per category: an ATS unified API that returns candidate and job data in one normalized model regardless of whether the customer uses Greenhouse, Lever, Workday, or another ATS; an HRIS unified API for employee records; a CRM unified API for deal and contact data. A developer integrates Knit's unified API once and gets coverage of all platforms in that category, rather than building separate integrations for each.
A unified API and workflow automation tools solve related but different integration problems. Knit's unified API normalizes data from all platforms in a software category — ATS, HRIS, CRM, Accounting — into one standardized endpoint, so a SaaS product can read and write data to whichever platform a customer uses, without building separate logic per platform. Workflow automation tools (Zapier, Make, n8n) automate sequences of actions across apps based on event triggers — they are event-driven connectors between specific pairs of apps. For SaaS companies building customer-facing, standardized product integrations at scale, a unified API is typically faster and more maintainable than workflow automation; workflow automation is better suited for internal, custom, one-off automations.
A unified API is a specific type of embedded iPaaS. Both are built into a SaaS product so end customers canconnect their tools from within the product's UI — that is what makes them'embedded.' The distinction is the integration approach: workflow-automationembedded iPaaS tools (Paragon, Cyclr, Tray) provide a visual builder socustomers or vendors can configure workflows per platform; a unified API (Knit)normalizes all platforms in a category into one data model so no per-platformconfiguration is needed. For SaaS companies that need standardized integrationsacross a whole category, Knit's unified API approach is faster to build andmaintain than a workflow-automation embedded iPaaS.
The right unified API depends on which software categories your product needs to integrate with. Knit covers ATS, HRIS, CRM, and Accounting platforms through a single normalized API and also provides MCP Servers for AI-native access to that same data. Knit'sunified API is particularly strong for companies that need to connect with abroad range of platforms in those categories — its pass-through architecturedoes not store customer data, it is SOC 2, GDPR, and ISO 27001 certified, andnew platforms added to the catalog become available automatically withoutadditional engineering. Other tools (Merge, Finch, Kombo) cover overlappingcategories with different depth and pricing. The best approach is to map yourrequired integration categories against each provider's catalog beforecommitting.
A unified API is the right choice when you need to support multiple platforms in the same softwarecategory and want to avoid building and maintaining each integrationseparately. Knit's unified API covers 30+ platforms per category through onenormalized endpoint — the main threshold is whether your integration need isstandardized (every customer needs the same core data from their ATS, HRIS,CRM, or accounting tool) or highly custom (one customer has very specific,bespoke workflows). For standardized, category-wide integrations, a unified APIlike Knit will be faster to implement and significantly cheaper to maintainthan in-house builds across 10+ platforms.
Yes — they serve different use cases and can coexist. Knit's unified API handles standardized, category-wide product integrations (e.g., connecting your product to every ATS your customers might use, normalizing candidate data into one model). Workflow automation tools can handle internal, one-off automations between specific apps that your operations or marketing teams need — notification routing, data copy jobs, simple triggers. The key principle is that Knit's unified API iscustomer-facing and productized; workflow automation tools are typically for internal use by your team. If customers are requesting a standardized integration with a category of platforms, that is the unified API's domain.
Knit's unified API currently covers ATS (Applicant Tracking Systems — 30+ platforms including Greenhouse, Lever, Workday, BambooHR, and Jobvite), HRIS (HR Information Systems — 30+platforms including Workday, BambooHR, Darwin box, and Personio), CRM (Customer Relationship Management — including Salesforce, HubSpot, and Zoho), and Accounting (including QuickBooks and Xero). Knit also provides MCP Servers foreach of these categories, giving AI agents direct access to the same normalizeddata through a Model Context Protocol interface. The full catalogue is at getknit.dev/integrations.
With Knit's unified API, a SaaScompany typically gets a working integration connected to a given category ofplatforms in days to a few weeks, depending on how deeply the integration mapsinto the product's data model. Straightforward read integrations (fetchingcandidate or employee data and displaying it) can be live in a day; two-waysync integrations with custom field mapping and write operations take longer.Workflow automation tools can also move quickly for simple event-basedtriggers, but each additional platform requires its own workflow configuration,so the total time scales with the number of platforms. The key advantage ofKnit's unified API is that time-to-platform is near zero after the initialintegration: new platforms added to Knit's catalog are available immediatelywithout additional engineering.
API stands for ApplicationProgramming Interface — a defined set of rules and protocols that lets twosoftware applications communicate with each other. Knit's unified API is an APIin this sense: it provides a standardized set of endpoints that a SaaS productcalls to read and write data from any of 30+ platforms in a category, with Knithandling the translation between each platform's native API and the normalizeddata model. APIs are the standard mechanism for integration in modern software— every ATS, HRIS, CRM, and accounting platform exposes its data through anAPI; a unified API like Knit aggregates all of those into one interface.
Curated API guides and documentations for all the popular tools
.png)
The Okta API is a RESTful management interface for Okta's identity platform. Developers use it to automate user lifecycle management, sync directory data, manage groups and app assignments, and build SCIM provisioning integrations. It supports two authentication methods — SSWS API tokens and OAuth 2.0 scoped access tokens — and all management endpoints live under https://{yourOktaDomain}/api/v1/.
The Okta API supports two credential types.
SSWS API tokens are the simpler option for scripts and internal tooling. Generate one in Admin Console → Security → API → Tokens, then pass it in every request as Authorization: SSWS <token>. Tokens inherit the creating admin's full privilege level and expire after 30 days of inactivity (the timer resets on each successful API call). See How to get an Okta API token for the step-by-step guide, common errors, and the one gotcha everyone hits (the scheme is SSWS, not Bearer).
OAuth 2.0 scoped access tokens are Okta's recommended approach for production integrations. Tokens are short-lived (1 hour), limited to explicitly granted scopes, and requested from your org's authorization server at /oauth2/v1/authorize. Scopes follow the okta.<resource>.<operation> pattern: okta.users.read for GET access to users, okta.users.manage for create/update/delete, and so on. Only Super Admin can grant scopes to an OAuth app.
For integrations connecting to other organisations' Okta orgs — a marketplace app or a multi-tenant product — you need OAuth 2.0, not a personal API token.
Every endpoint requires Content-Type: application/json and Accept: application/json on requests that include a body. All timestamps are ISO 8601 (YYYY-MM-DDTHH:mm:ss.SSSZ).
GET /api/v1/users?filter=status+eq+"ACTIVE" on a schedule, or use GET /api/v1/logs filtered to eventType eq "user.lifecycle.*" to get only changes.POST /api/v1/users?activate=true with the user's profile; assign to an app with POST /api/v1/apps/{appId}/users.GET /api/v1/groups to list groups, GET /api/v1/groups/{id}/users to get members of a specific group.DELETE /api/v1/users/{userId}/sessions clears all active Okta sessions for that user.GET /api/v1/logs?since=2026-07-01T00:00:00Z with date filtering; paginate using the Link: next header value.Okta uses a bucket-based rate limit system — limits apply per org per endpoint (or per endpoint per user for authenticated sessions), and vary based on your subscription tier, HTTP method, and whether you have the DynamicScale add-on. There is no single table of numbers that applies to all orgs.
When a limit is exceeded, Okta returns HTTP 429 Too Many Requests. Inspect the response headers to back off correctly:
X-Rate-Limit-Limit — total requests allowed in the current window for this bucketX-Rate-Limit-Remaining — requests remaining before the limit is hitX-Rate-Limit-Reset — Unix timestamp (UTC) when the window resetsMonitor live usage through the Rate Limit Dashboard in Admin Console → Reports → Rate Limits, or query the System Log for system.operation.rate_limit.warning and system.operation.rate_limit.violation events (Okta Docs, Rate limits).
All list endpoints that return collections support cursor-based pagination. Pass limit to control page size, and use the after cursor from the Link response header to fetch the next page — do not construct the next-page URL yourself, as cursor formats can change without notice.
GET /api/v1/users?limit=200
→ HTTP 200
Link: <https://yourcompany.okta.com/api/v1/users?limit=200>; rel="self"
Link: <https://yourcompany.okta.com/api/v1/users?limit=200&after=00u1...>; rel="next"
The end of the list is signalled by the absence of a rel="next" link — except for the System Log, which always returns a next link to support continuous polling.
If you're connecting one Okta org for internal use, the API is straightforward. The complexity scales when you're connecting Okta alongside BambooHR, Workday, or other HRIS/directory tools in a product — each has its own auth model, user schema, group structure, and lifecycle event format.
Knit's unified HRIS API handles Okta's auth token management, rate-limit backoff, and cursor pagination for you, and normalises users, groups, and directory data across all connected HRIS and directory connectors behind one schema. You integrate once and add connectors from a list rather than re-engineering for each one. See the Okta integration page for what Knit syncs, or book a demo to see it against your own Okta org. You can also sign up free and test with a sandbox.
If your team is building AI agents or workflows that need to query Okta user and group data, Knit exposes the Okta connector as an LLM tool and MCP server — letting agents call normalised HRIS APIs without handling Okta-specific auth or pagination. See Knit LLM Tools for Okta for details.
What is the Okta API used for?
The Okta API is used to programmatically manage users, groups, applications, MFA factors, sessions, and policies in an Okta org. Common use cases include user provisioning and deprovisioning, syncing directory data to a product's database, automating group-based app access, and querying the audit log for compliance reporting.
How do I authenticate to the Okta API?
The Okta API supports two authentication methods. SSWS API tokens are the simpler option — generate one in the Admin Console and include it as Authorization: SSWS <token> on every request. OAuth 2.0 scoped access tokens are Okta's recommended approach for production; they're short-lived and limited to specific scopes granted to an OAuth app. See How to get an Okta API token for step-by-step instructions on both.
What is the base URL for Okta API calls?
All management API calls go to https://{yourOktaDomain}/api/v1/, where {yourOktaDomain} is your org's subdomain — for example, https://yourcompany.okta.com/api/v1/. Some organisations use a custom domain instead. The HTTPS scheme is required; HTTP is not supported.
Does the Okta API support webhooks?
Okta uses Event Hooks and Inline Hooks rather than traditional webhooks. Event Hooks (POST /api/v1/eventHooks) deliver batched System Log events to an external endpoint. Inline Hooks intercept Okta workflows (e.g., the registration flow) and call your endpoint synchronously. Both are configured through the Admin Console or the API under /api/v1/eventHooks and /api/v1/inlineHooks.
How does Okta API pagination work?
Okta uses cursor-based pagination. List endpoints accept a limit parameter and return a Link: <url>; rel="next" response header pointing to the next page. Always follow the URL from the header rather than constructing it yourself — cursor formats can change. The end of a result set is signalled by the absence of a rel="next" link, except for the System Log which always returns one for continuous polling.
Sources:
Ashby software is a robust recruiting platform designed to transform the way organizations manage their recruitment and talent acquisition processes. By integrating Applicant Tracking System (ATS), analytics, scheduling, Customer Relationship Management (CRM), and sourcing capabilities, Ashby offers a comprehensive solution that empowers recruiting teams to streamline their operations and make data-driven decisions. This all-in-one platform is tailored to enhance efficiency and strategic planning, making it an indispensable tool for modern recruitment teams.
One of the standout features of Ashby is its ability to seamlessly integrate with various systems through the Ashby API. This integration capability allows organizations to connect Ashby with their existing tools and platforms, ensuring a smooth flow of data and enhancing the overall recruitment process. The Ashby API is designed to be user-friendly and flexible, enabling developers to customize and extend the platform's functionalities to meet specific organizational needs. By leveraging the Ashby API, companies can optimize their recruitment strategies and achieve better outcomes.
Additional Resources:
Below is a comprehensvie list of Ashby API endpoints with details on each endpoint:
Authorization header as a Bearer token.limit and cursor to navigate large datasets.401 Unauthorized: Missing or invalid API key403 Forbidden: Insufficient permissions429 Too Many Requests: Rate limit exceeded500 Internal Server Error: Ashby-side issueFor quick and seamless integration with Ashby API, Knit API offers a convenient solution. It's AI powered integration platform allows you to build any Ashby API Integration use case. By integrating with Knit just once, you can integrate with multiple other ATS, HRIS, Payroll and other systems. Knit takes care of all the authentication, authorization, and ongoing integration maintenance. This approach not only saves time but also ensures a smooth and reliable connection to Ashby API.
To sign up for free, click here. To check the pricing, see our pricing page.
Xero is a leading cloud-based accounting software platform tailored for small and medium-sized businesses. It offers an extensive suite of financial management tools, including invoicing, bank reconciliation, expense tracking, and financial reporting. These features simplify the financial management process, allowing businesses to efficiently handle their finances. Additionally, Xero provides payroll management tools to streamline employee payments, tax calculations, and ensure compliance with local payroll regulations. Its inventory management capabilities enable businesses to track stock levels and manage product sales effectively.
One of Xero's standout features is its integration capabilities, particularly through the Xero API. This allows seamless connectivity with a wide range of third-party applications, such as payment processors, CRM systems, and e-commerce platforms, enhancing the software's functionality. The user-friendly interface and real-time data access make it easy for users to manage their business finances from anywhere. Xero's versatility and comprehensive features make it an invaluable tool for businesses looking to streamline their financial operations and gain insights into their financial health.
Additional Resources:
For quick and seamless integration with Xero API, Knit API offers a convenient solution. It’s AI powered integration platform allows you to build any Xero API Integration use case. By integrating with Knit just once, you can integrate with multiple other CRMs, HRIS, Accounting, and other systems in one go with a unified approach. Knit takes care of all the authentication, authorization, and ongoing integration maintenance. This approach not only saves time but also ensures a smooth and reliable connection to Xero API.
To sign up for free, click here. To check the pricing, see our pricing page.


%20(3).png)